How to Find and Edit the wp-config file – WordPress
wp-config.php file is the heart of your WordPress website. It holds key settings, like your database connection details. This lets WordPress access and manage your site’s content.Want to edit wp-config.php? This guide shows you how to make changes safely and well. You can update your site without worrying about problems.
What is the wp-config.php File?
Think of the wp-config.php file as the control panel for your WordPress database. This essential WordPress configuration file stores sensitive information such as:
- Your database name
- MySQL hostname
- WordPress database username
- WordPress database password
- Table prefix
- Security keys (salts)
Without this information, your WordPress site simply cannot function. It’s the bridge between your website’s code and the data stored in your database.
Why You Might Need to Edit wp-config.php?
While you won’t need to access wp-config.php every day, there are several reasons why you might need to edit WordPress config file:
- Changing Database Credentials: If you’ve updated your database password, you’ll need to reflect those changes in wp-config.php.
- Enabling Debugging: Turning on WordPress debugging (WP_DEBUG) in wp-config.php helps identify and fix errors on your website. This is especially important during development or troubleshooting.
- Defining Constants: You can set custom constants in wp-config.php to change how WordPress works. For example, you can limit post revisions or turn off automatic updates.
- Managing Salts: WordPress security relies on “salts” for encrypting sensitive data. While rare, you might need to modify these salts in wp-config.php for security reasons.
- Adjusting Memory Limit: If you run into memory errors, you might need to up the PHP memory limit. This is done in the wp-config.php file.
- Configuring Multisite: If you’re setting up a WordPress Multisite network, you’ll need to tweak your wp-config.php file.
Important: Editing the `wp-config.php` file incorrectly can break your website. Always back up your `wp-config.php` file before making any changes!
1. Finding your wp-config.php file.
2. Backing up your wp-config.php file.
3. Safely editing the wp-config.php file.
4. Troubleshooting common errors.
5. Applying wp-config.php best practices.
Finding Your wp-config.php File
The first step in learning how to edit wp-config.php is to actually find it! The wp-config.php file is usually located in the root directory of your WordPress installation. This is the same directory where you’ll find folders like wp-content, wp-admin, and wp-includes.
Here are a few methods to locate wp-config.php:
Method 1: Finding wp-config.php Using cPanel File Manager
cPanel is a popular web hosting control panel that provides a user-friendly interface for managing your website’s files. Here’s how to find your wp-config.php file using cPanel:
1. Log in to your cPanel account. Your hosting provider will have given you the login details for cPanel when you first signed up.
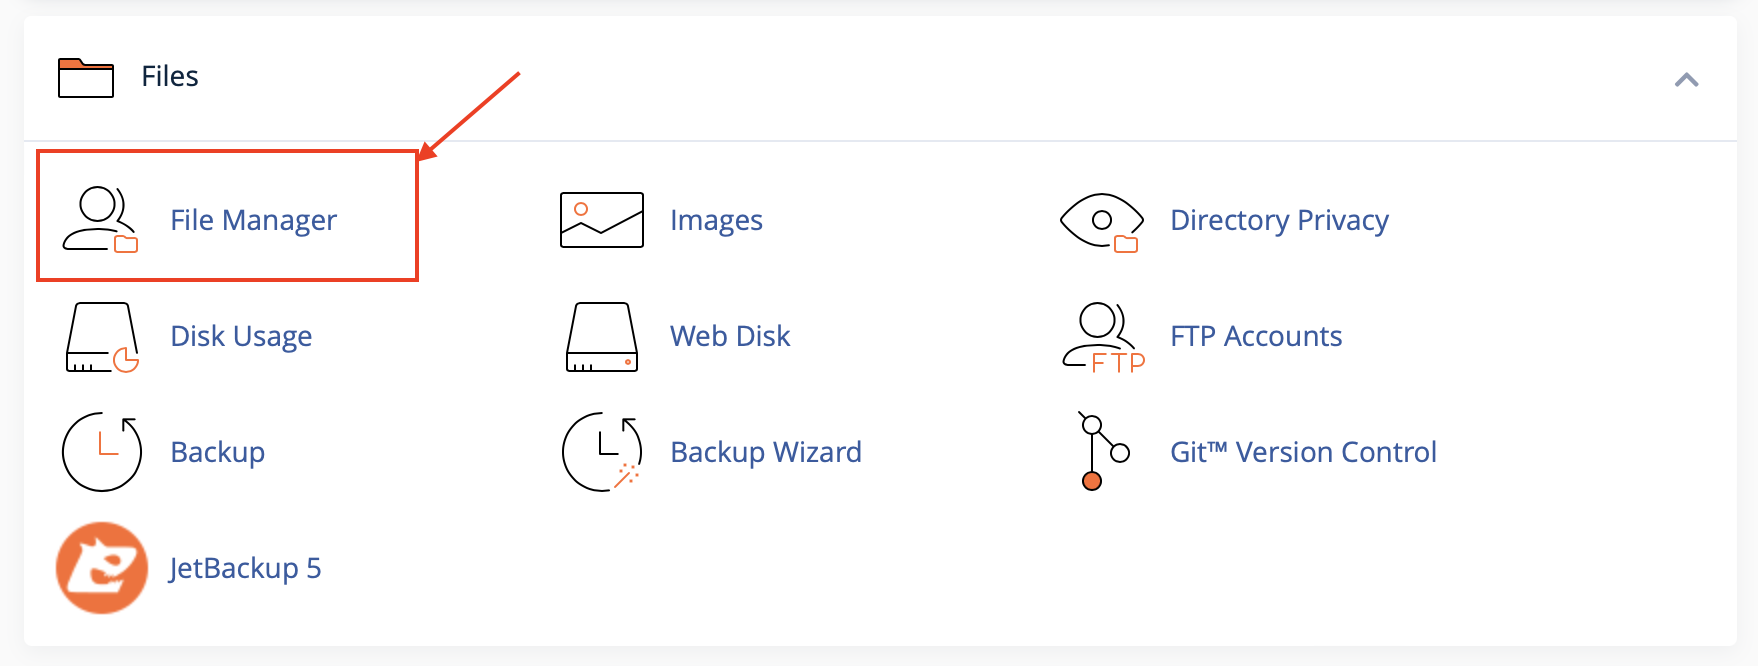
2. Locate the “File Manager” icon Usually, it’s under the “Files” section. Click on it to open the File Manager.
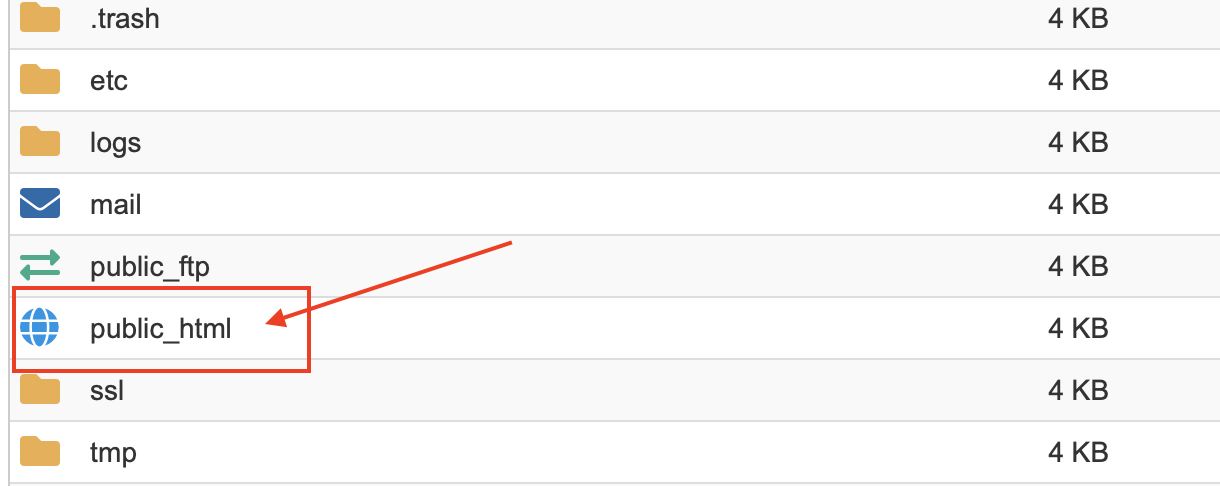
3. Navigate to your WordPress installation directory. In most cases, this will be public_html. If you installed WordPress in a subdirectory (e.g., public_html/blog), you’ll need to navigate to that subdirectory instead.
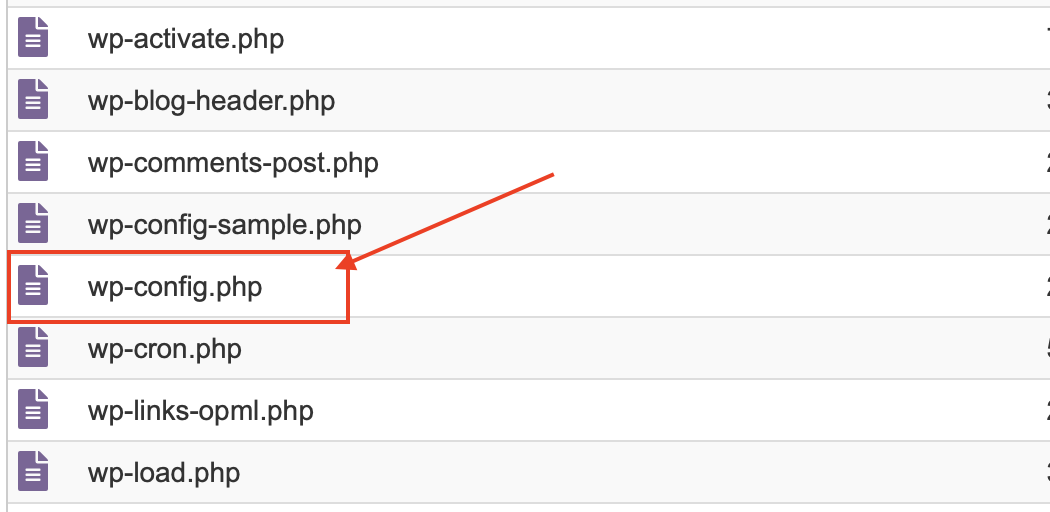
4. Look for the wp-config.php file. It should be in the root directory alongside folders like wp-content, wp-admin, and wp-includes.
Method 2: Finding wp-config.php Using FTP/SFTP
FTP (File Transfer Protocol) and SFTP (Secure File Transfer Protocol) are ways to move files between your computer and web server. You’ll need an FTP client like FileZilla to use this method.
1. Download and install an FTP client (if you don’t already have one). FileZilla is a popular and free option.
2. Obtain your FTP credentials from your web hosting provider. This typically includes:
- Hostname (or server address)
- Username
- Password
- Port (usually 21 for FTP or 22 for SFTP)
3. Open your FTP client and enter your FTP credentials. Connect to your server.

4. Navigate to your WordPress installation directory. This is usually public_html, but it could be a subdirectory if you installed WordPress there.
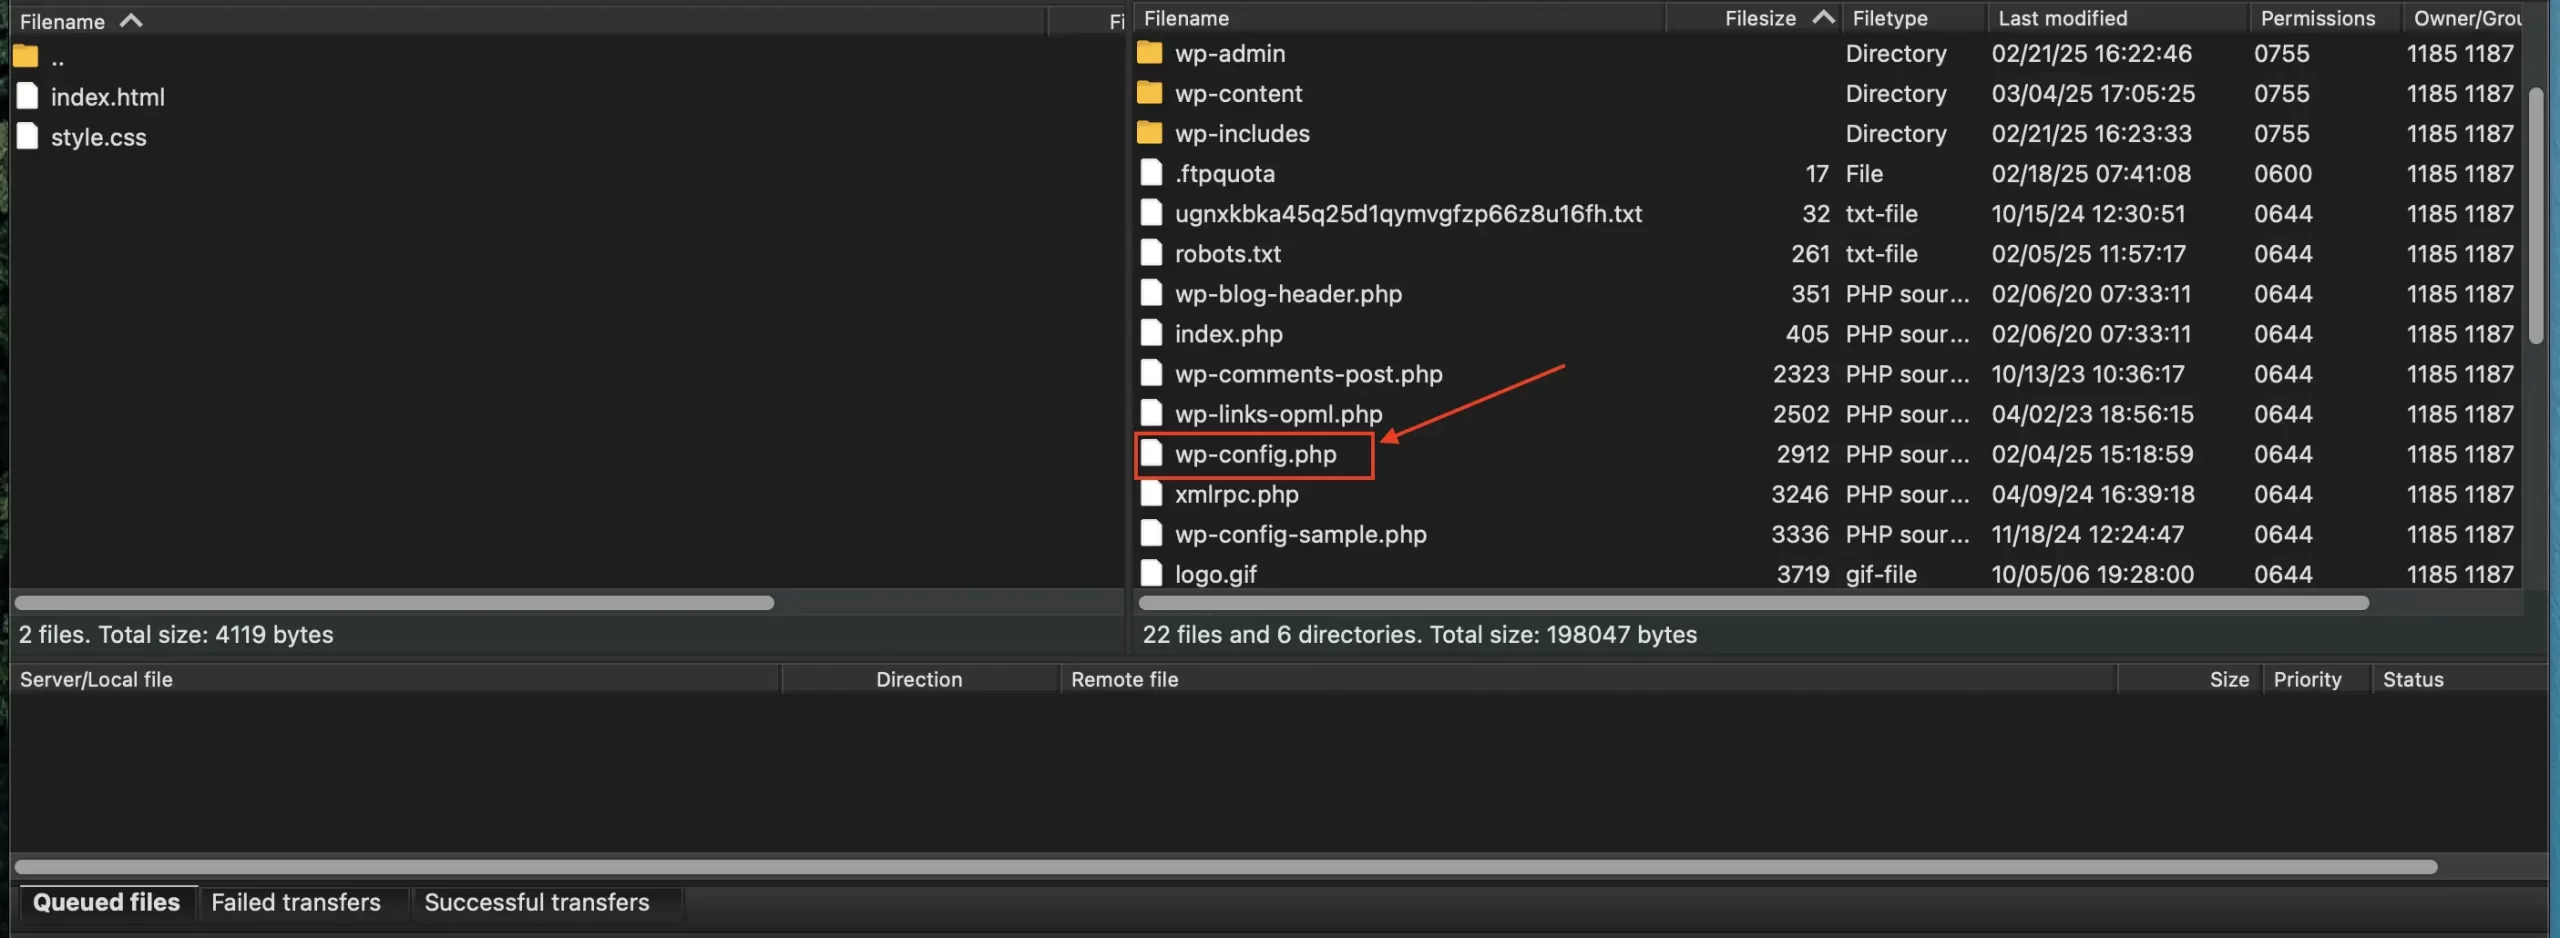
5. Look for the wp-config.php file. It should be in the root directory of your WordPress installation.
Method 3: Finding wp-config.php Using SSH
1. Connect to your server using an SSH client (e.g., PuTTY on Windows, Terminal on macOS/Linux). You’ll need your SSH credentials from your hosting provider.
2. Navigate to your WordPress installation directory using the cd command. For example: cd public_html.
3. List the files in the current directory using the ls -la command.
4. Look for the wp-config.php file in the list.
Preparing to Edit wp-config.php: Backup First!
Before you even think about making changes to your wp-config.php file, you must create a backup! Consider this your golden rule.
A backup is your safety net. If editing goes wrong, you can quickly fix it. Just restore the original file and your website will be back online.
Why backing up is absolutely essential:
- Prevents Website Downtime: Incorrect edits can cause errors that make your website inaccessible. A backup allows you to revert to a working version.
- Protects Against Data Loss: While less likely, mistakes could potentially corrupt your database connection, leading to data loss.
- Provides Peace of Mind: Knowing you have a backup allows you to edit wp-config.php with confidence, knowing you can recover from any errors.
How to Backup wp-config.php
Backup wp-config.php via cPanel File Manager
1. Log in to your cPanel account and open the File Manager (as described in the previous section).
2. Navigate to your WordPress installation directory and locate the wp-config.php file.
3. Right-click on the wp-config.php file and select “Download.” This will download a copy of the file to your computer.
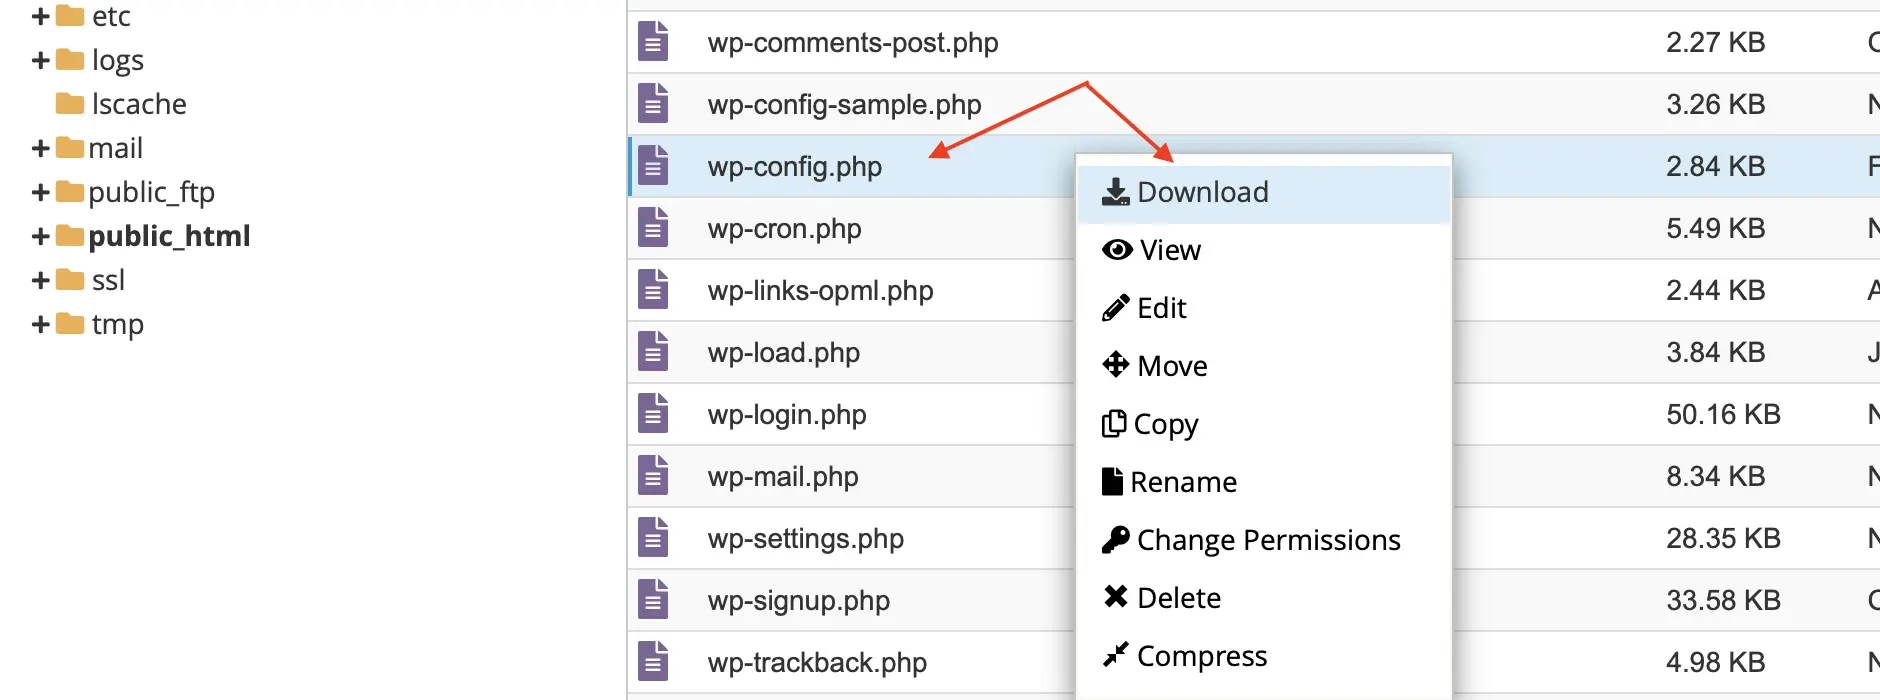
4. Rename the downloaded file to something like wp-config.php.backup or wp-config.php.YYYYMMDD. This makes it easy to spot as a backup. It’s a good idea to use the current date in the name. Store it in a safe location on your computer.
Backup wp-config.php via FTP/SFTP
1. Connect to your server using your FTP client (e.g., FileZilla).
2. Navigate to your WordPress installation directory and locate the wp-config.php file.
3. Right-click on the wp-config.php file and select “Download” (or “Copy to Local”). This will download a copy of the file to your computer.
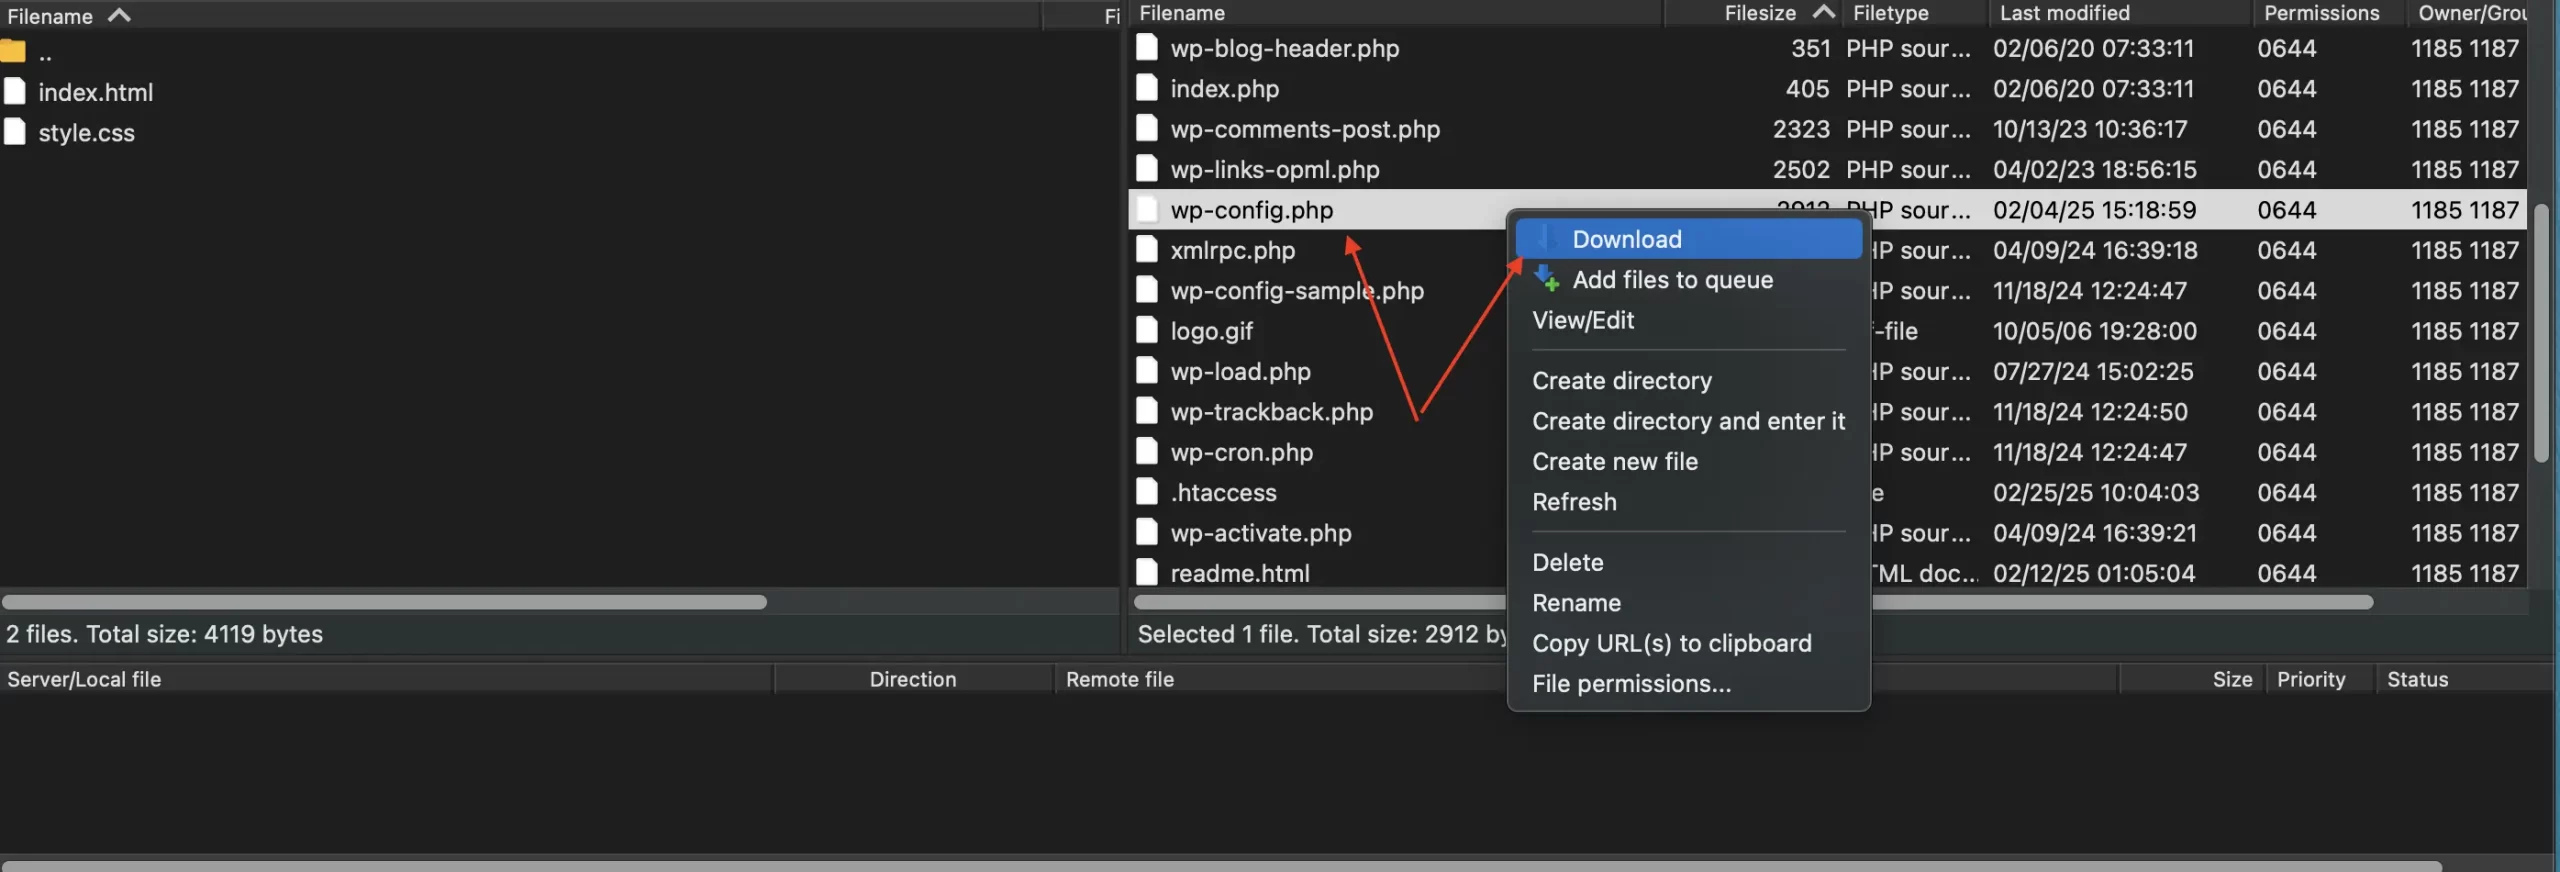
4. Rename the downloaded file to something like wp-config.php.backup or wp-config.php.YYYYMMDD. Store it safely on your computer.
(Optional) Plugin Backup Considerations
Some WordPress backup plugins offer the ability to back up your entire website, including the wp-config.php file. However, always verify that the plugin actually includes the wp-config.php file in its backup.
Due to the sensitive nature of the information it contains, some plugins may exclude it for security reasons. If your chosen plugin does back up the wp-config.php file, make sure you understand where the backup is stored and how to restore it if necessary. Manual backups (using cPanel or FTP) are often the most reliable for this crucial file.
How to Edit wp-config.php Safely
Now that you’ve backed up your wp-config.php file, you’re ready to edit wp-config.php. But remember, proceed with caution!
Choosing a Code Editor for wp-config.php
Recommended Plain Text Editors:
- Notepad++ (Windows): A free and powerful editor with syntax highlighting.
- Visual Studio Code (Cross-Platform): A popular and versatile code editor with many features.
- Sublime Text (Cross-Platform): A sophisticated editor with a free trial version.
- TextEdit (macOS): Comes pre-installed, but make sure to save the file as “Plain Text” (Format -> Make Plain Text).
Step-by-Step Guide to Editing wp-config.php
1. Open the wp-config.php file in your chosen code editor.
2. Locate the section you want to modify. The wp-config.php file contains various settings, each with a specific purpose. Be sure to understand what you’re changing before you make any edits.
Example 1: Changing the Database Password:
Look for the following lines:
define( ‘DB_PASSWORD’, ‘your_old_password’ );
define( ‘DB_PASSWORD’, ‘your_new_password’ );
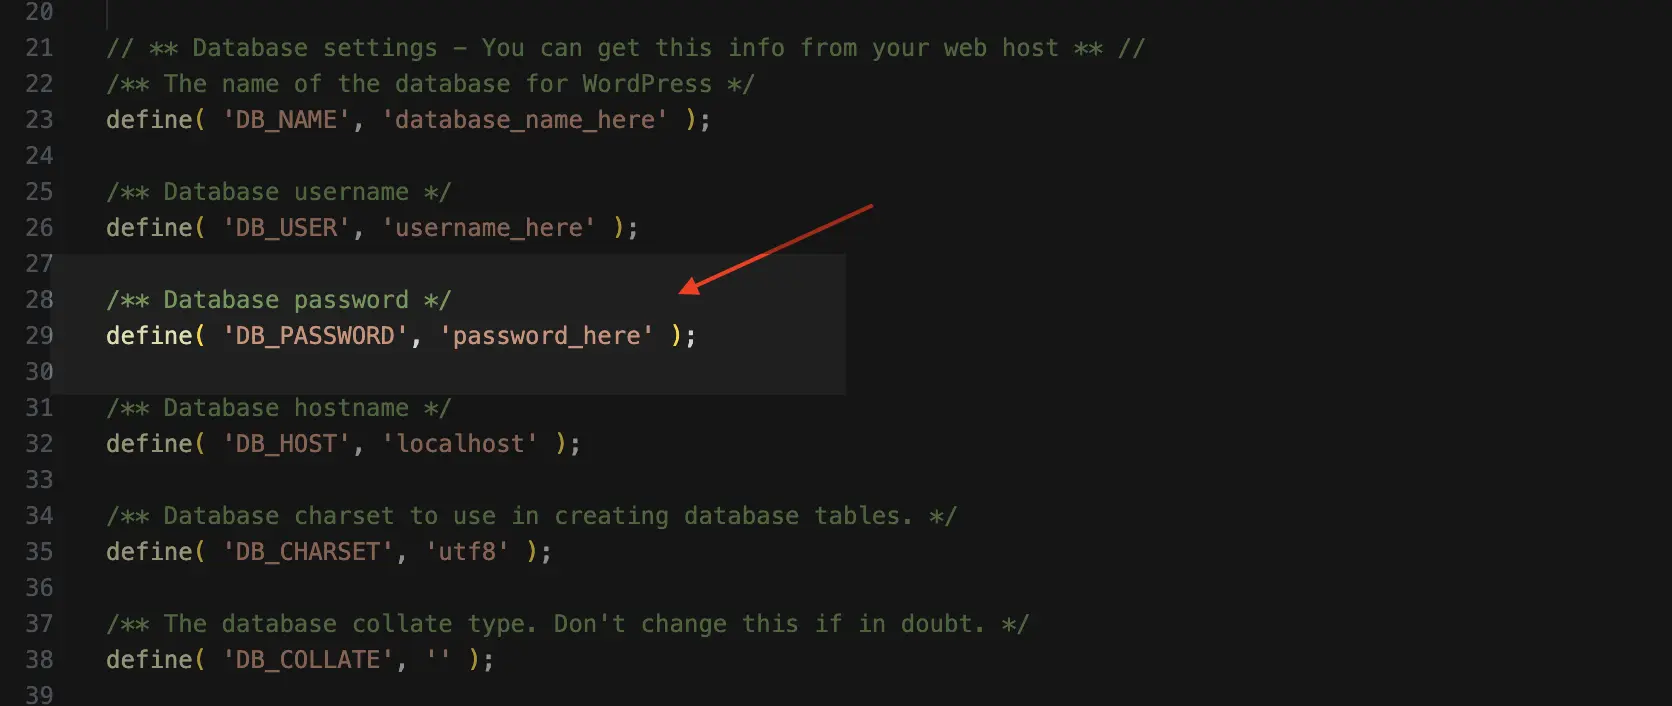
Example 2: Enabling Debugging:

3. Make the necessary changes carefully. Double-check your work for typos or errors. Even a small mistake can break your site.
4. Save the file. In your code editor, choose “File” -> “Save” (or press Ctrl+S/Cmd+S). Make sure the file is saved as plain text with the .php extension.
Uploading the Modified wp-config.php File
Uploading via cPanel File Manager
1. Log in to your cPanel account and open the File Manager.
2. Navigate to your WordPress installation directory.
3. Click the “Upload” button.
4. Select the modified wp-config.php file from your computer.
5. When prompted, choose to overwrite the existing wp-config.php file. Be absolutely sure you’re overwriting the correct file!
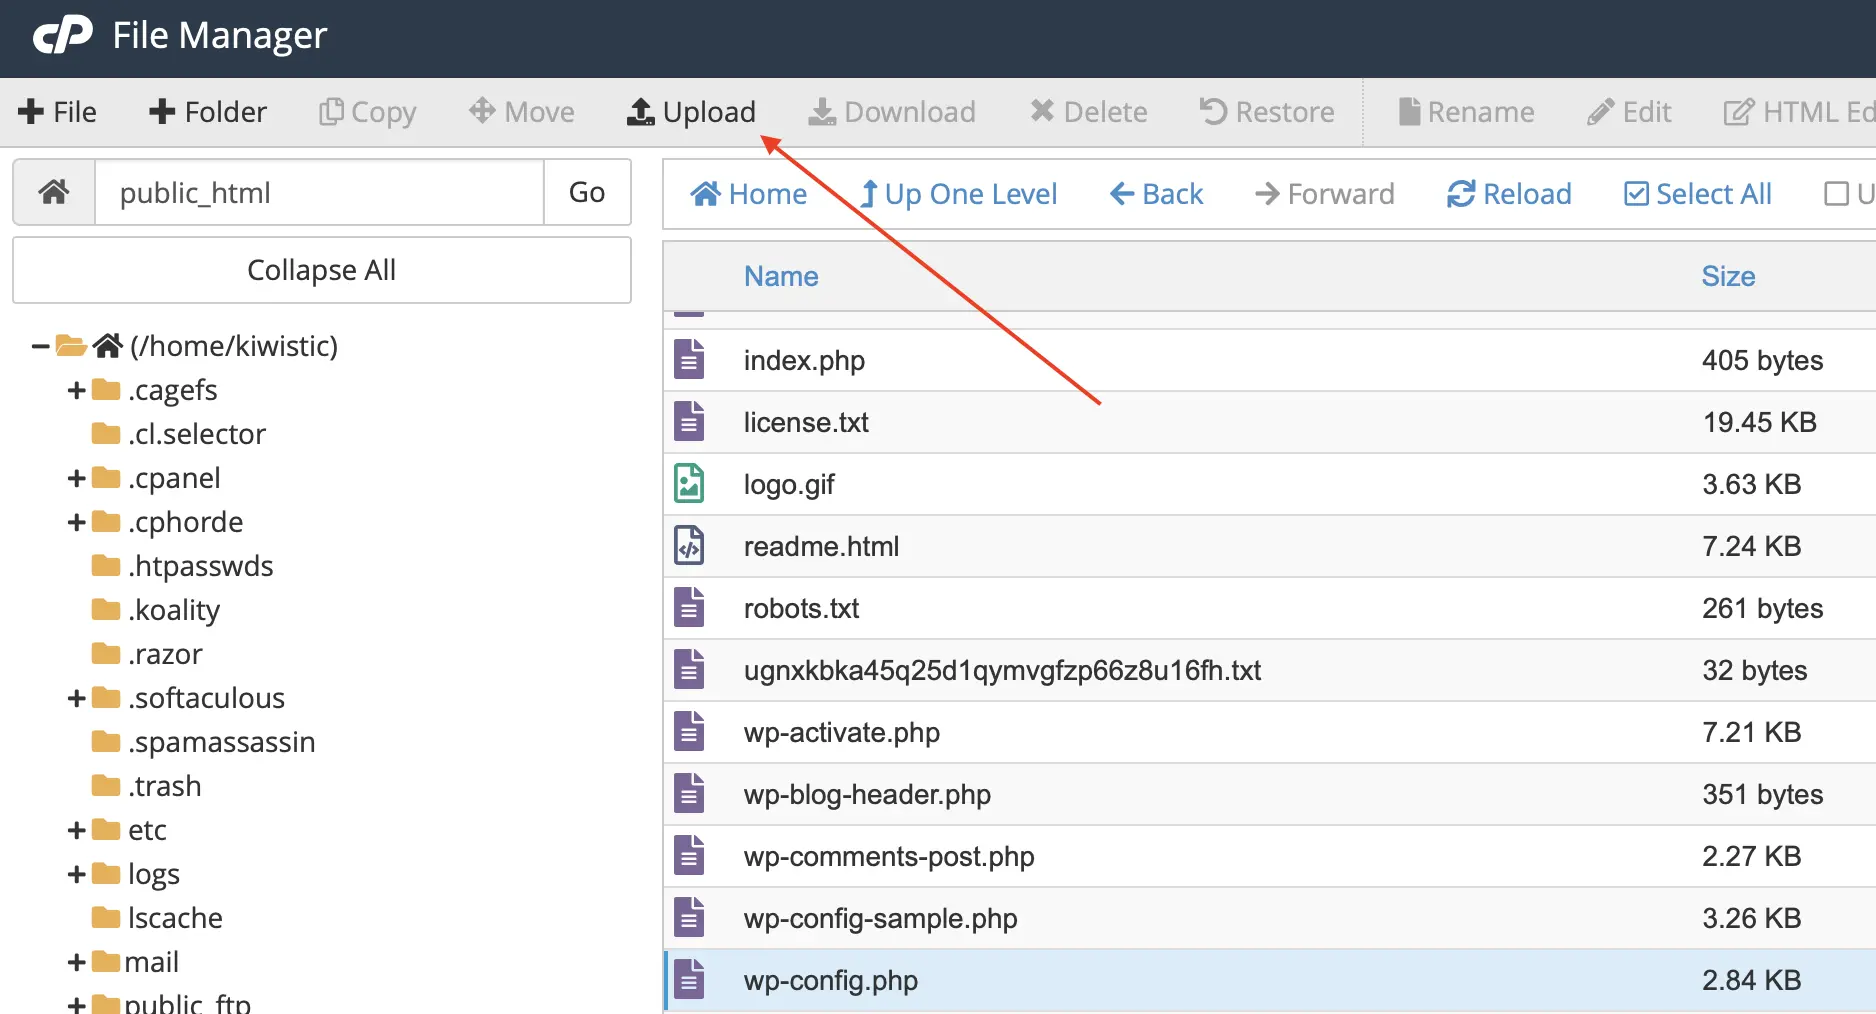
Uploading via FTP/SFTP
1. Connect to your server using your FTP client.
2. Navigate to your WordPress installation directory.
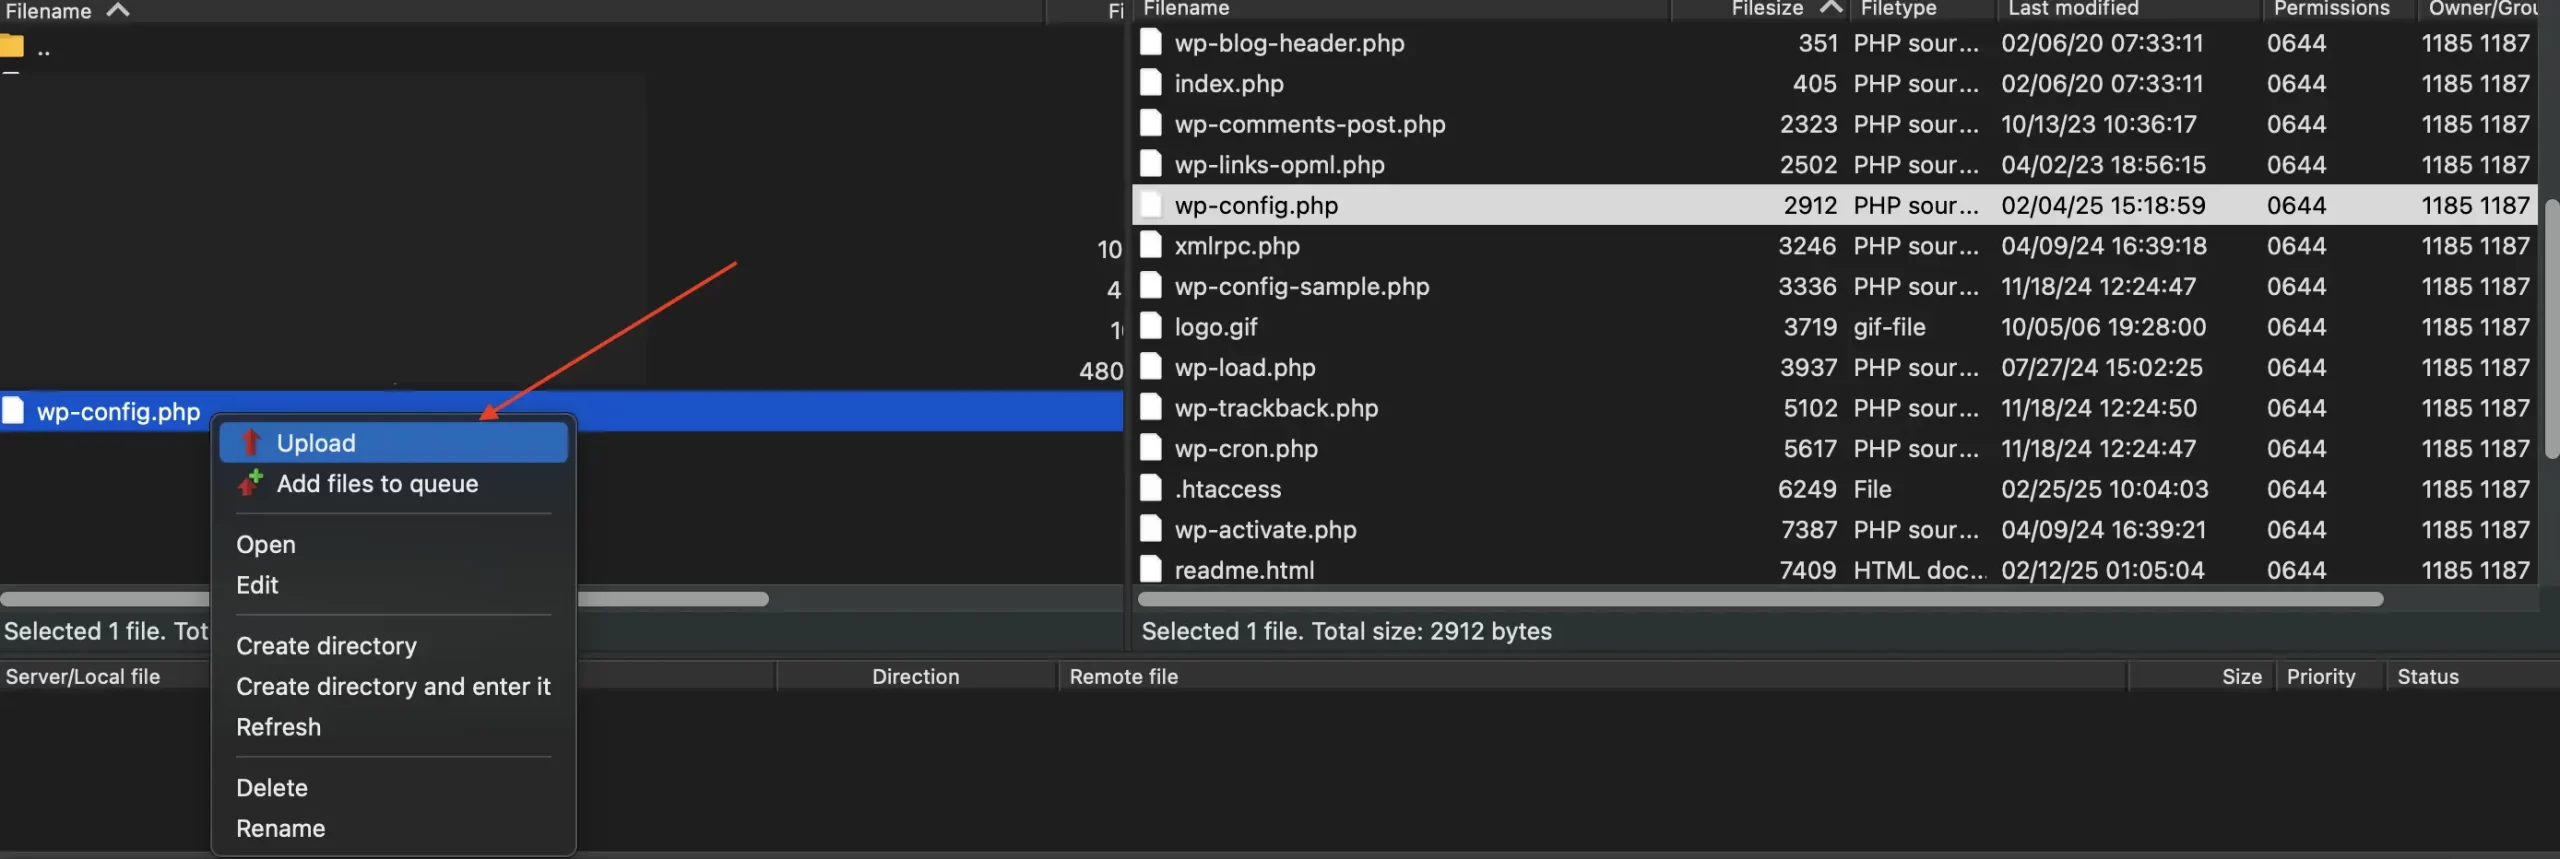
3. Locate the modified wp-config.php file on your computer (in the left-hand pane of FileZilla, for example).
4. Drag and drop the modified file from your computer to the WordPress installation directory on the server (right-hand pane).
5. Your FTP client will likely ask you to confirm that you want to overwrite the existing wp-config.php file. Confirm the overwrite.
Verification: Checking Your Changes
- Visit your website. Check if it’s loading without errors.
- If you enabled debugging, look for error messages that might indicate a problem with your changes. The WP_DEBUG mode will display errors directly on your website or in the wp-content/debug.log file (if logging is enabled).
- If you changed database credentials, try logging in to your WordPress dashboard. If you can log in successfully, the changes were likely applied correctly.
Best Practices for Editing wp-config.php
To ensure smooth sailing when you edit wp-config.php, follow these best practices:
Commenting Your Code in wp-config.php
Example:

Avoid Directly Editing the Live wp-config.php File
Ideally, you should avoid making changes directly to the wp-config.php file on your live website. Consider using a staging environment – a copy of your website used for testing.
Staying Organized When Editing wp-config.php
Regularly Back Up Your wp-config.php
This can’t be stressed enough! Backups are your best friend when editing wp-config.php.
Make it a habit to back up your wp-config.php file regularly, especially before making any significant changes to your website or WordPress configuration. Consider setting up automated backups with a plugin to make the process even easier.
Common wp-config.php Errors and Troubleshooting
Error Establishing a Database Connection
Possible Causes:
- Incorrect Database Credentials: Make sure the database name, username, password, and hostname in your wp-config.php file are correct.
- Database Server Down: Your database server might be temporarily unavailable. Contact your hosting provider to check.
- Verify that the database credentials in wp-config.php match the credentials in your hosting account.
- Contact your hosting provider to check the status of your database server.
Syntax Errors in wp-config.php (White Screen of Death)
Possible Causes:
- Typos: A simple typo in your code can cause a syntax error.
- Missing Semicolon: PHP statements must end with a semicolon (;).
- Incorrect Quotes: Using the wrong type of quotes or mismatched quotes can cause errors.
- Carefully review the changes you made to the wp-config.php file. Look for any typos, missing semicolons, or incorrect quotes.
- Use a code editor with syntax highlighting to help identify errors.
- Restore your backup of the wp-config.php file if you can’t find the error.
Internal Server Error (500) After Editing wp-config.php
Possible Causes:
- Incorrect PHP Syntax: Similar to syntax errors, incorrect PHP syntax can cause a 500 error.
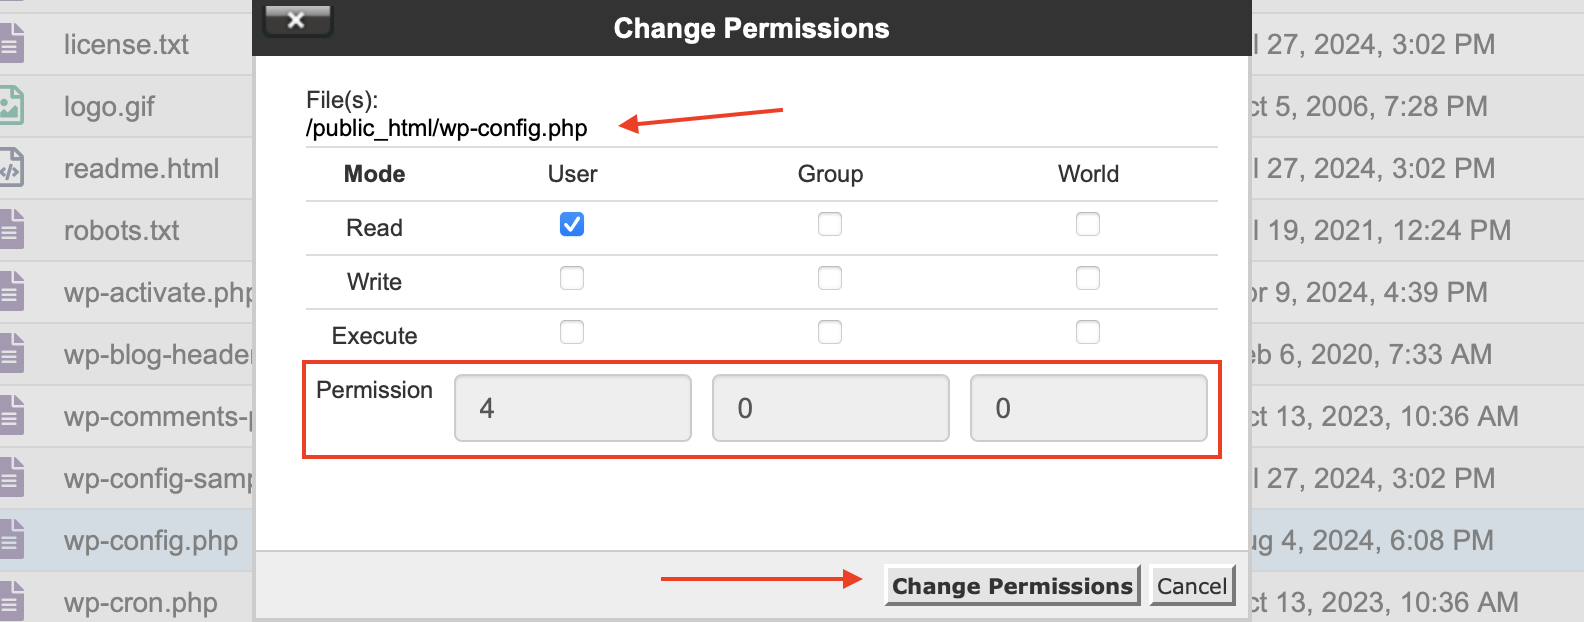
- File Permissions: Incorrect file permissions on the wp-config.php file can sometimes cause a 500 error.
- Check the error logs on your server. These logs can provide more specific information about the cause of the error. Your hosting provider can help you access the error logs.
- Restore your backup of the wp-config.php file.
- Check file permissions. The wp-config.php file should typically have permissions of 644.
Debugging: Enabling WP_DEBUG
Conclusion
wp-config.php safely allows you to customize your site and troubleshoot problems effectively. However, it’s crucial to remember that this file contains sensitive information and that incorrect edits can have serious consequences.Follow the steps in this guide and stick to wp-config.php best practices. This way, you can make the needed changes safely. It helps avoid mistakes.
Always, always, back up your wp-config.php file before making any changes. It’s the best way to protect your website and ensure a smooth editing experience.
If you’re facing challenges finding or modifying your wp-config.php file, our WordPress support team is ready to provide tailored solutions. Contact us today for expert help!


