TL;DR
You can upload a new WordPress theme through cPanel File Manager by opening wp-content/themes and extracting the theme’s ZIP file.
However, uploading a theme does not activate it. If you can access WordPress, activate it under Appearance → Themes. If your dashboard is unavailable, you’ll need another method, such as WP-CLI, to switch themes. Back up your website before making changes.
The important distinction is that managing theme files isn’t the same as activating a theme. This guide explains how to prepare your website, work with themes through cPanel, and handle activation or recovery safely when dashboard access is limited.
When Should You Change Your WordPress Theme?
1. Your Current Theme Is Outdated or Unsupported
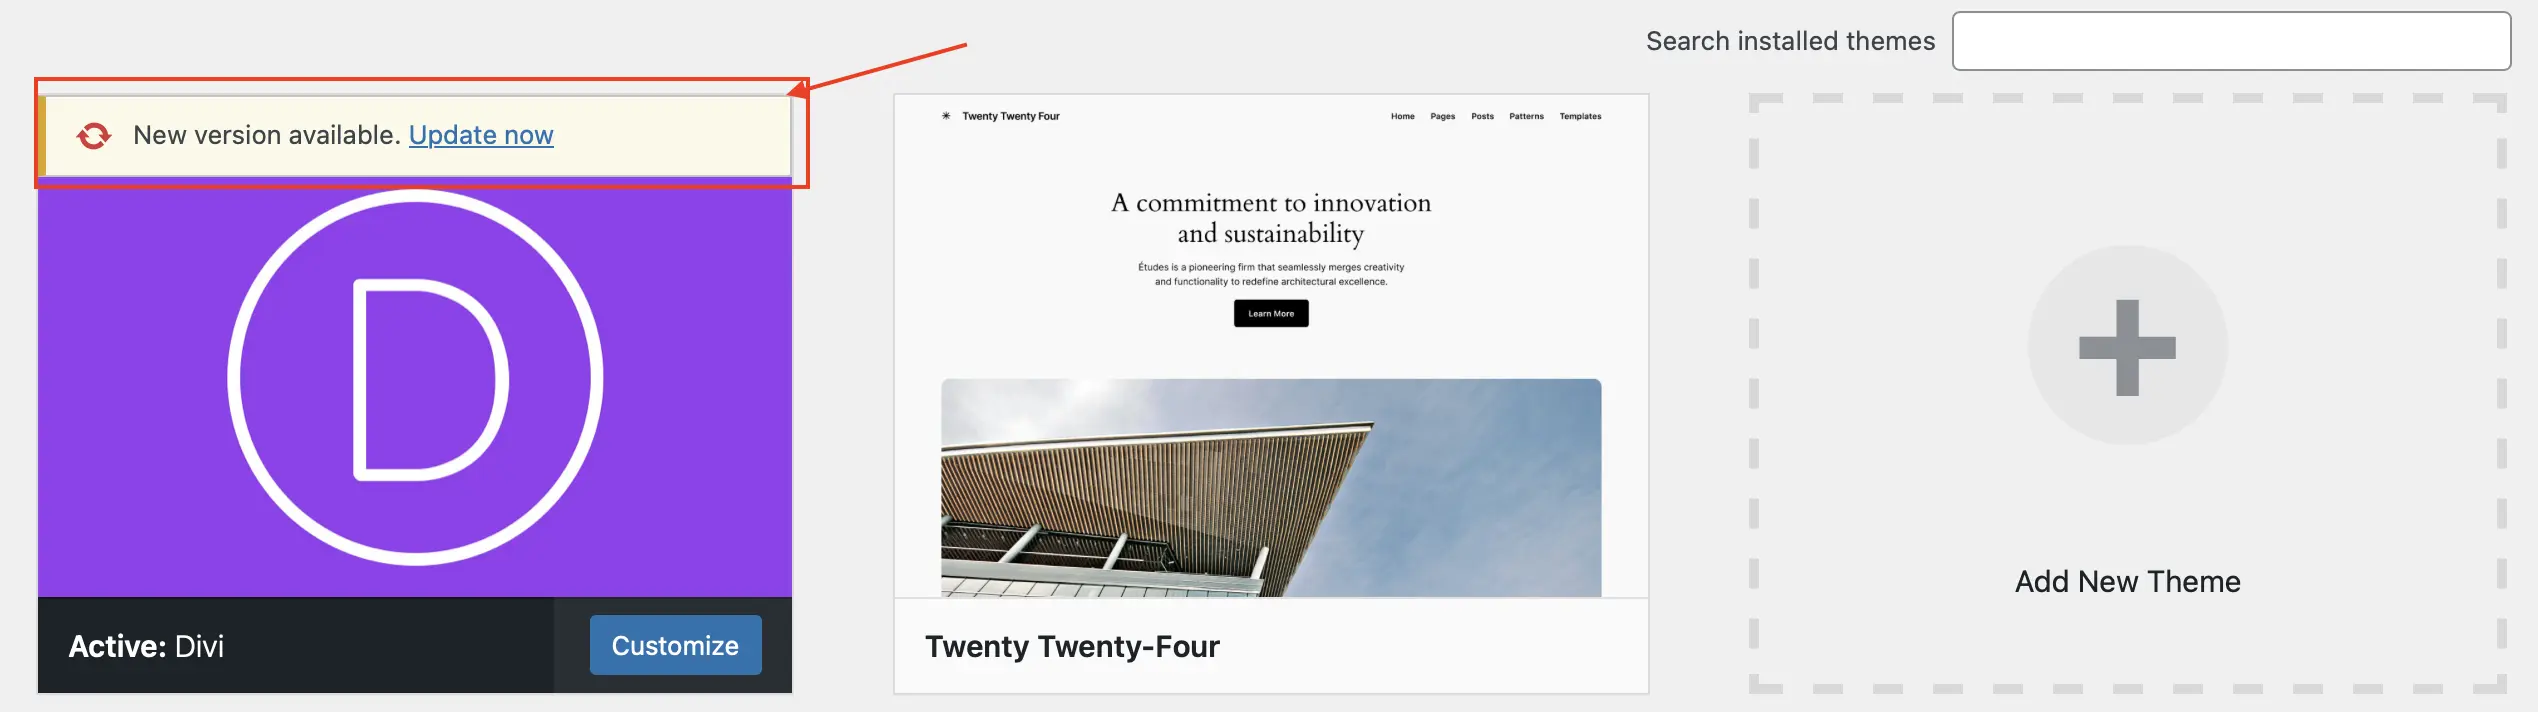
2. A Theme Error Is Preventing Website Access
However, renaming a theme folder and activating a different theme are not the same operation. We’ll cover the relevant methods later in this guide.
3. Your Website Needs a Design or Functionality Change
4. Your Theme Is Affecting Performance or Mobile Usability
A different theme might help, but switching themes does not automatically improve Core Web Vitals or search rankings.
Preparing to Change Your WordPress Theme via cPanel
1. Back Up Your Website and Verify the Backup
- Your WordPress database, including settings, users, and content.
- The wp-content directory, including themes, plugins, and uploads.
- Your WordPress configuration and any custom server rules.
- Custom code or theme modifications that may not be included in a standard theme package.

Don’t assume a completed backup notification means everything is recoverable. Check that the files are accessible, the database is included, and you know how to restore them.
2. Test the New Theme on a Staging Website
- The homepage and important landing pages.
- Navigation menus, headers, and footers.
- Contact forms, buttons, and interactive elements.
- Mobile layouts and responsive behavior.
- WooCommerce product pages, cart, and checkout, if applicable.
If your site uses WooCommerce or collects form submissions, remember that staging contains copied data. Avoid sending test emails to real customers or processing real payments, and don’t overwrite newer live orders or submissions when deploying changes.
If staging is unavailable, document the risks and arrange a suitable maintenance window before changing a live website.
3. Check Theme Dependencies, Customizations, and SEO Settings
Theme and child theme: Confirm whether you’re using a child theme. If so, identify its parent theme and preserve any custom files. The new theme may not support those modifications.
Custom code: Review CSS, PHP snippets, theme options, and custom templates. Code stored inside the old theme may not carry over automatically.
Navigation and layouts: Record menu assignments, widget areas, headers, footers, and page templates. Some settings are specific to the active theme and may need to be configured again.
SEO settings: Check that your page titles, meta descriptions, canonical tags, structured data, and internal links remain intact. If your old theme generates any of these elements, verify how they will work after the switch.
Tracking and forms: Identify analytics tags, conversion tracking, contact forms, and other business-critical features that depend on the current theme or its templates.
Before you proceed: Confirm that you have a usable backup, have tested the replacement theme where possible, and know how to restore your original theme if the change fails.
How to Access cPanel to Change Your WordPress Theme
If you’re unfamiliar with the hosting tools available in cPanel, read our guide to cPanel and its role in WordPress management before changing any files.
Logging in to cPanel
1. Sign in to your hosting provider’s website.
2. Open the hosting account associated with the WordPress site you want to manage.
3. Look for cPanel, Manage Hosting, or a similar control-panel option.
4. Open cPanel using the access method provided by your host.
https://yourdomain.com/cpanel, but this won’t work on every hosting setup.If you don’t see cPanel: Your hosting provider may use a different control panel, such as Plesk or a custom dashboard. Don’t assume your account has cPanel access simply because your website runs WordPress.
Navigating to File Manager
1. Find File Manager in the Files section.
2. Open the document root for the WordPress website you want to modify.
3. Locate the WordPress installation by looking for wp-admin, wp-content, and wp-includes.
4. Open wp-content.
5. Open the themes directory.
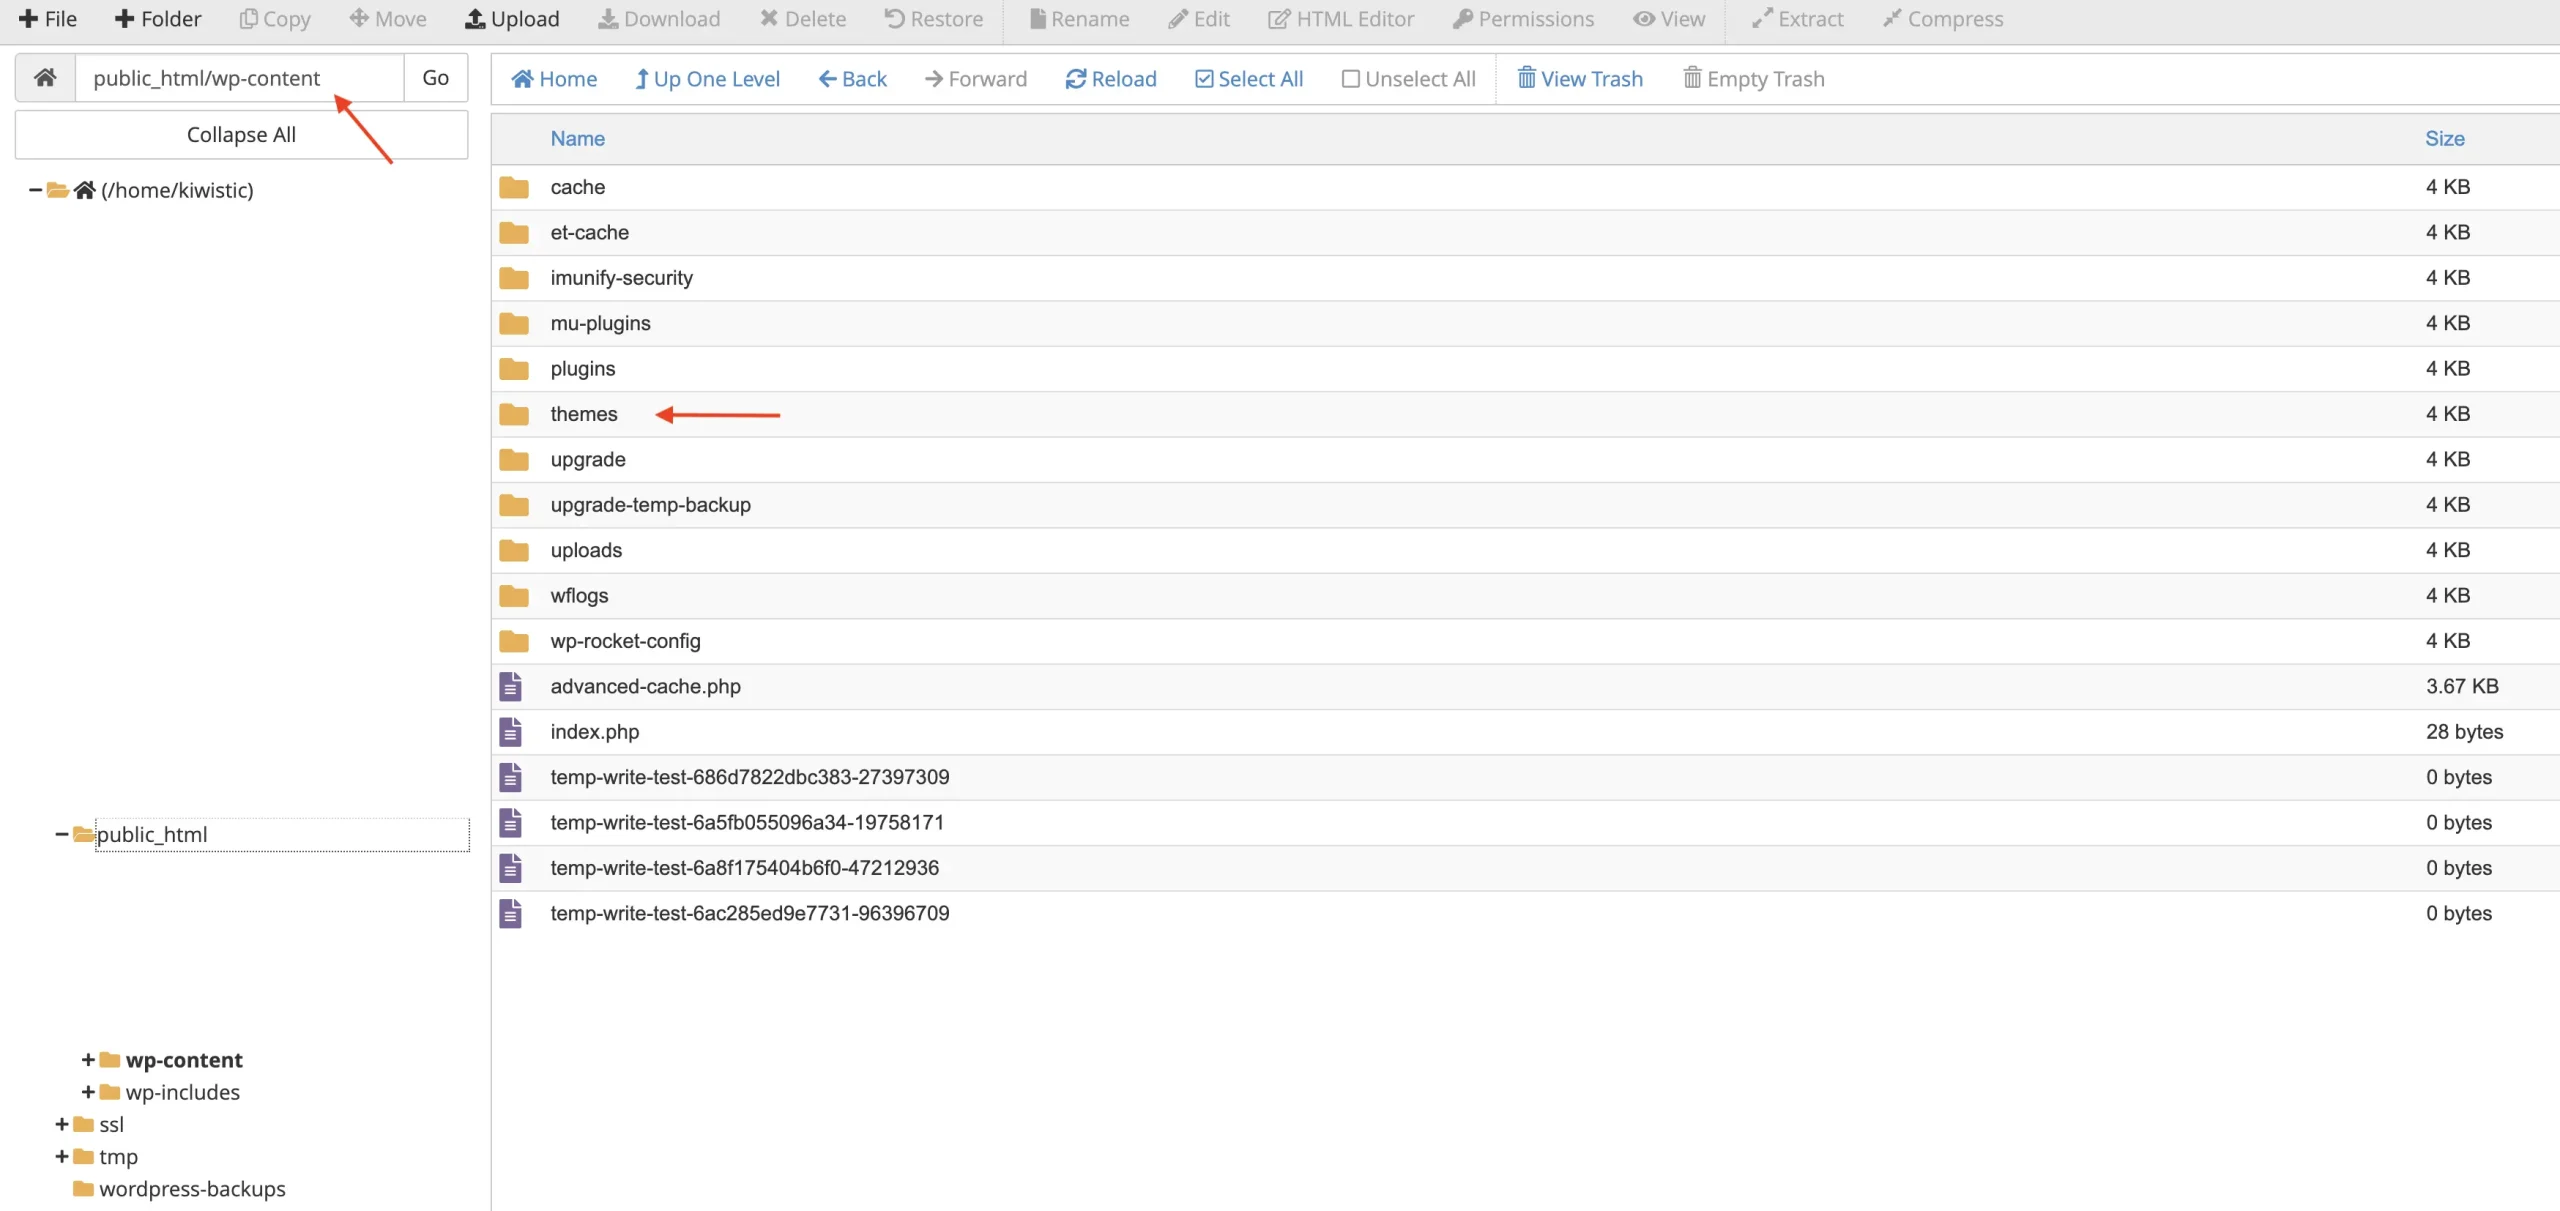
public_html/wp-content/themes/public_html/wordpress/wp-content/themes/Before making changes: Confirm that you’ve opened the correct installation and that your backup is available. Uploading or renaming files in the wrong directory can affect another website or staging environment.
Step-by-Step Guide to Changing Your WordPress Theme via cPanel
The process has two parts: install the theme files through cPanel, then activate the theme in WordPress. If your dashboard is unavailable, a different activation method is required.
Step 1: Open the WordPress Themes Directory
wp-content/themes/public_html/wp-content/themes/
Don’t delete or rename the active theme just to install a new one. You can keep multiple themes installed, even though only one theme is active at a time on a standard WordPress site.
Step 2: Upload Your New Theme ZIP File
1. Open wp-content/themes/ in cPanel File Manager.
2. Click Upload in the toolbar.
3. Select the theme’s ZIP file from your computer.
4. Wait for the upload to complete.
5. Return to the themes directory and locate the uploaded ZIP file.
Check the package before extracting it. Some commercial theme downloads contain documentation, licenses, child themes, and a separate installable ZIP file. You need the actual WordPress theme package, not necessarily the entire download bundle.
Step 3: Extract the Theme Files
1. Select the ZIP file in File Manager.
2. Click Extract.
3. Confirm that the extraction destination is wp-content/themes/.
4. Wait for cPanel to finish extracting the files.
5. Open the extracted theme folder and check its contents.

Watch out for nested folders. If extraction creates themes/new-theme/new-theme/, WordPress may not detect the package as intended. Confirm that the actual theme files are inside the folder WordPress should recognize.
Step 4: Activate the Theme in WordPress
1. Log in to WordPress.
2. Go to Appearance → Themes.
3. Find the theme you uploaded.
4. Open its details or preview it, if the preview option is available.
5. Click Activate when you’re ready to switch.
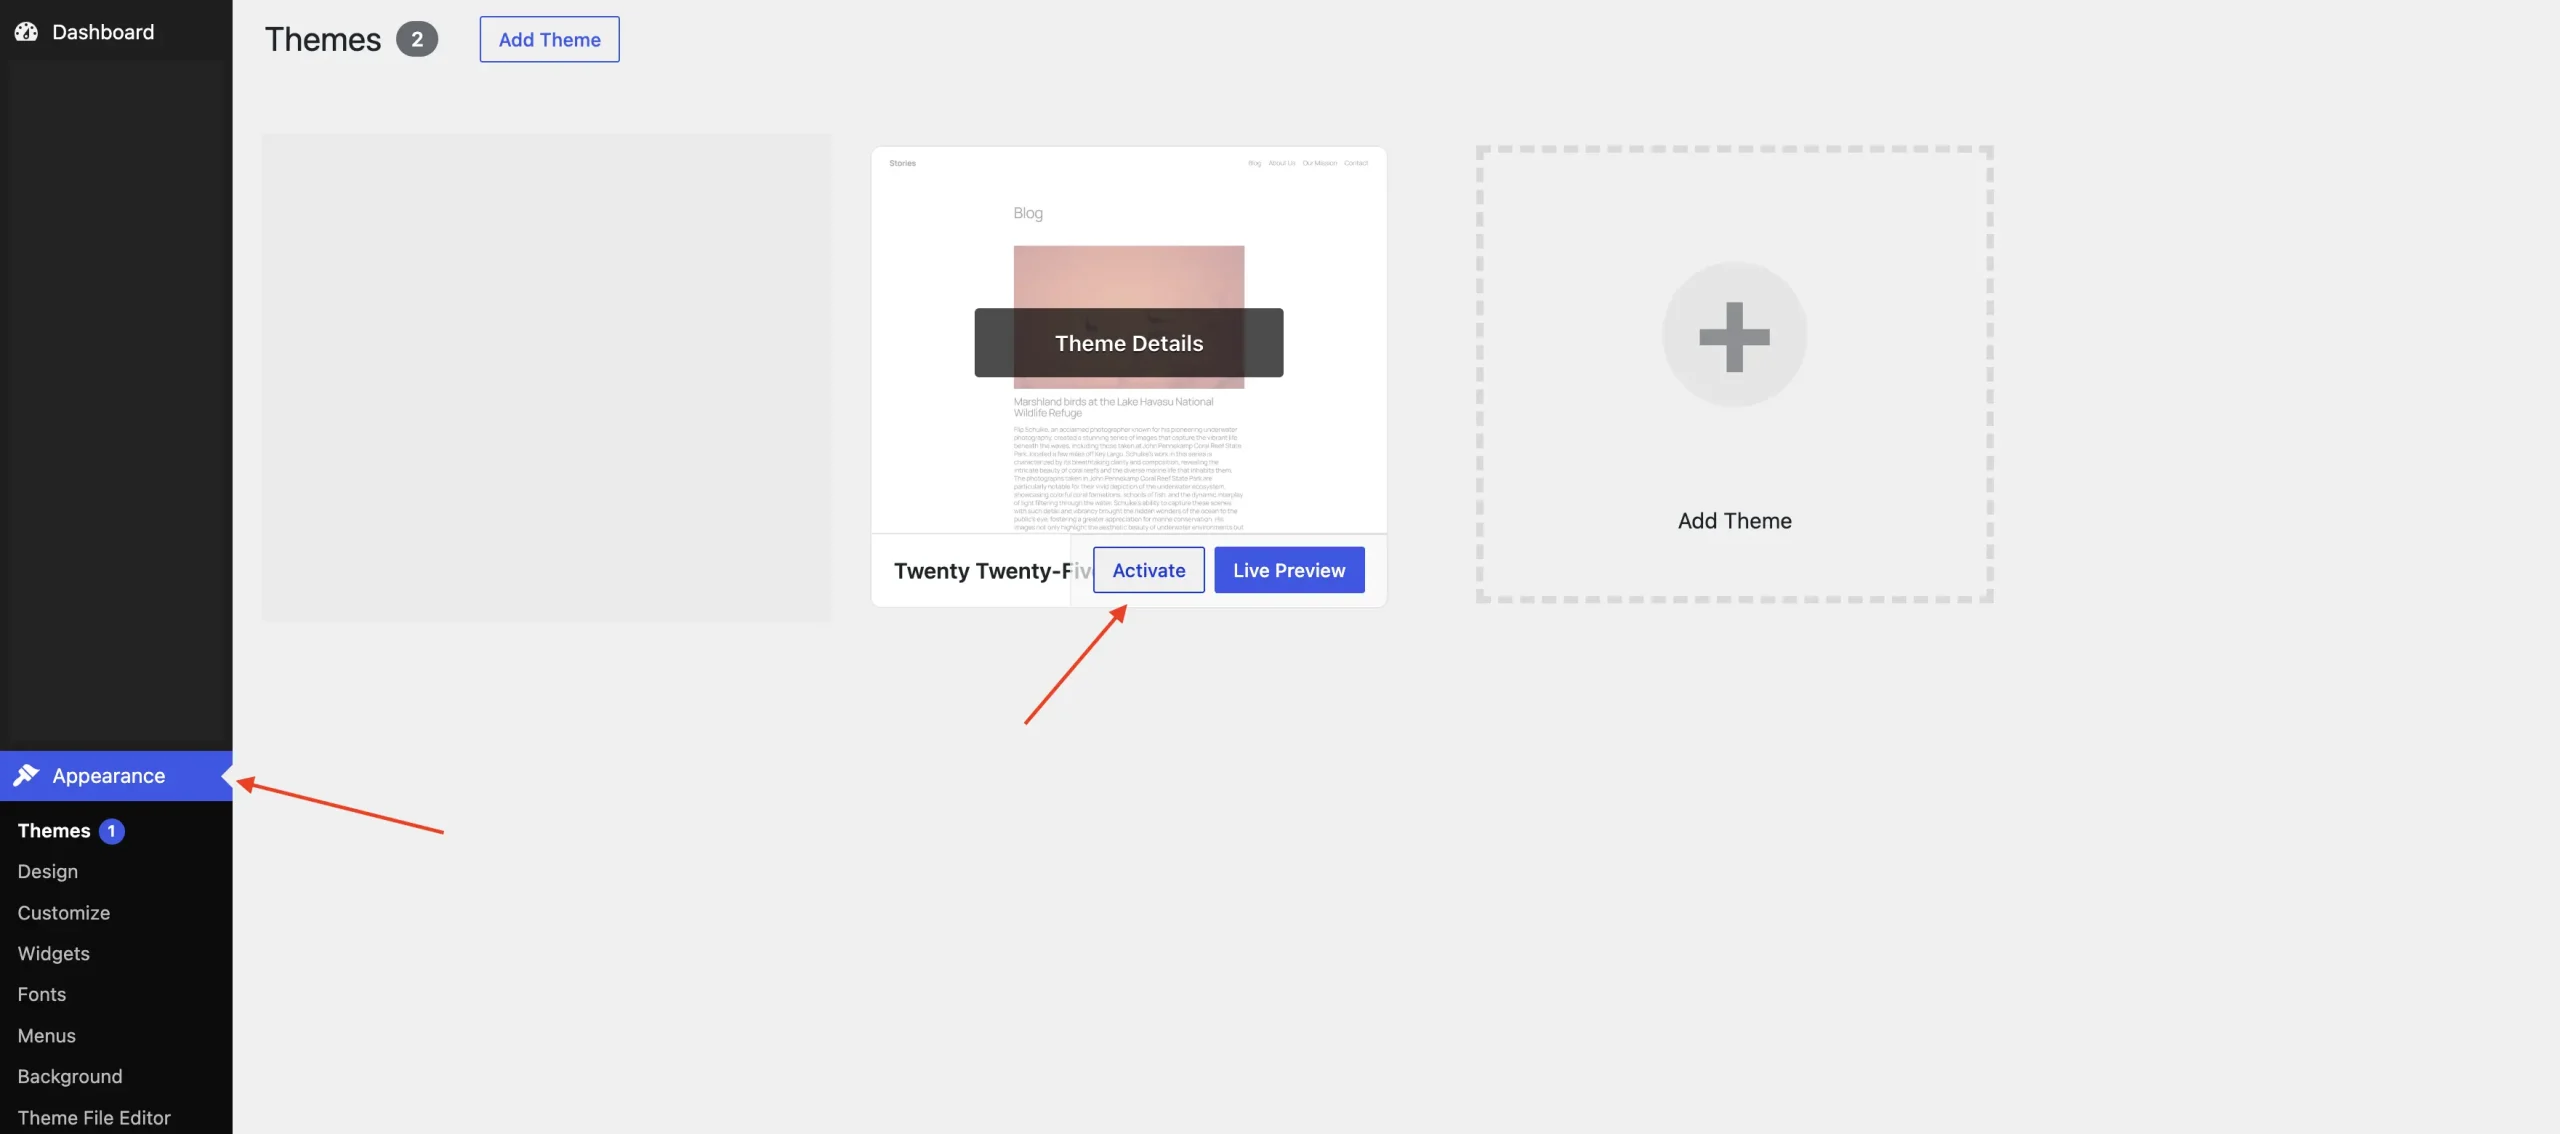
If the theme doesn’t appear: Recheck the extracted folder structure, required theme files, and compatibility with your WordPress installation. If it’s a child theme, confirm that its parent theme is installed.
Step 5: Verify That the Theme Change Worked
Can’t access the WordPress dashboard? Uploading the theme through cPanel won’t activate it automatically. The next section explains how to change the active theme when wp-admin is unavailable.
How to Activate a WordPress Theme Without wp-admin
You can activate an installed WordPress theme without accessing the dashboard, but cPanel File Manager alone does not provide a standard theme activation button.
Method 1: Activate a Theme Using WP-CLI
Use this method if your hosting account provides WP-CLI access through cPanel Terminal or SSH.
Step 1: Open the Terminal and Locate WordPress
1. Log in to cPanel.
2. Look for Terminal under the available hosting tools.
3. Open the terminal and navigate to your WordPress installation directory.
4. Confirm that you’re working with the correct website before running commands.
cd ~/public_htmlStep 2: Identify the Installed Theme
wp theme listIdentify the theme slug, which normally matches its directory name.
wp-content/themes/twentytwentyfive/twentytwentyfiveStep 3: Activate the Replacement Theme
wp theme activate twentytwentyfiveDo not run the command with an example slug unless that theme is actually installed.
Step 4: Check the Website
1. Open the website’s homepage.
2. Check whether the original theme-related error has disappeared.
3. Try accessing /wp-admin/ again.
4. Test navigation, templates, forms, and other important features.
5. Review PHP error logs if problems continue.
Method 2: Change the Active Theme Using phpMyAdmin
If WP-CLI is unavailable, an administrator with database access can change the stored active theme settings through phpMyAdmin.
This is an advanced recovery procedure, not the preferred method for a routine theme change. Direct database edits bypass the normal WordPress theme-switching process and can leave theme-specific settings or functionality needing further attention.
Step 1: Locate Your WordPress Database
1. Open cPanel and launch phpMyAdmin.
2. Identify the database used by your WordPress installation.
3. If necessary, confirm the database name by checking the DB_NAME setting in wp-config.php.
4. Export a database backup before changing records.
5. Open the WordPress options table.
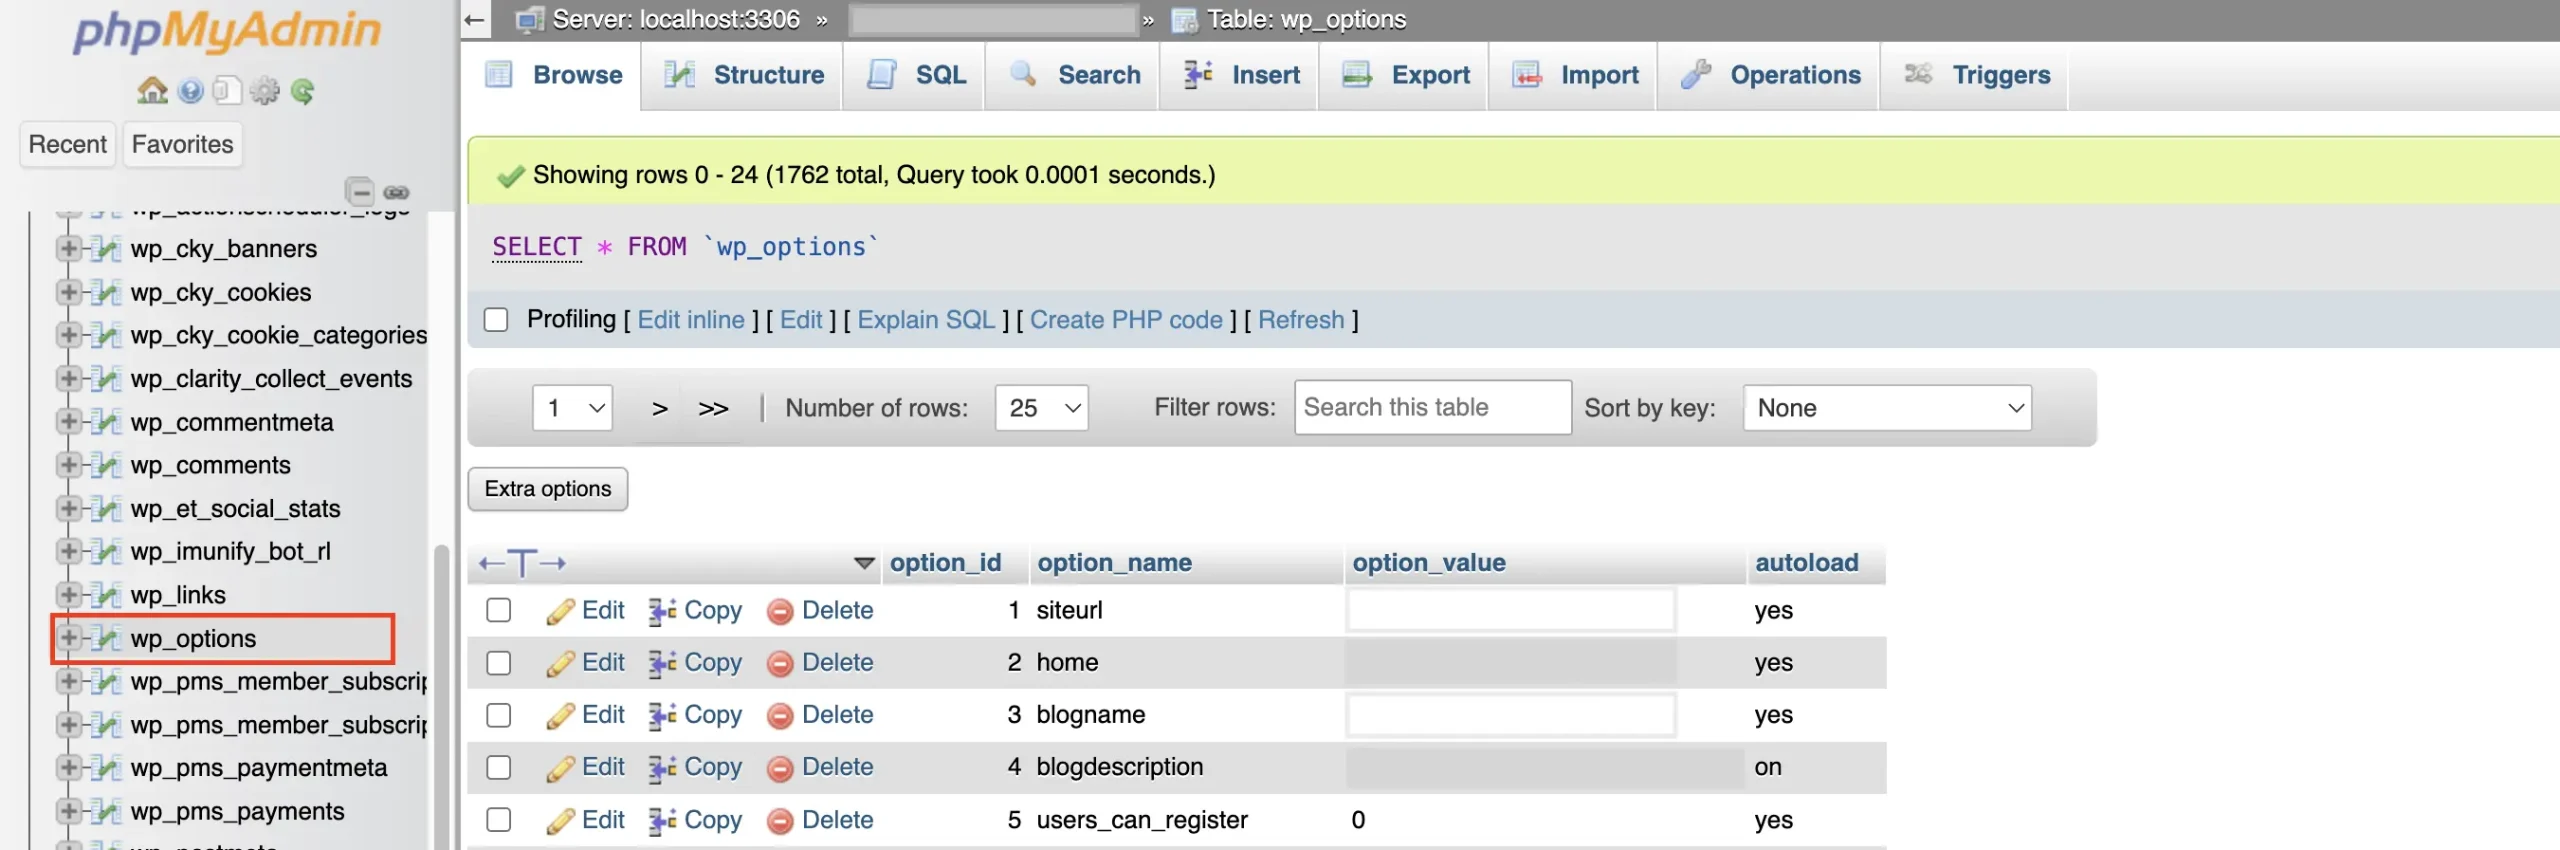
Step 2: Find the Active Theme Settings
- template – identifies the parent theme directory.
- stylesheet – identifies the active theme’s stylesheet directory.
template: twentytwentyfive
stylesheet: twentytwentyfivetemplate: parent-theme
stylesheet: child-themeStep 3: Update the Settings Carefully
1. Record the original template and stylesheet values.
2. Confirm that the replacement theme is installed and compatible.
3. Edit the two records to match the correct parent and active theme directories.
4. Save the changes.
5. Open your website and check whether WordPress loads.
Do not change unrelated records or edit database values without confirming the correct theme directories.
Step 4: Restore Dashboard Access and Review the Theme
1. Sign in to WordPress.
2. Open Appearance → Themes.
3. Verify which theme is active.
4. Review menus, widgets, theme options, templates, and other theme-dependent settings.
5. If appropriate, perform a controlled theme switch through WordPress to ensure the normal activation process runs.
Which Method Should You Use?
Choose WP-CLI when available. It performs a WordPress theme activation rather than relying only on manual database changes.
Troubleshooting Common Errors After Changing a WordPress Theme
1. WordPress Shows a Critical Error or Blank Page
What to check:
1. Check the administrator email for a WordPress Recovery Mode link. If WordPress detected a qualifying fatal error, the email may identify the affected theme or plugin.
2. Review the PHP error logs in your hosting account. Look for errors recorded at the time of activation.
3. Check whether the new theme supports your WordPress and PHP versions.
4. If the new theme is responsible, restore the previous working theme using the appropriate activation method.
Don’t keep switching themes without checking the error logs. A faulty plugin or custom code may still cause the error even after the theme changes.
2. The New Theme Doesn’t Appear in WordPress
If you’ve uploaded a theme through cPanel but can’t find it under Appearance → Themes, check the installation directory.
wp-content/themes/your-theme-folder/- A valid
style.cssfile with the required WordPress theme information.
- An incorrectly nested folder created when extracting the ZIP archive.
- An incomplete upload or extraction.
- A missing parent theme if you’ve installed a child theme.
3. The Website Layout, Menus, or Widgets Look Broken
What to check:
1. Review the new theme’s navigation and menu assignments.
2. Check the header, footer, and homepage templates.
3. Inspect widget areas or block-based template parts, depending on your theme.
4. Look for missing shortcodes or page-builder elements that depended on the previous theme.
5. Clear your website and browser caches if old styling is still appearing.
4. Plugins or PHP Compatibility Cause Problems
1. Identify which feature stopped working.
2. Check the browser console or PHP logs for relevant errors.
3. Review the theme’s documented WordPress and PHP requirements.
4. Check whether the affected plugin supports the new theme or requires a configuration change.
5. Test suspected conflicts individually, preferably on staging.
Avoid disabling every plugin on a live business website as your first action. Doing so can interrupt checkout, forms, security features, and other important functionality.
When Should You Restore the Previous Theme?
Post-Theme Change Checklist
Run these checks before considering the theme change complete, especially if your website generates leads, processes orders, or relies on custom page layouts.
1. Check Your Website’s Layout and Navigation
- The header, footer, and navigation menus display correctly.
- Menu links lead to the intended pages.
- Images, buttons, and page layouts appear as expected.
- Theme-specific templates, widgets, and shortcodes are still working.
2. Test Mobile Responsiveness
3. Test Forms, Plugins, and Important Features
4. Verify SEO Settings and Internal Links
- Your existing page titles and meta descriptions remain intact.
- Important pages still use the correct H1 and heading hierarchy.
- Canonical URLs and structured data are still generated as intended.
- Internal navigation and contextual links work.
- Important content isn’t accidentally hidden or excluded from indexing.
Don’t assume that installing an SEO-friendly theme guarantees better rankings. Verify the actual page output instead.
5. Clear Cache and Check Website Performance
6. Verify Analytics and Conversion Tracking
- Contact form submissions.
- Quote or consultation requests.
- Purchases, where applicable.
7. Confirm Your Backup and Recovery Options
Final check: Test the website as a visitor would – open a page, follow the navigation, interact with key features, and complete a test conversion where appropriate. Only consider the theme change finished when the website works beyond the WordPress dashboard.
Conclusion
Before making the switch, back up your website and check how much of its layout and functionality depends on the current theme. Afterward, test the pages and features your visitors actually use. If something breaks, restore the last working configuration and investigate the cause rather than making more changes at random.
FAQ
Will changing my WordPress theme delete my pages or blog posts?
Can I change a WordPress theme through cPanel without causing downtime?
It’s possible to prepare and install a new theme without taking your website offline, but activating it on a live site can introduce errors or temporarily disrupt functionality.
For a business website, test the replacement on staging first. Check the important pages, forms, and integrations before switching on production. A backup and rollback plan are essential, but they don’t guarantee zero downtime.