TL;DR
- Reset your password. Use the “Lost your password?” link on the login page. If the reset email never arrives, change the password directly in phpMyAdmin.
- Clear your browser cache and cookies. This stops the login page from reloading or redirecting in a loop. A private window is a quick way to test.
- Deactivate all plugins. Rename the plugins folder via FTP or File Manager. If you can log in afterward, a plugin was the cause.
Being locked out of wp-admin is stressful, but WordPress login problems almost always come down to a handful of causes: a wrong password, a stale browser cookie, a plugin conflict, or a damaged core file. Each one has a known fix, and most take only a few minutes.
Before editing any file, save a copy of it so you can roll back. And if you would rather hand the job to a developer, Kiwistic can restore access and find the root cause.
Why Can’t I Log In To WordPress? Common Causes
WordPress login problems can happen for several reasons, including incorrect credentials, browser cookie issues, plugin conflicts, or server errors. The quickest way to identify the cause is to look at what happens when you try to access your WordPress admin dashboard.
- Incorrect username or password. If WordPress displays an “Incorrect password” or “Unknown username” message, your login credentials may be wrong. Check for typing errors, confirm that Caps Lock is off, and make sure you’re using the correct username or email address.
- Browser cookie or cache issues. If your login page keeps refreshing, redirects you back to the login form, or displays a cookie-related error, your browser may not be storing authentication cookies correctly. Browser settings, cached data, and server-side caching can all contribute to login problems.
- Plugin or theme conflicts. A faulty update or incompatible plugin or theme can trigger a critical error, a blank screen, or an inaccessible admin area. If the problem started immediately after an update, the affected component is a useful place to investigate.
- Corrupted or misconfigured WordPress files. Problems with .htaccess, wp-login.php, or other core files can prevent the login page from loading correctly. Depending on the affected file and server configuration, you might encounter redirect loops, server errors, or a blank page.
- Incorrect WordPress site URLs. If your WordPress Address (URL) and Site Address (URL) are configured incorrectly, you may experience unexpected redirects or authentication issues. This can happen after a domain change, website migration, or HTTPS configuration change.
- PHP memory exhaustion. When WordPress or one of its plugins exceeds the available PHP memory limit, the request may fail with a fatal error. Symptoms can include a critical error message, an HTTP 500 error, or a blank screen. Check the error logs before assuming memory is the cause.
- Database connection errors. If your site displays “Error establishing a database connection,” WordPress cannot communicate with its database. Possible causes include incorrect database credentials, an unavailable database server, or database-related problems.
Not sure which issue you’re facing? Start with the error message or symptom you can see. The troubleshooting steps below begin with simple login and browser checks before moving to changes involving plugins, WordPress files, and server settings.
For additional checks involving passwords, browser cookies, and security software, see the official WordPress login troubleshooting guide.
9 Step-by-Step Solutions to Fix Your WordPress Login
1. Check Your Credentials & Reset Your Password
Start here if WordPress says your username, email address, or password is incorrect. If your credentials are accepted but you are redirected back to the login page, the issue may involve cookies or redirects instead. We cover those possibilities in the next steps.
Method A: Reset Your Password from the Login Page
1. Open your WordPress login page, typically yourdomain.com/wp-login.php.
2. Select Lost your password?

3. Enter your WordPress username or the email address associated with your account.
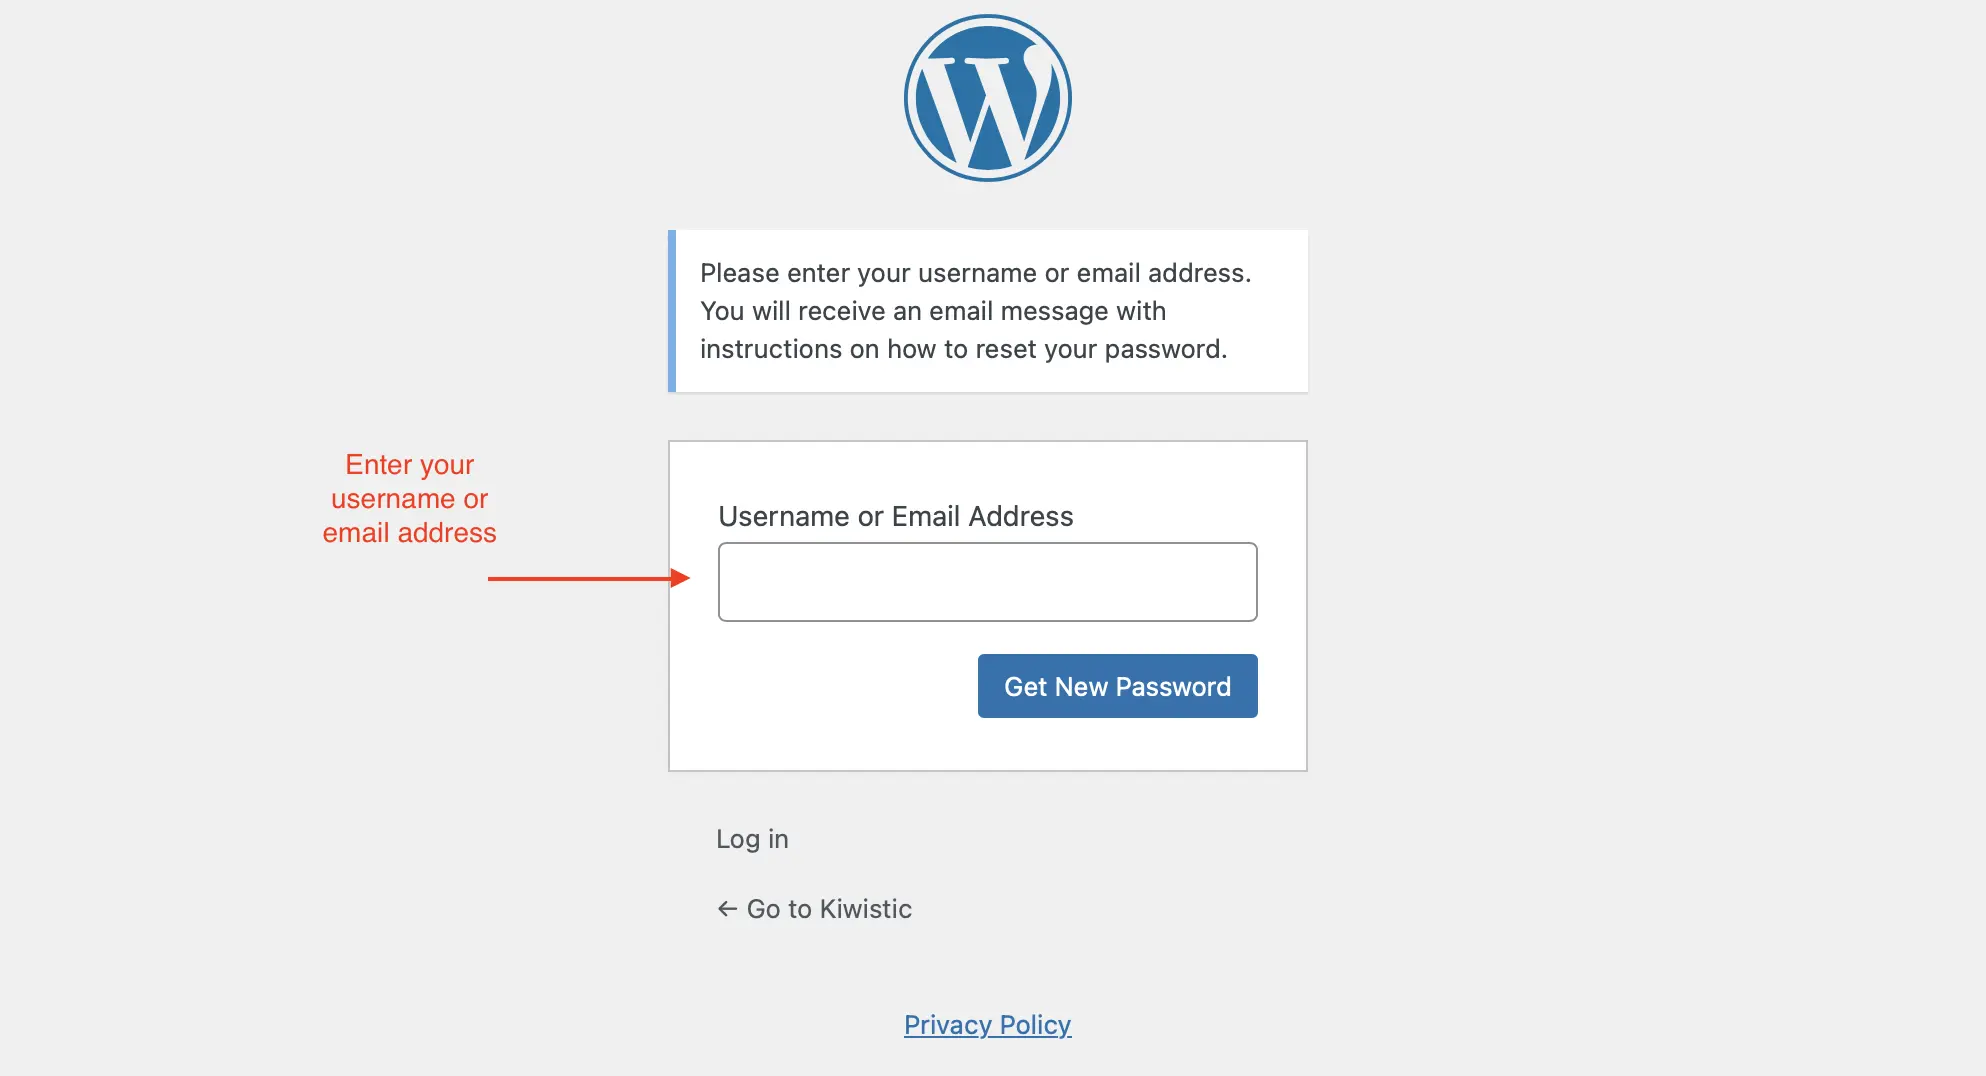
4. Select Get New Password.
5. Check your inbox for the password-reset email and follow its link.
6. Choose a new, unique password and sign in again.
If the reset email does not arrive: Check your spam folder and confirm that you entered the email address assigned to the WordPress user. A missing message does not automatically mean the account is gone. Email delivery may be failing, or the account may use a different address.
Method B: Reset Your Password Through phpMyAdmin
Editing the database directly is more sensitive than using the login form. Create a database backup first, and confirm that you have selected the correct database and user account.
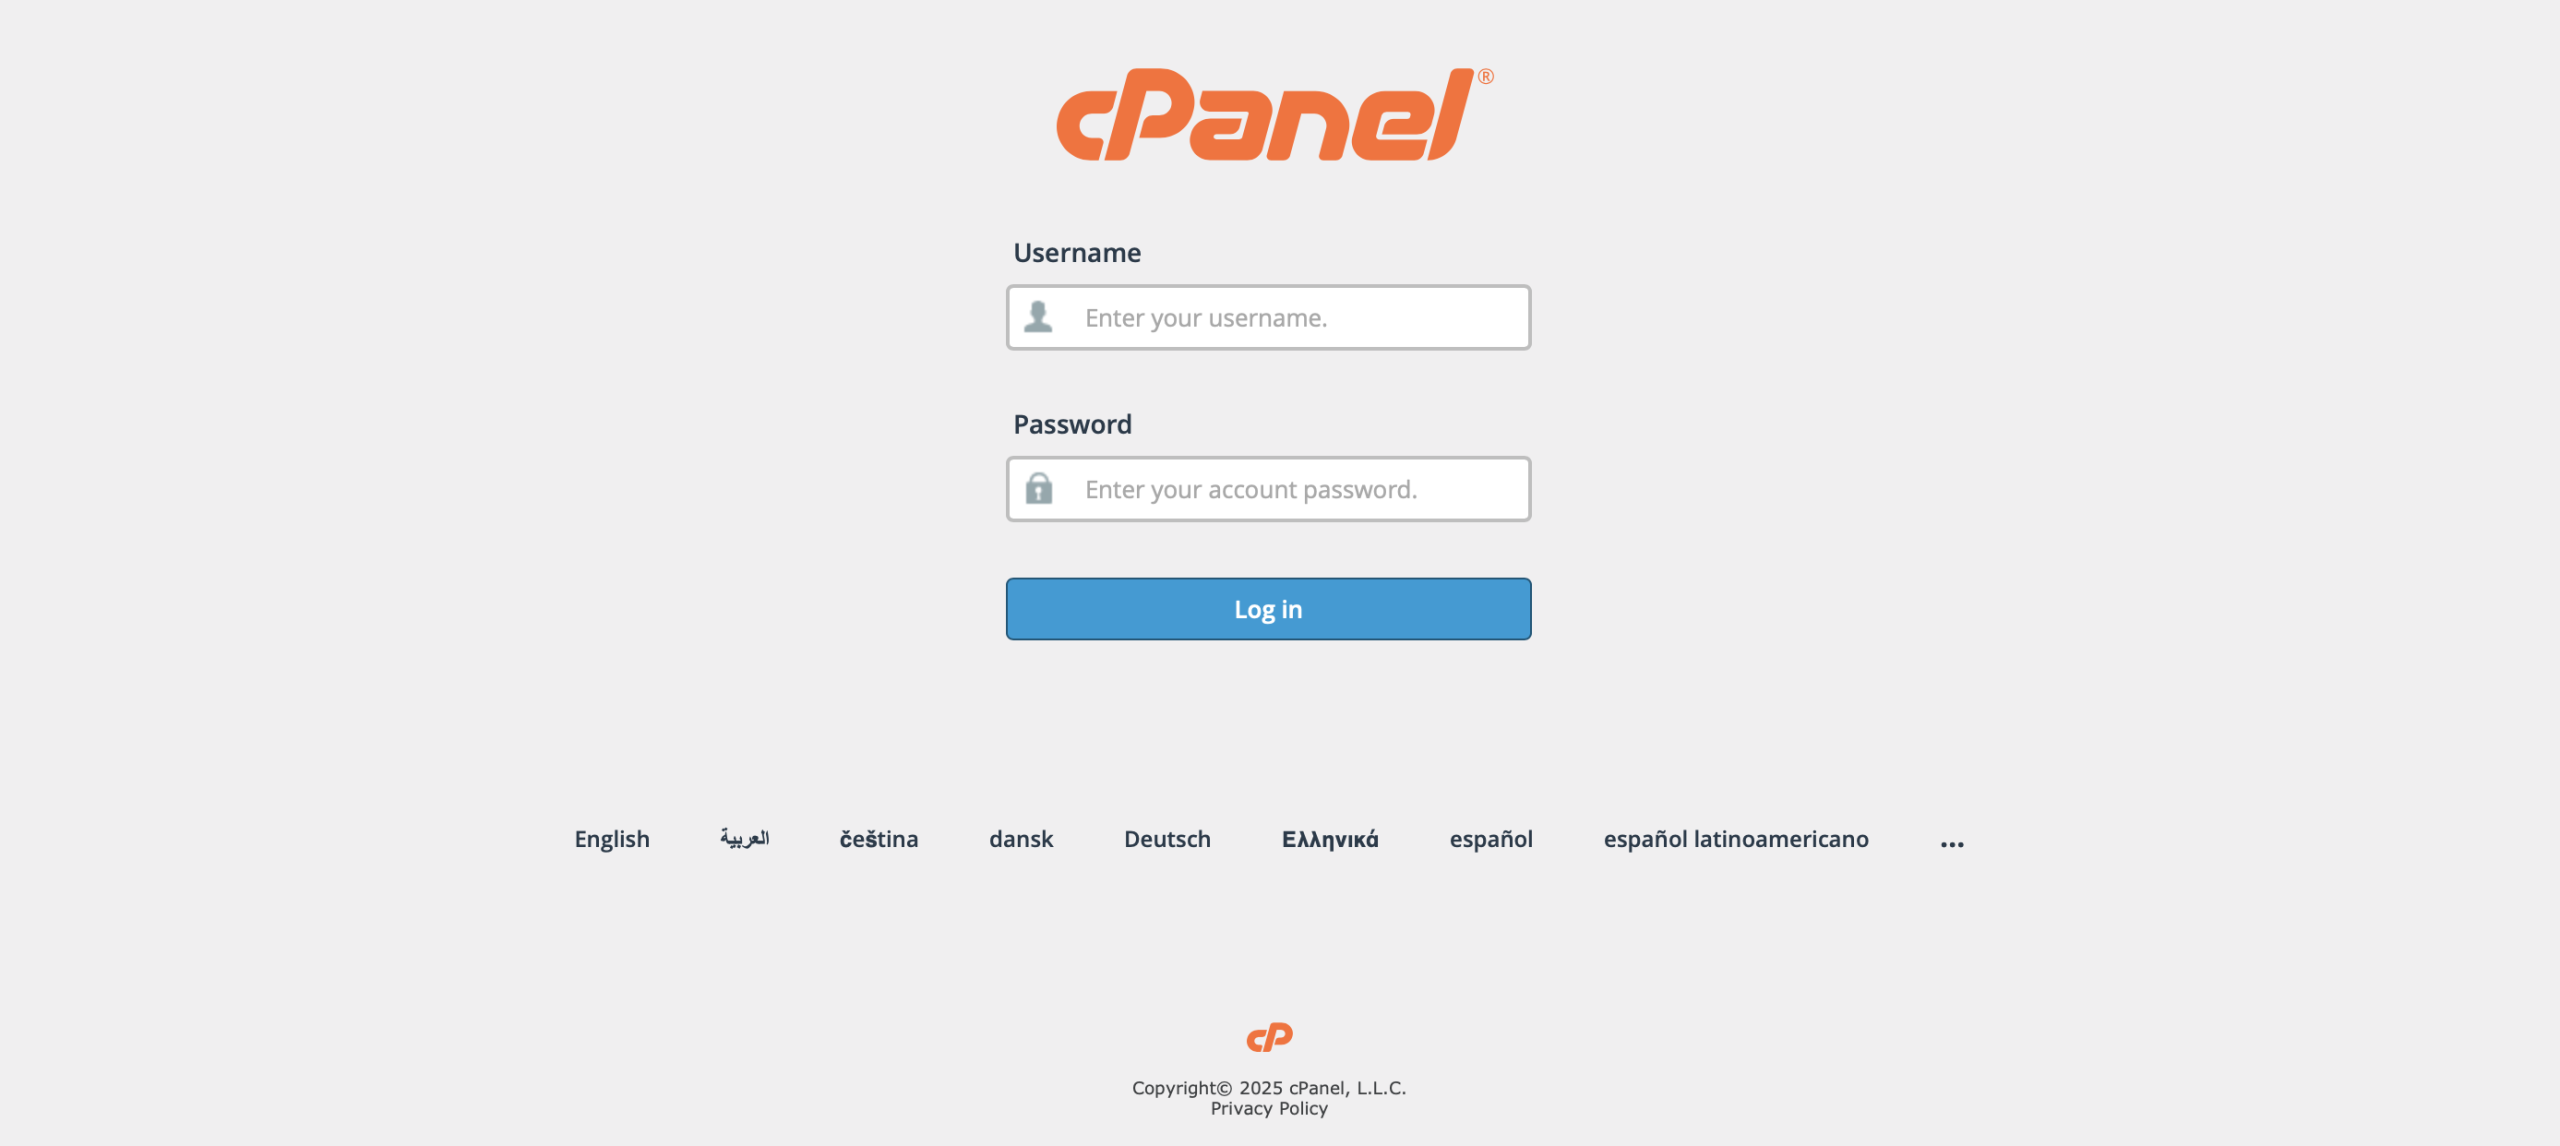
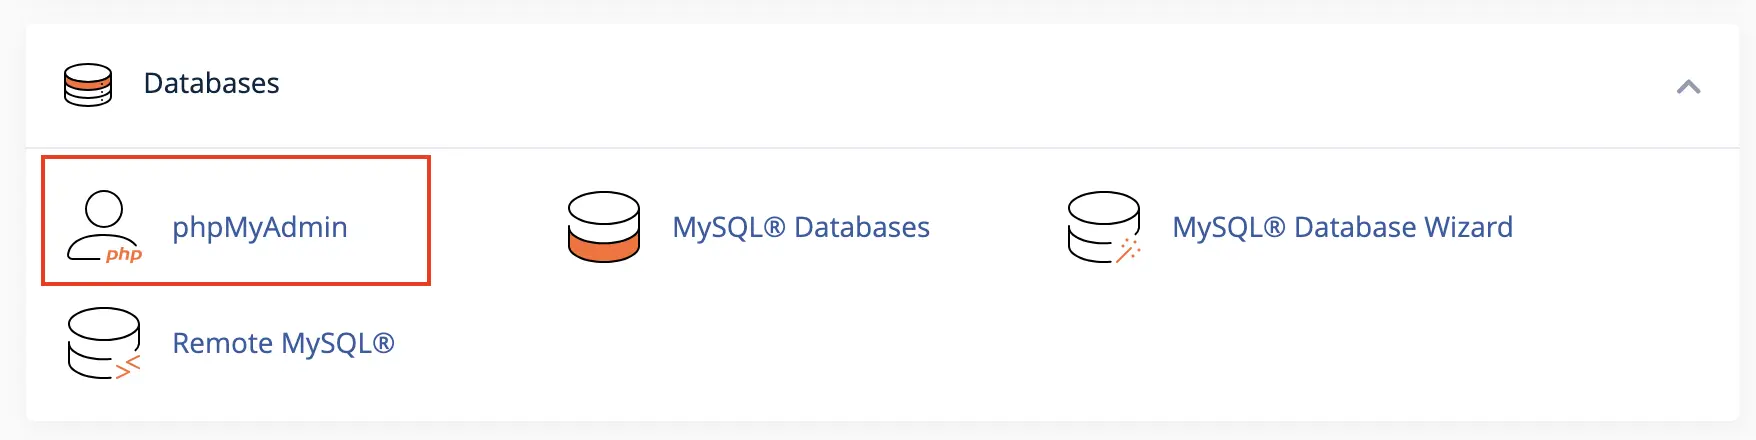
1. Sign in to your hosting control panel and open phpMyAdmin.
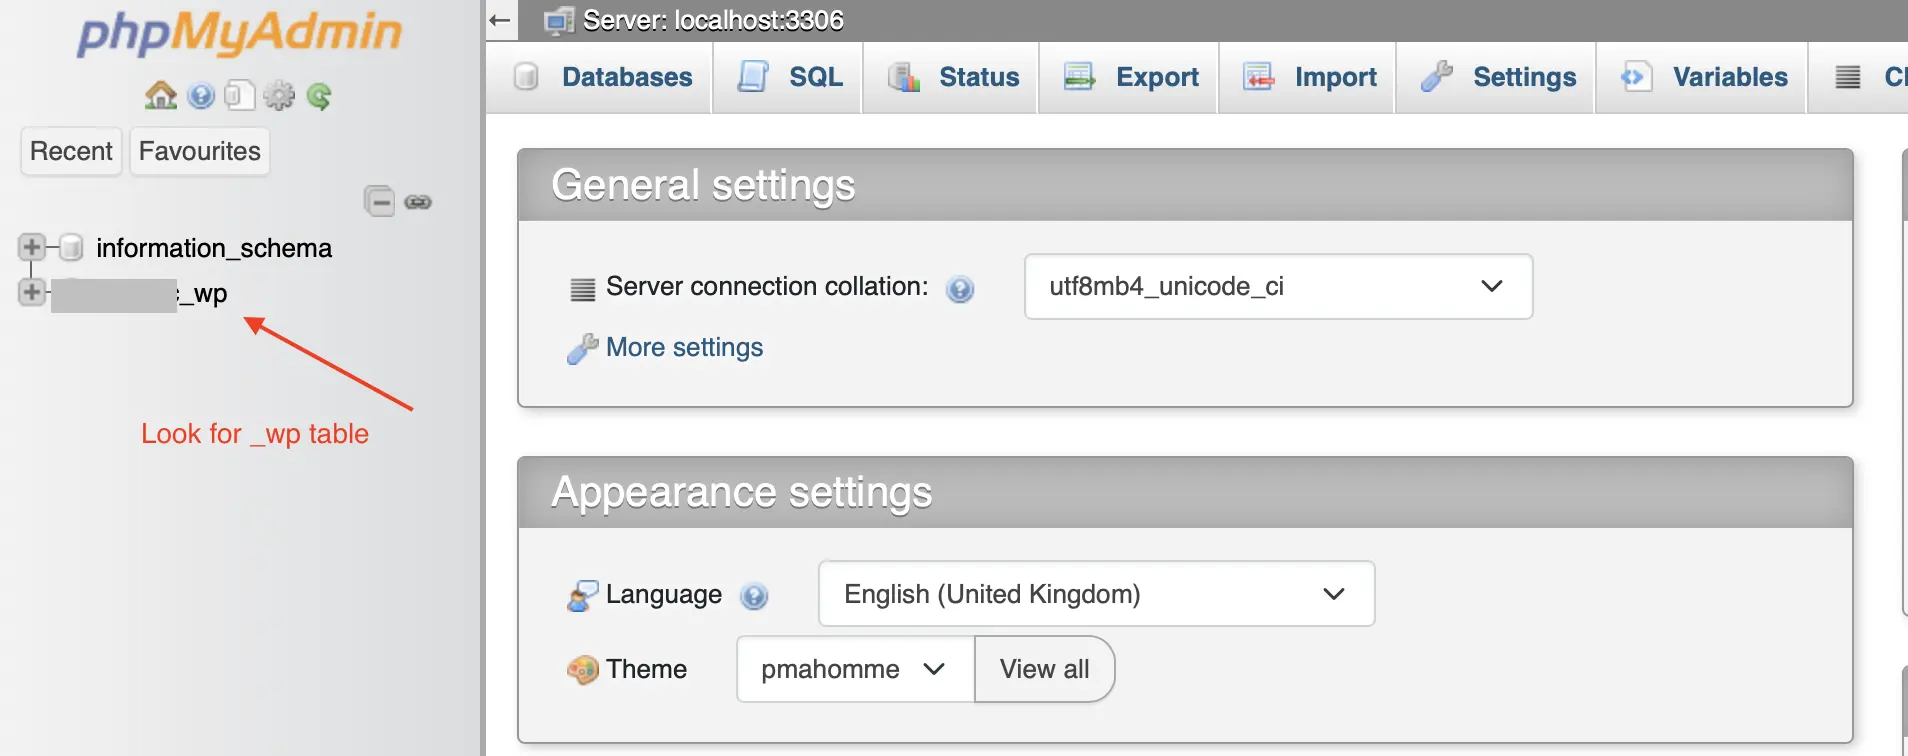
2. Select the database used by your WordPress installation. If you are unsure which one is correct, check the DB_NAME value in wp-config.php.
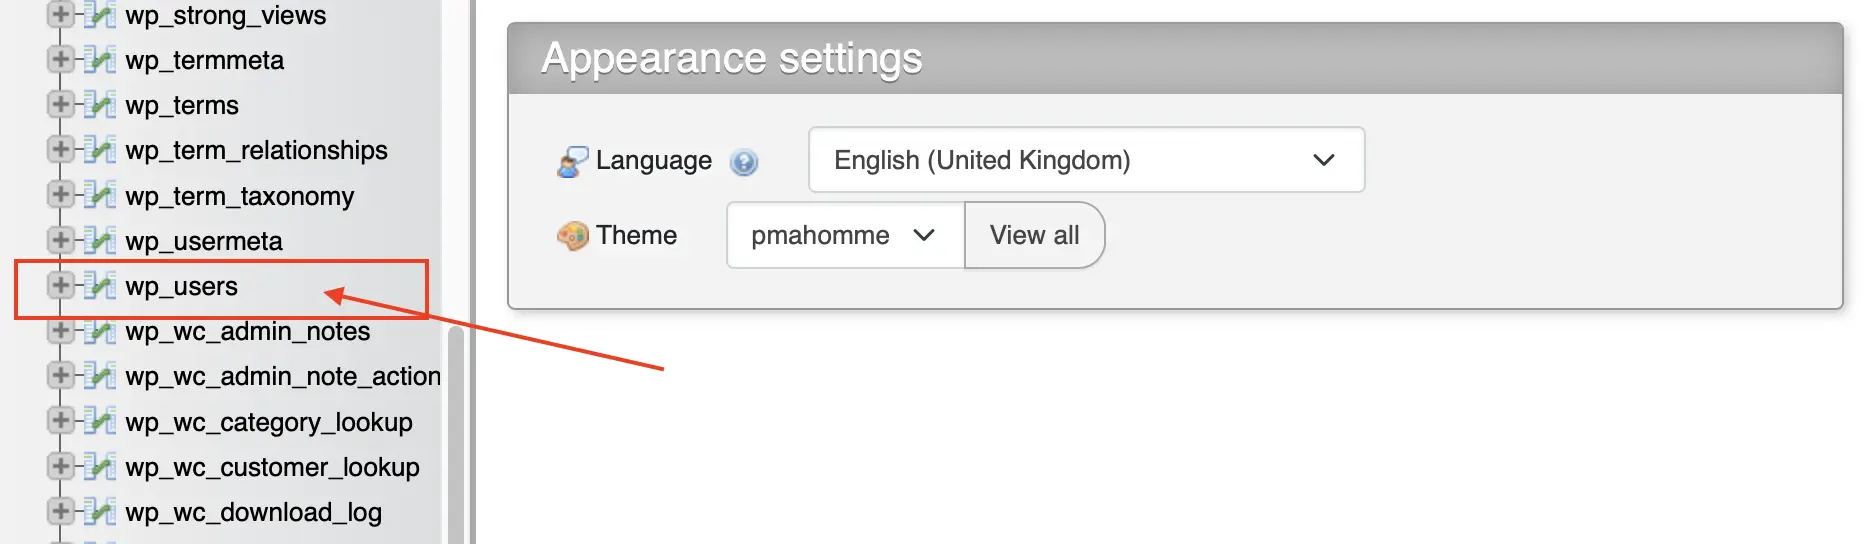
3. Find the WordPress users table. It is commonly named wp_users, but the prefix may be different.
4. Open the table and locate your account using the user_login or user_email column.
5. Select Edit for the correct user.

6. Find the user_pass field.
7. Enter a new, strong, unique password in its value field and select MD5 from the Function dropdown.

8. Save the change by selecting Go.
9. Return to the WordPress login page and sign in with your new password.
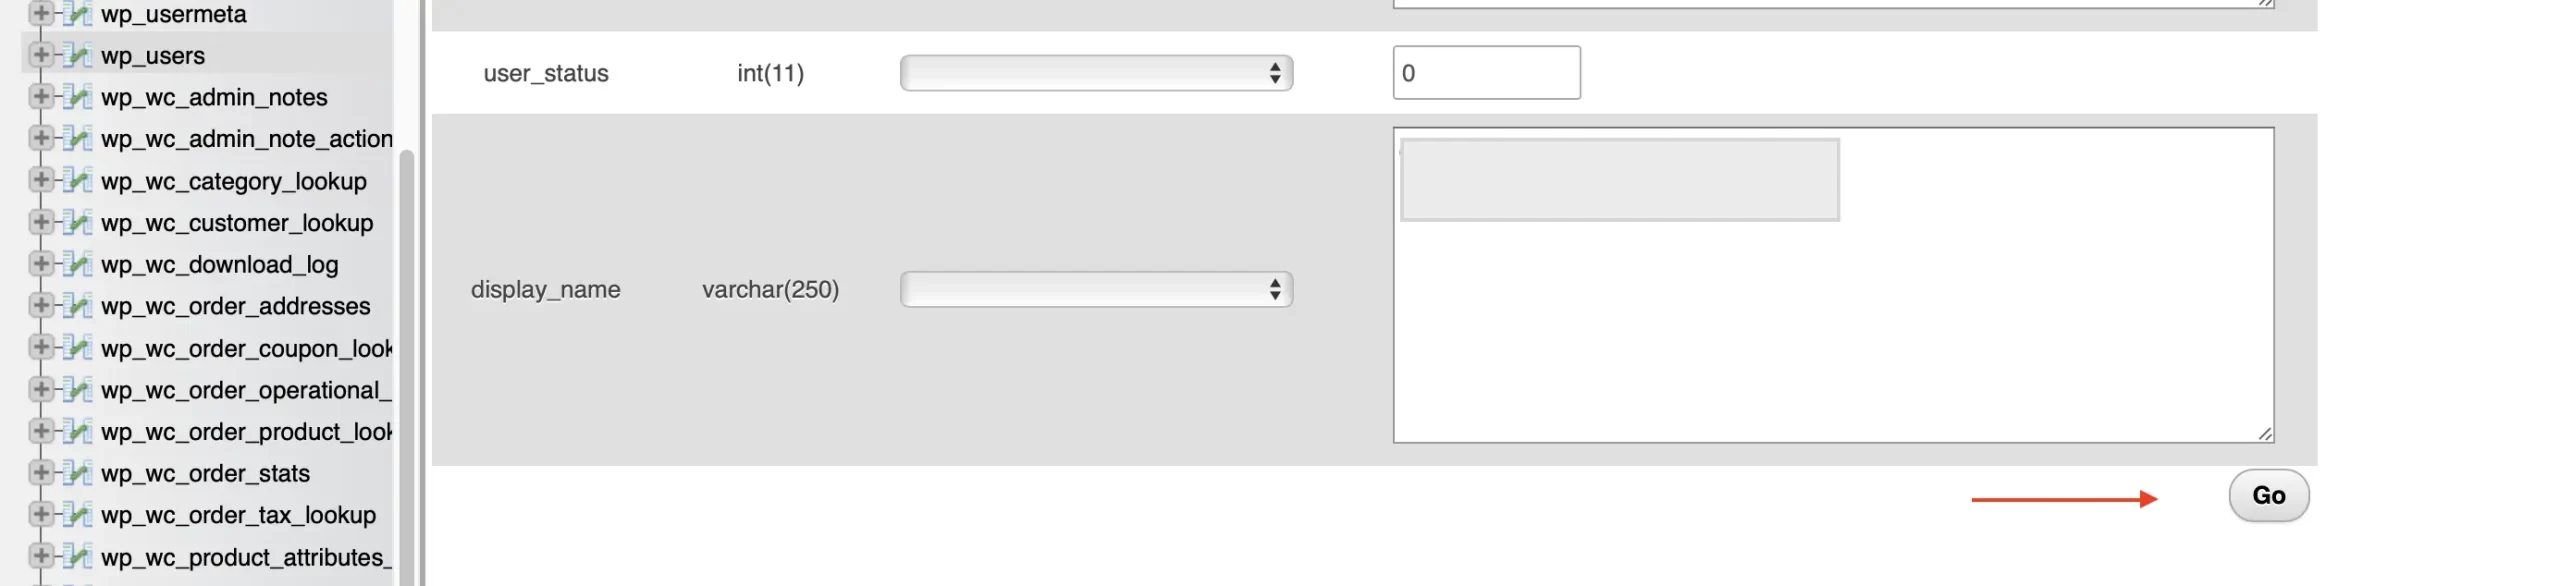
Why MD5 appears in these instructions: This is a compatibility-based recovery procedure documented by WordPress, not a recommendation to use MD5 for ongoing password storage. On a standard modern WordPress installation, a successful login causes the temporary MD5 password hash to be replaced with a stronger hash.
How to tell whether this fixed the issue
1. You reach the WordPress dashboard: The password reset worked.
2. WordPress still reports incorrect credentials: Recheck the username, site, database, and user record before changing anything else.
3. The login page refreshes or redirects without signing you in: Continue to Step 2 and investigate browser cookies.
4. You see a critical error or blank page: A password reset is unlikely to resolve the underlying problem. Investigate WordPress errors, plugins, or themes instead.
2. Clear Your Browser’s Cache and Cookies
1. Open an Incognito window in Chrome or a Private Browsing window in Firefox.
2. Visit your WordPress login URL, usually yourdomain.com/wp-login.php.
3. Enter your credentials manually and try to sign in.
4. If the login still fails, repeat the test in another browser.
Clear Cookies and Site Data in Google Chrome
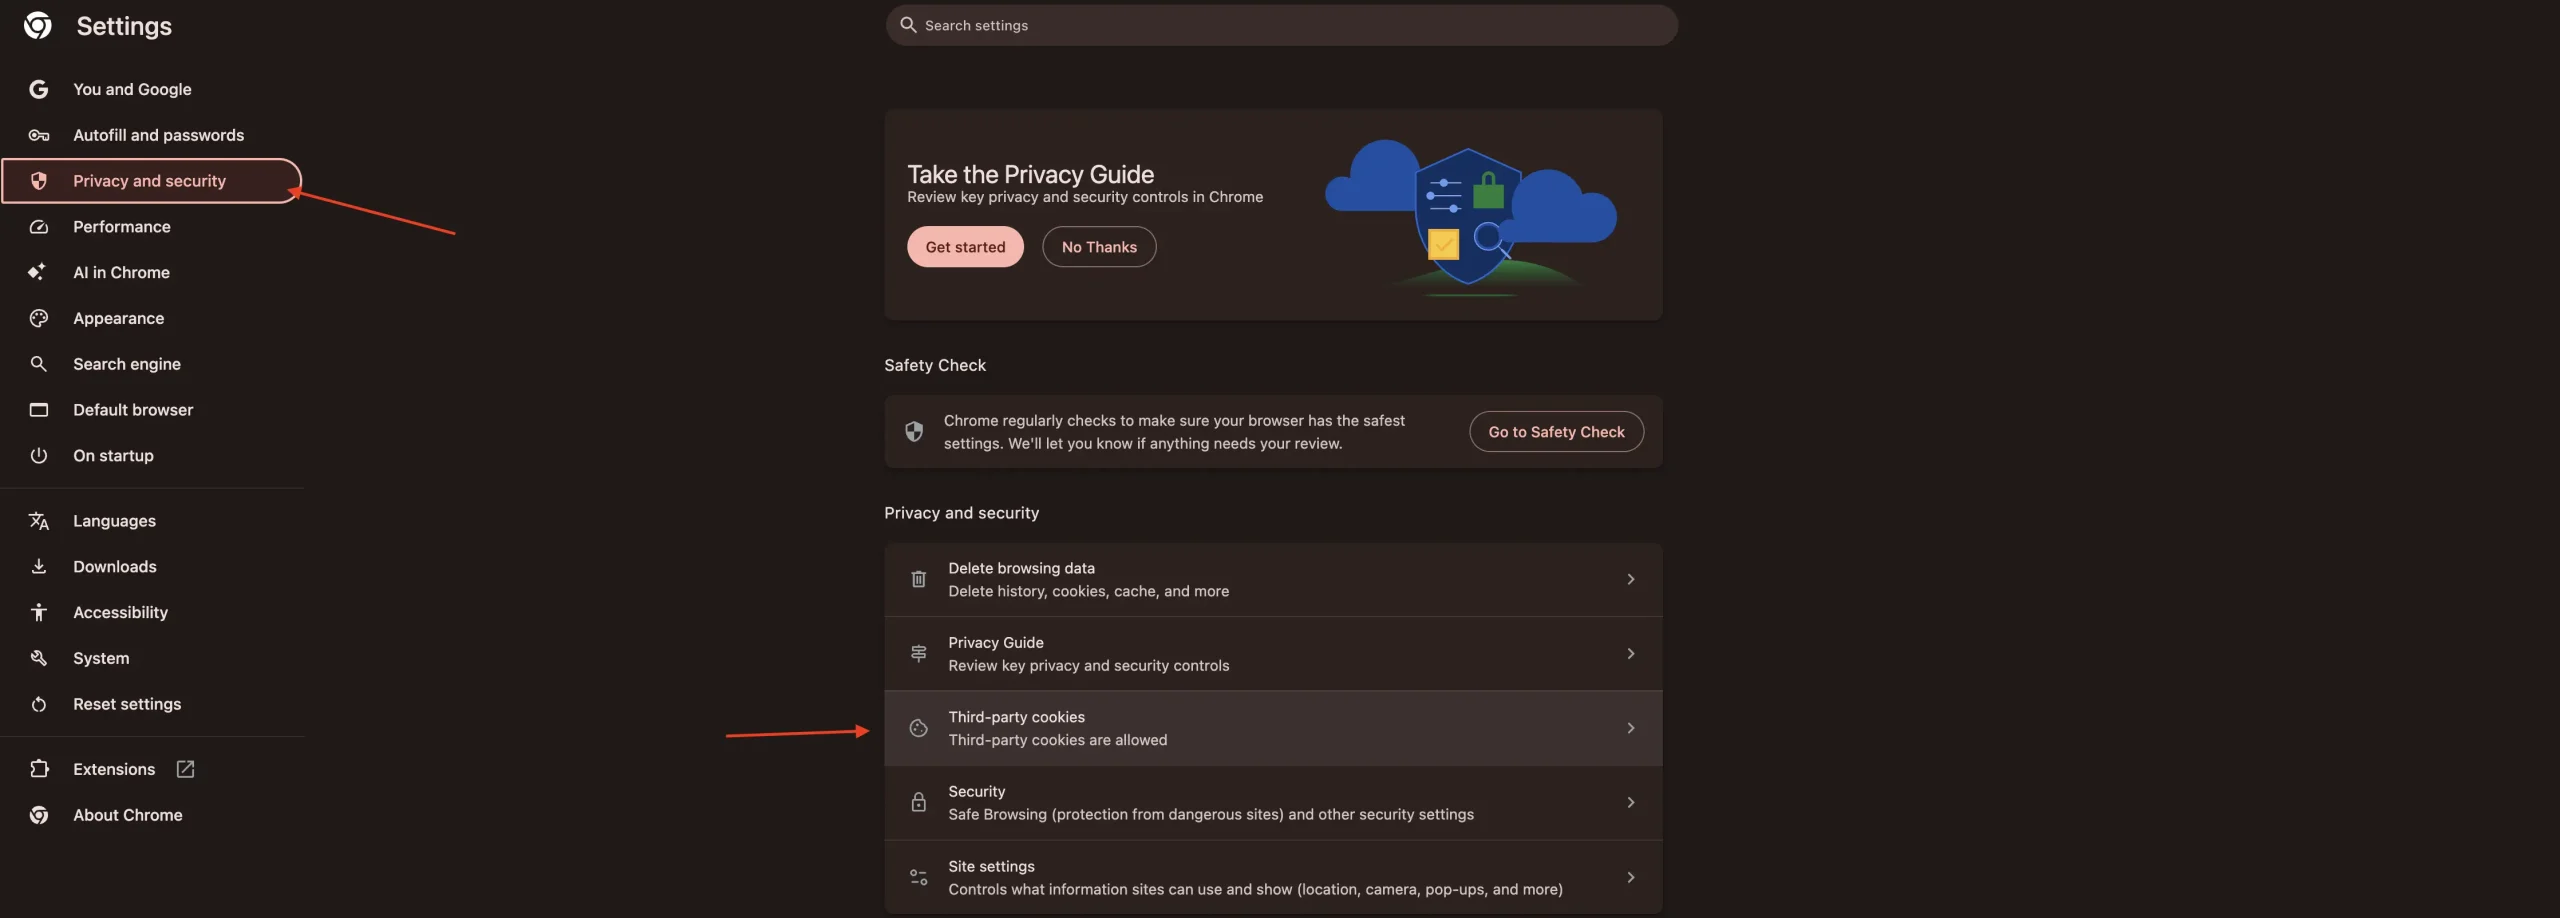
1. Open Chrome and go to Settings → Privacy and security → Third-party cookies.
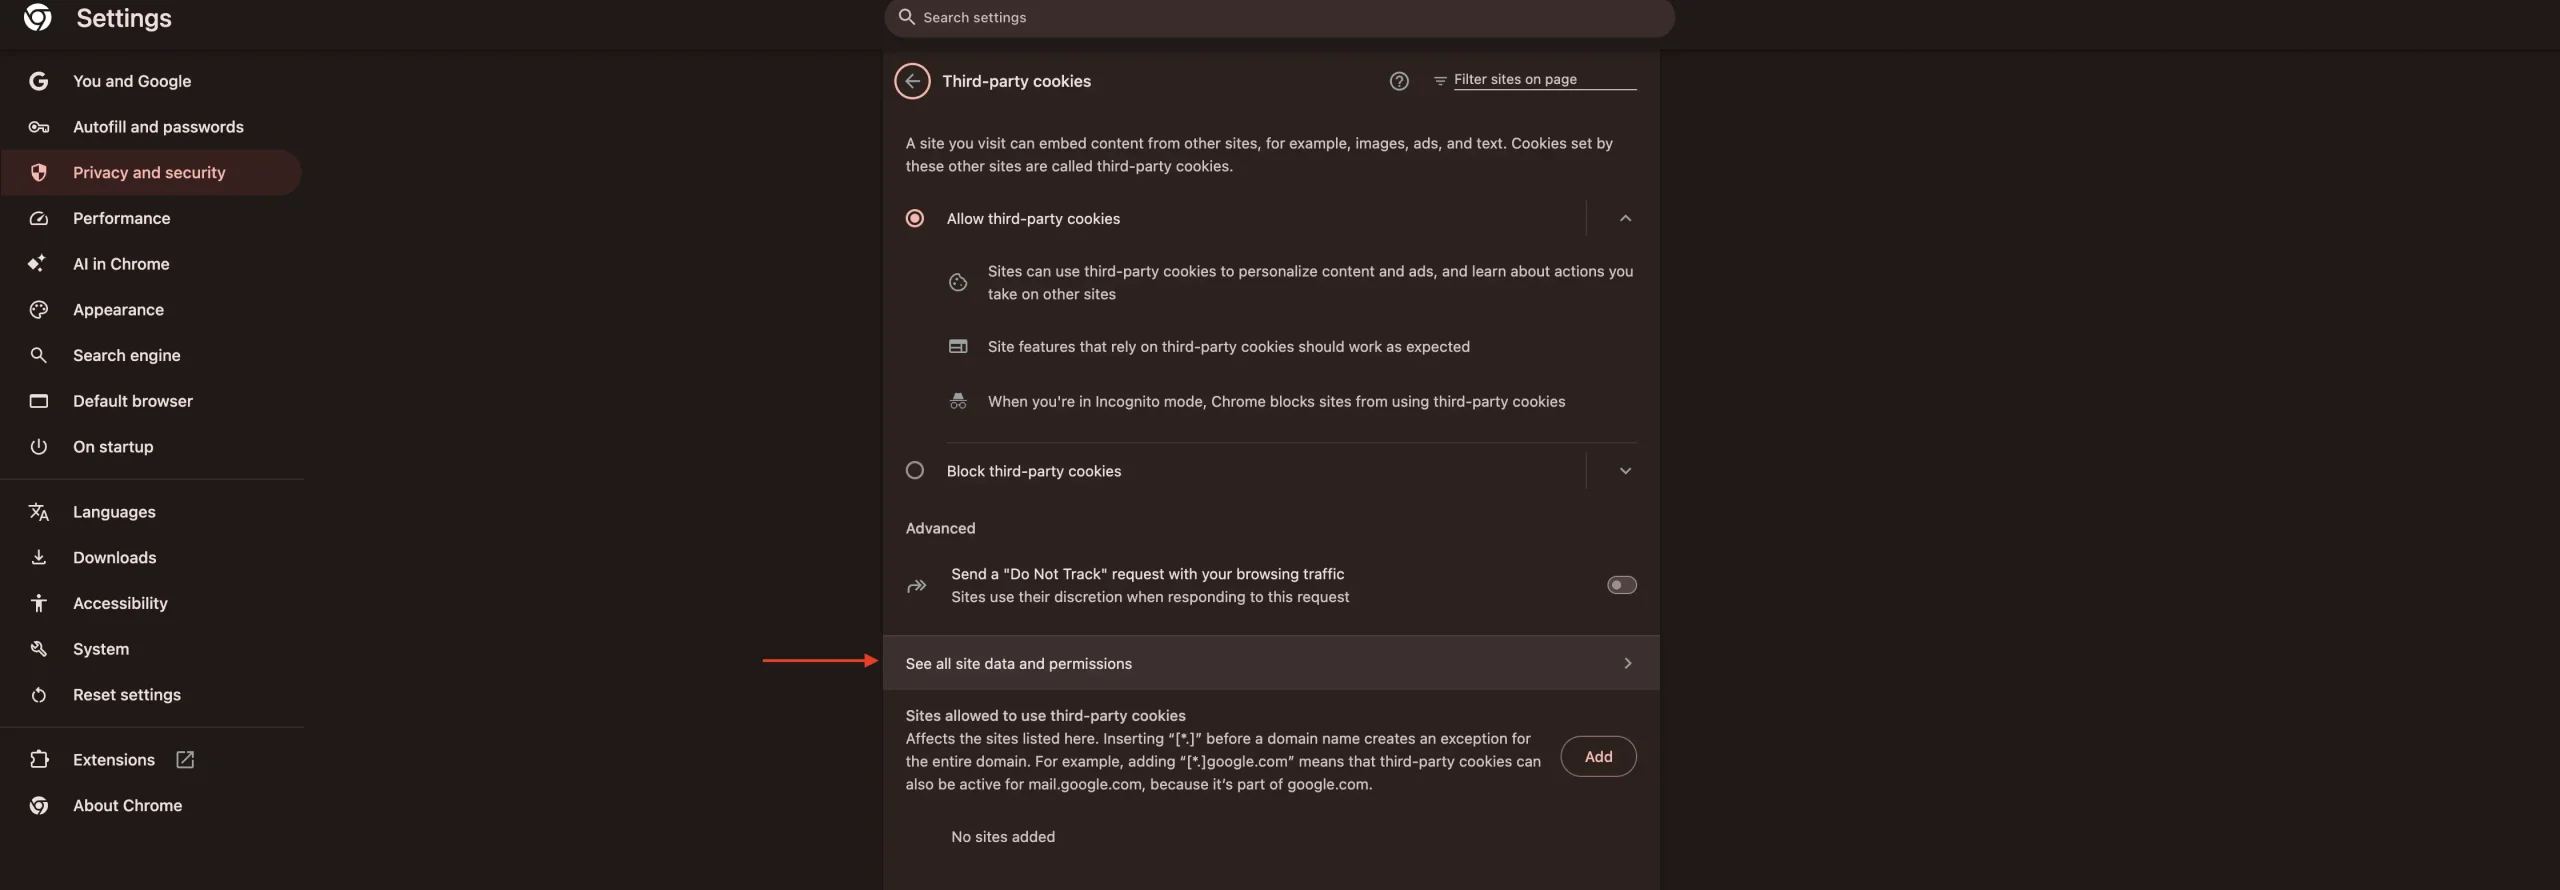
2. Open See all site data and permissions. The location or wording may differ by Chrome version.
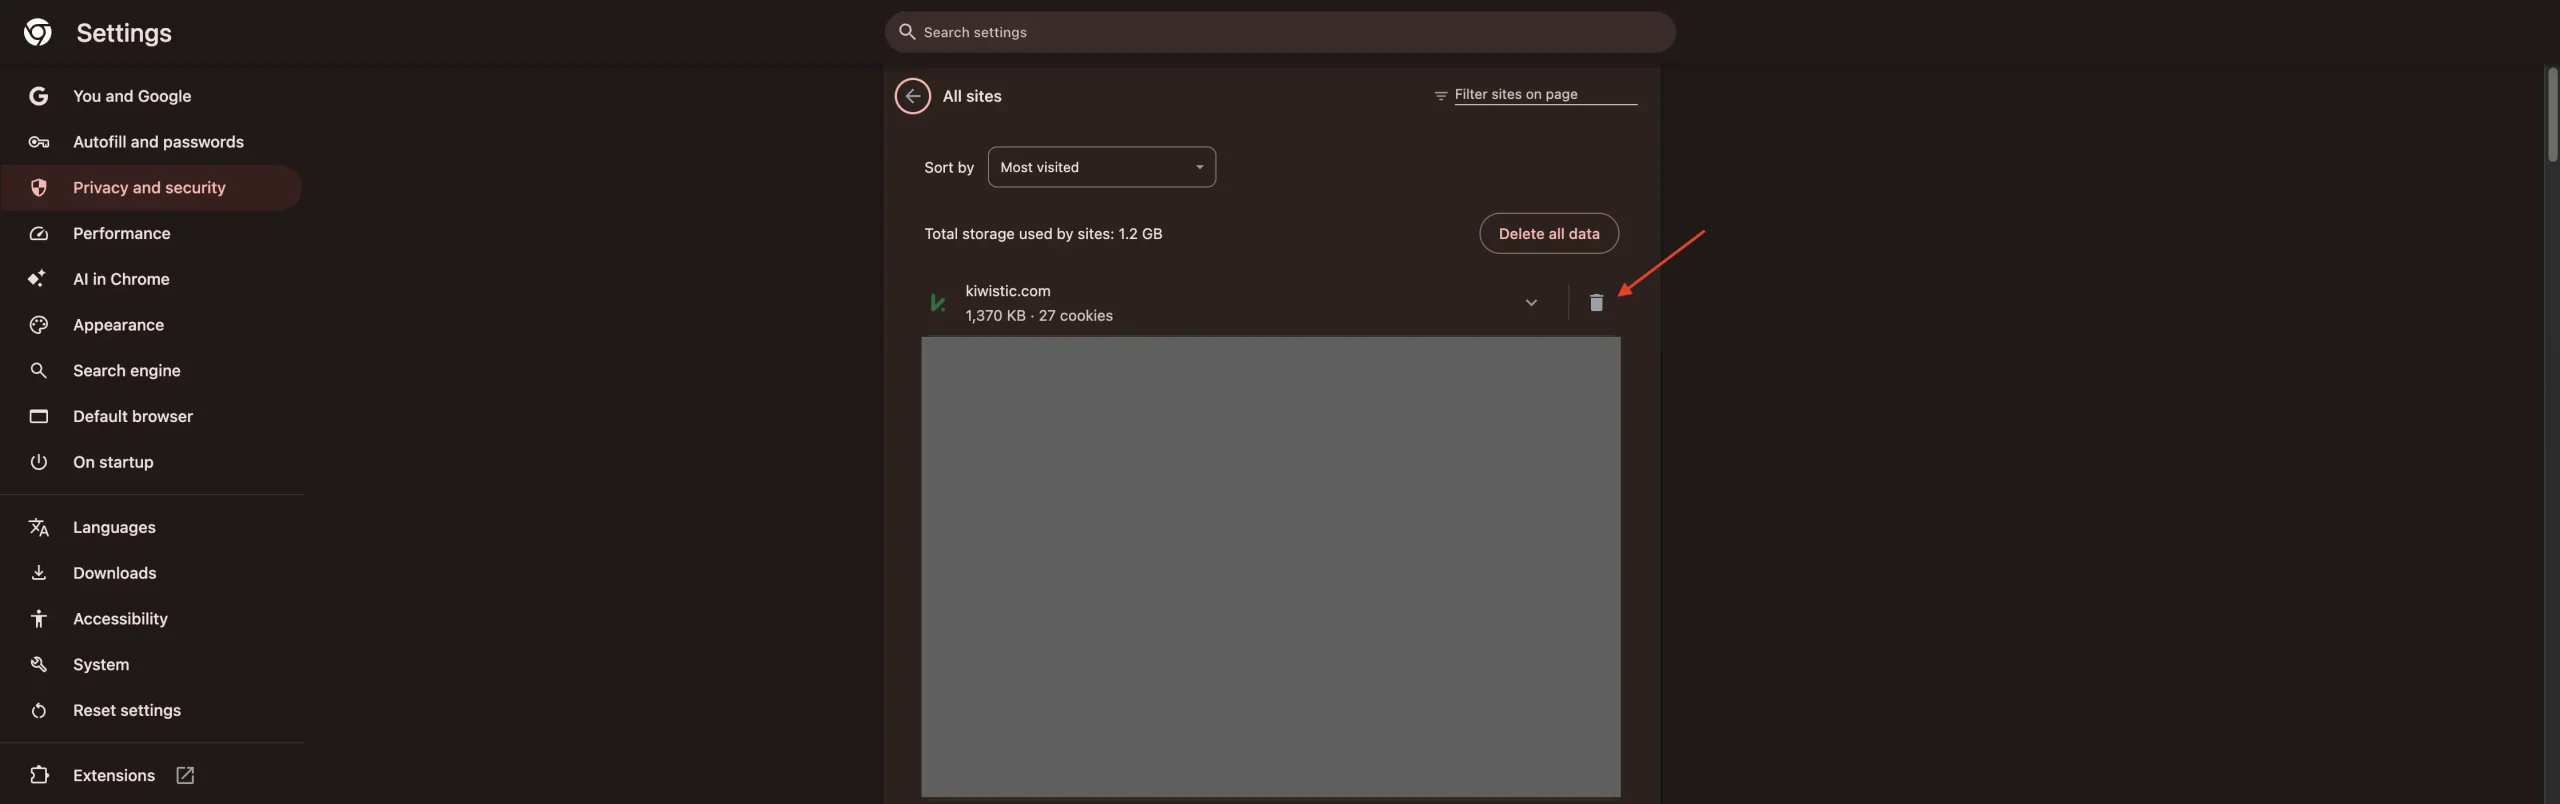
3. Search for your website’s domain.
4. Delete the stored site data for that domain.
5. Open the WordPress login page again and sign in.
If the problem continues, try clearing Chrome’s cached images and files through Settings → Privacy and security → Delete browsing data.
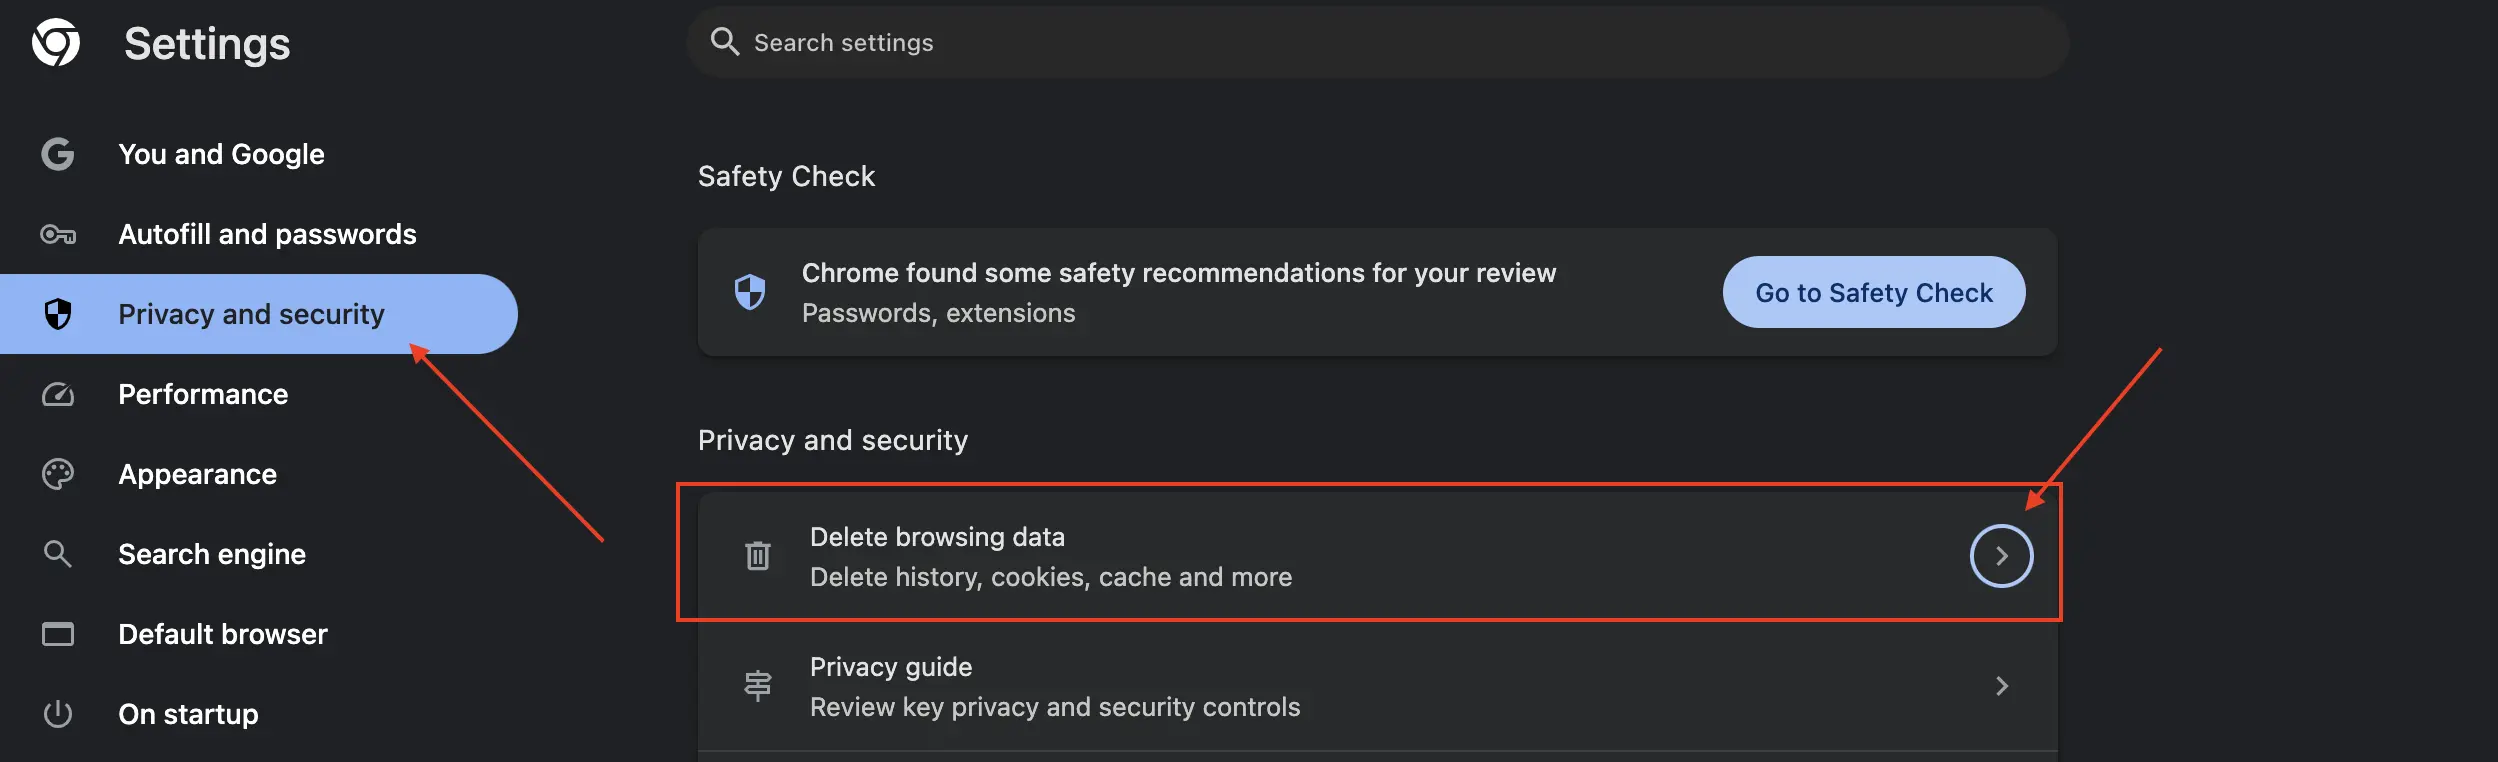
Note: Removing cookies for a domain signs you out of sessions associated with that domain.
Clear Cookies and Site Data in Mozilla Firefox
1. Open Firefox and go to Settings → Privacy & Security.
2. Find Cookies and Site Data.
3. Click Manage Data.
4. Search for your website’s domain.
5. Select the matching website data and click Remove Selected.
6. Save the changes and try logging in again.
Check Whether Cookies Are Being Blocked
If WordPress displays “Cookies are blocked or not supported by your browser”, check that your browser allows cookies for the website.
What if the login still redirects?
- A plugin interfering with authentication or redirects.
- Incorrect WordPress site URLs or an HTTP/HTTPS mismatch.
- Server-side caching or security rules affecting the login request.
Continue to Step 3 to check for plugin conflicts.
3. Rule Out Plugin Conflicts (The Safe Way)
Before You Disable Anything
Important: Before proceeding, make sure you have a recent backup of your website files and database. Disabling plugins can temporarily affect contact forms, payment processing, caching, security features, and other active functionality. On a busy WooCommerce store or another business-critical website, perform this test during a suitable maintenance window or on a staging copy when possible.
How to Disable WordPress Plugins Using FTP or File Manager
1. Connect to your website using an FTP/SFTP client or open the File Manager in your hosting control panel.
2. Locate the WordPress installation directory. It usually contains wp-admin, wp-content, and wp-includes.
3. Open the wp-content folder.
4. Find the folder named plugins.
5. Rename it to plugins-disabled.
6. Open your WordPress login page and try signing in again.
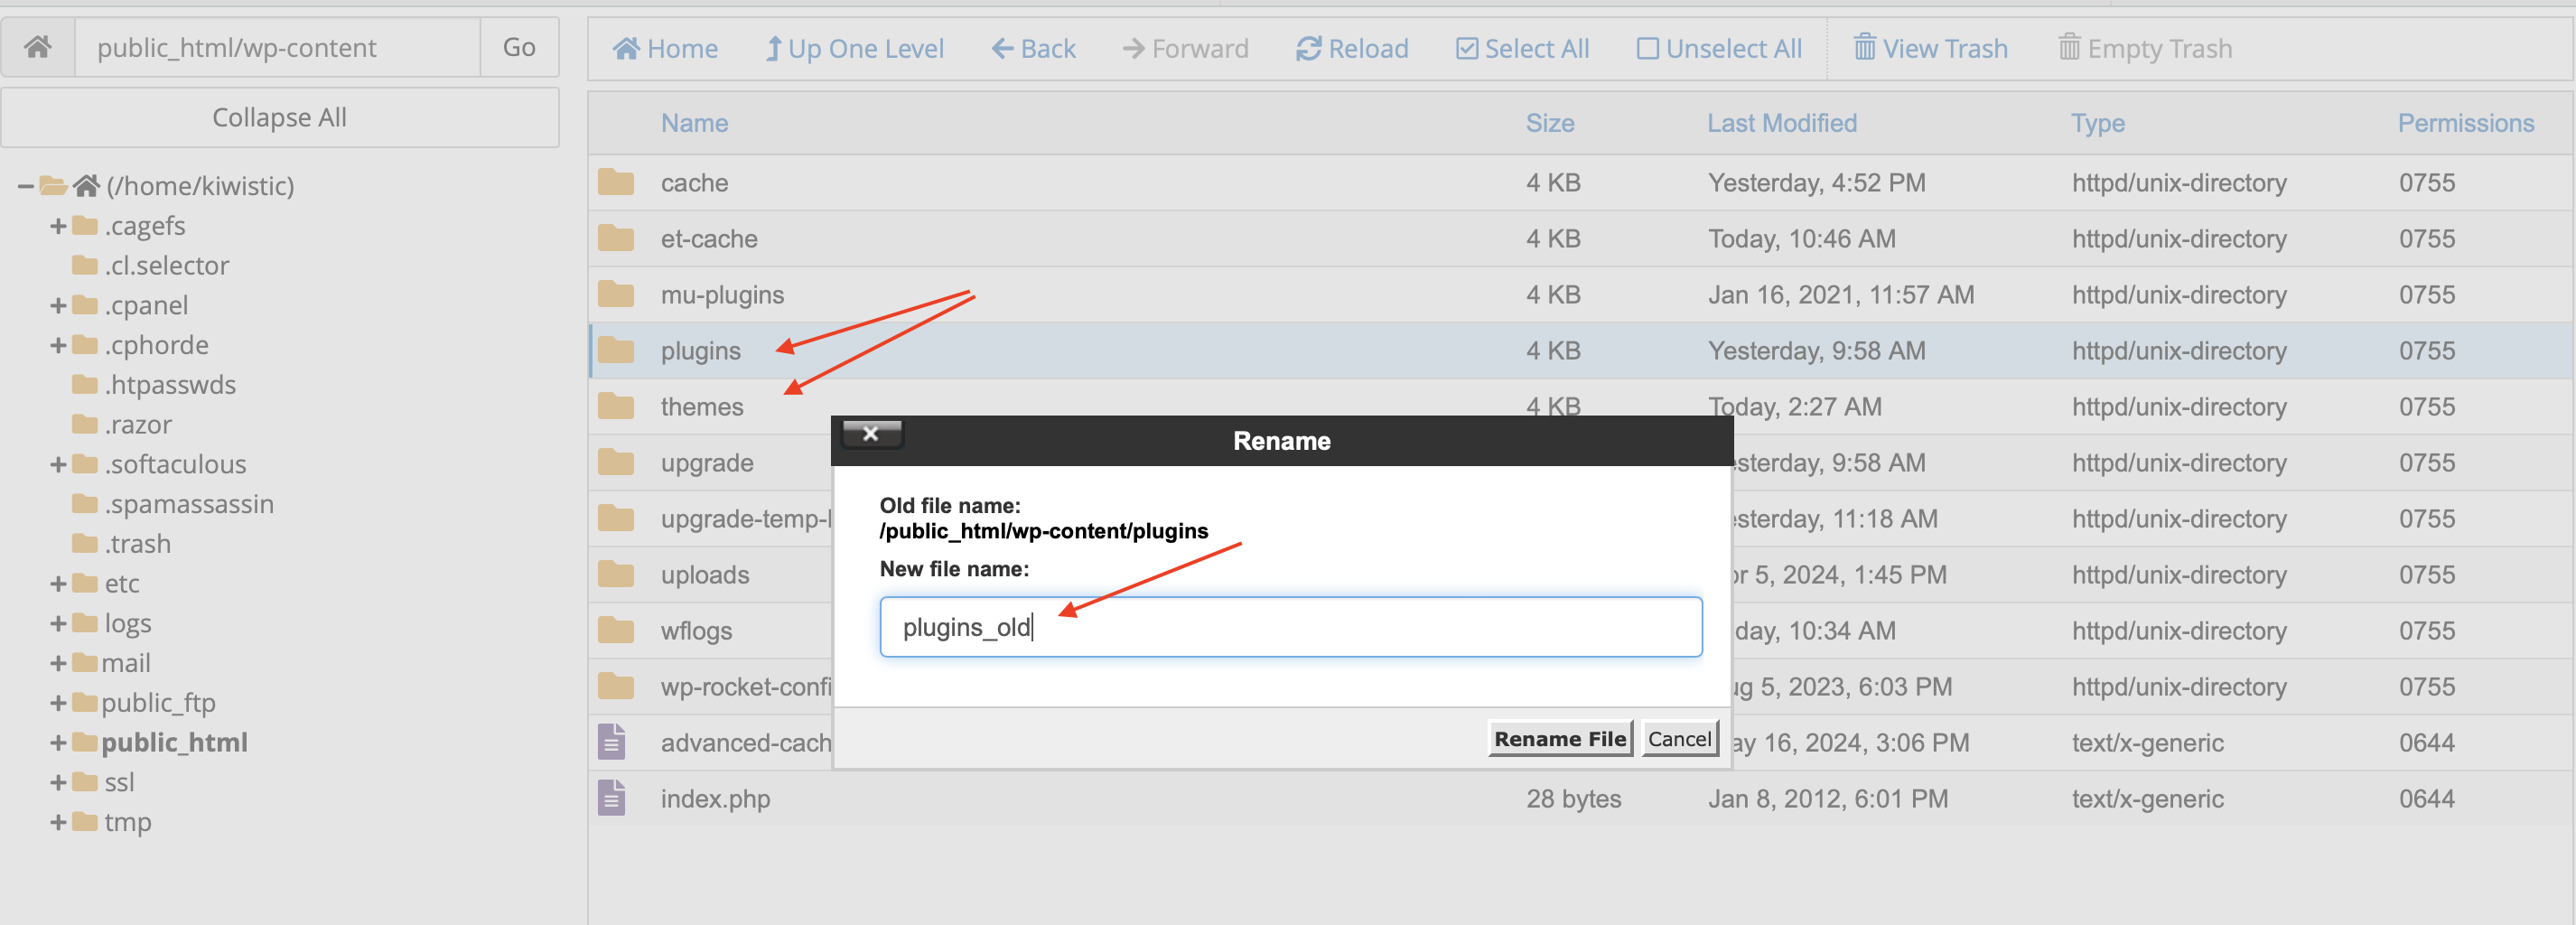
(This action is completely safe and reversible. By renaming the folder, WordPress can no longer find your plugins and will automatically disable all of them.)
If you can log in now: A standard plugin is likely involved. Continue with the isolation steps below.
If you still cannot log in: Rename plugins-disabled back to plugins. Don’t leave the folder renamed while investigating unrelated causes.
How to Identify the Problematic Plugin
1. Rename plugins-disabled back to plugins.
2. Open Plugins → Installed Plugins in your WordPress dashboard.
3. Check which plugins are inactive. You may need to reactivate them manually.
4. Reactivate one plugin at a time, testing the login and affected website features after each activation.
5. If the issue returns after activating a particular plugin, deactivate it again and investigate further.
Don’t delete the suspected plugin immediately. First, check its update history, compatibility, error logs, and available support or rollback options. Removing a plugin can also affect its settings or stored data.
What If the Plugin Folder Test Doesn’t Work?
Continue to Step 4: Switch to a Default WordPress Theme to test whether your active theme is contributing to the problem.
4. Switch to a Default WordPress Theme
Before Switching Themes
Check whether a default WordPress theme, such as Twenty Twenty-Five, is already installed and compatible with your WordPress version.
If you can access the dashboard, go to Appearance → Themes and check your installed themes. If you cannot access it, inspect the folders inside wp-content/themes using SFTP or your hosting File Manager.
Important: Switching themes on a live website can change its layout, navigation, widgets, and other theme-dependent features. Use a staging environment when possible, especially for a WooCommerce store or a business-critical website. Keep a recent backup before making changes.
Method A: Switch Themes from the WordPress Dashboard
1. Go to Appearance → Themes.
2. Find an installed default WordPress theme.
3. Select Activate.
4. Test the affected login or dashboard page.
5. Check whether the original error still appears.
Method B: Rename Your Active Theme Folder Using SFTP
1. Connect to your hosting account using SFTP or open its File Manager.
2. Navigate to wp-content/themes/.
3. Identify the folder belonging to your currently active theme.
4. Confirm that a compatible default WordPress theme is also installed.
5. Rename your active theme folder. For example, change my-theme to my-theme-disabled.
6. Reload your WordPress login page and try accessing the dashboard.
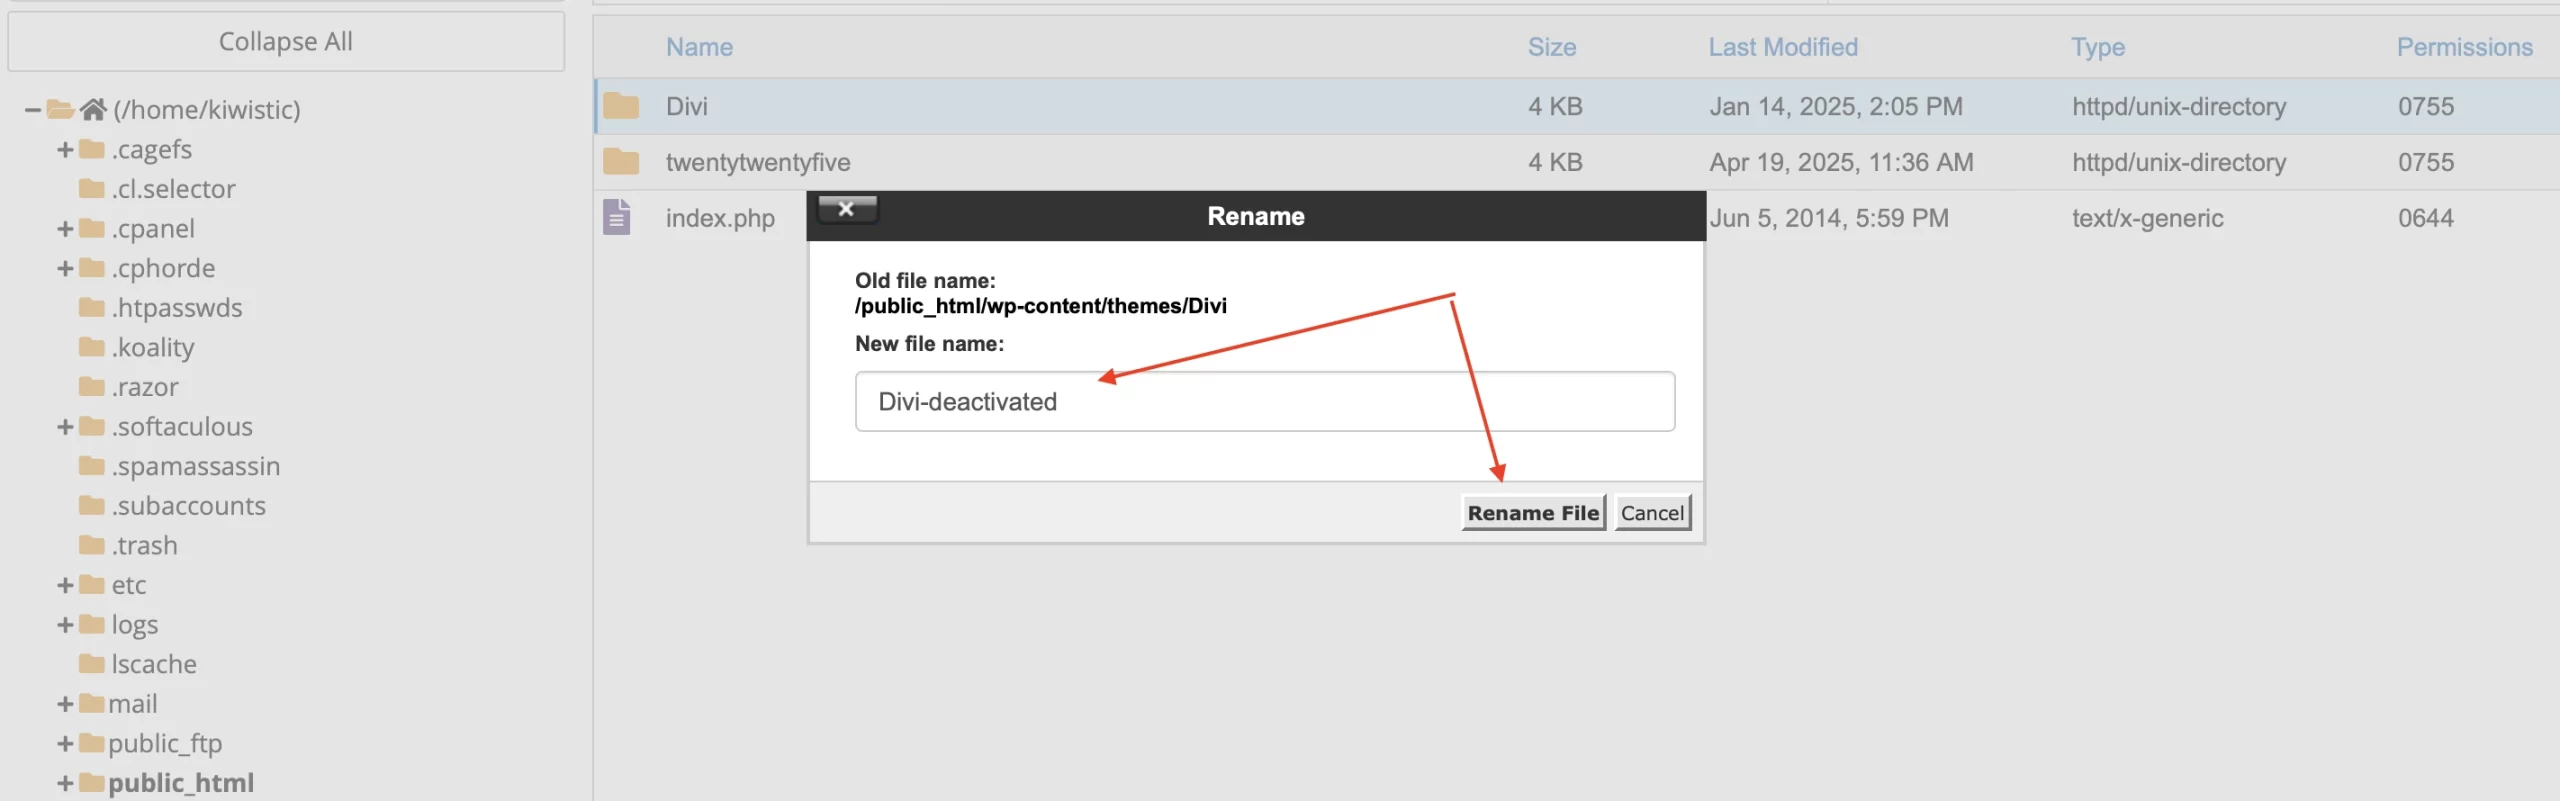
(This action tells WordPress it can no longer find your active theme. It will then automatically fall back to the most recent default theme it can find.)
If no usable fallback theme is installed, this test may leave the website displaying an error. Do not assume WordPress can automatically recover without another theme.
What Do the Results Tell You?
The login works with the default theme.
The login still fails
The website shows a new error
Restore Your Original Theme After Testing
1. Return to wp-content/themes/.
2. Rename the folder back to its original name.
3. If you can access WordPress, open Appearance → Themes.
4. Reactivate your original theme only when it is safe to do so.
5. Check the website’s layout, navigation, and important functionality.
If the problem persists after testing both plugins and themes, continue to Step 5: Fix a Corrupted .htaccess File to investigate possible server-level redirect or rewrite issues.
5. Fix a Corrupted .htaccess File
Check your .htaccess file if your WordPress login returns a 403 Forbidden or 500 Internal Server Error, or if the problem began after changes to redirects or server rules.
Not every WordPress website uses .htaccess. Standalone Nginx servers manage these rules through their server configuration instead. If you’re unsure which web server your hosting account uses, check with your hosting provider before editing anything.
Step 1: Back Up Your Existing .htaccess File
1. Connect to your hosting account using SFTP or File Manager.
2. Open the directory containing your WordPress installation, usually the same folder as wp-config.php.
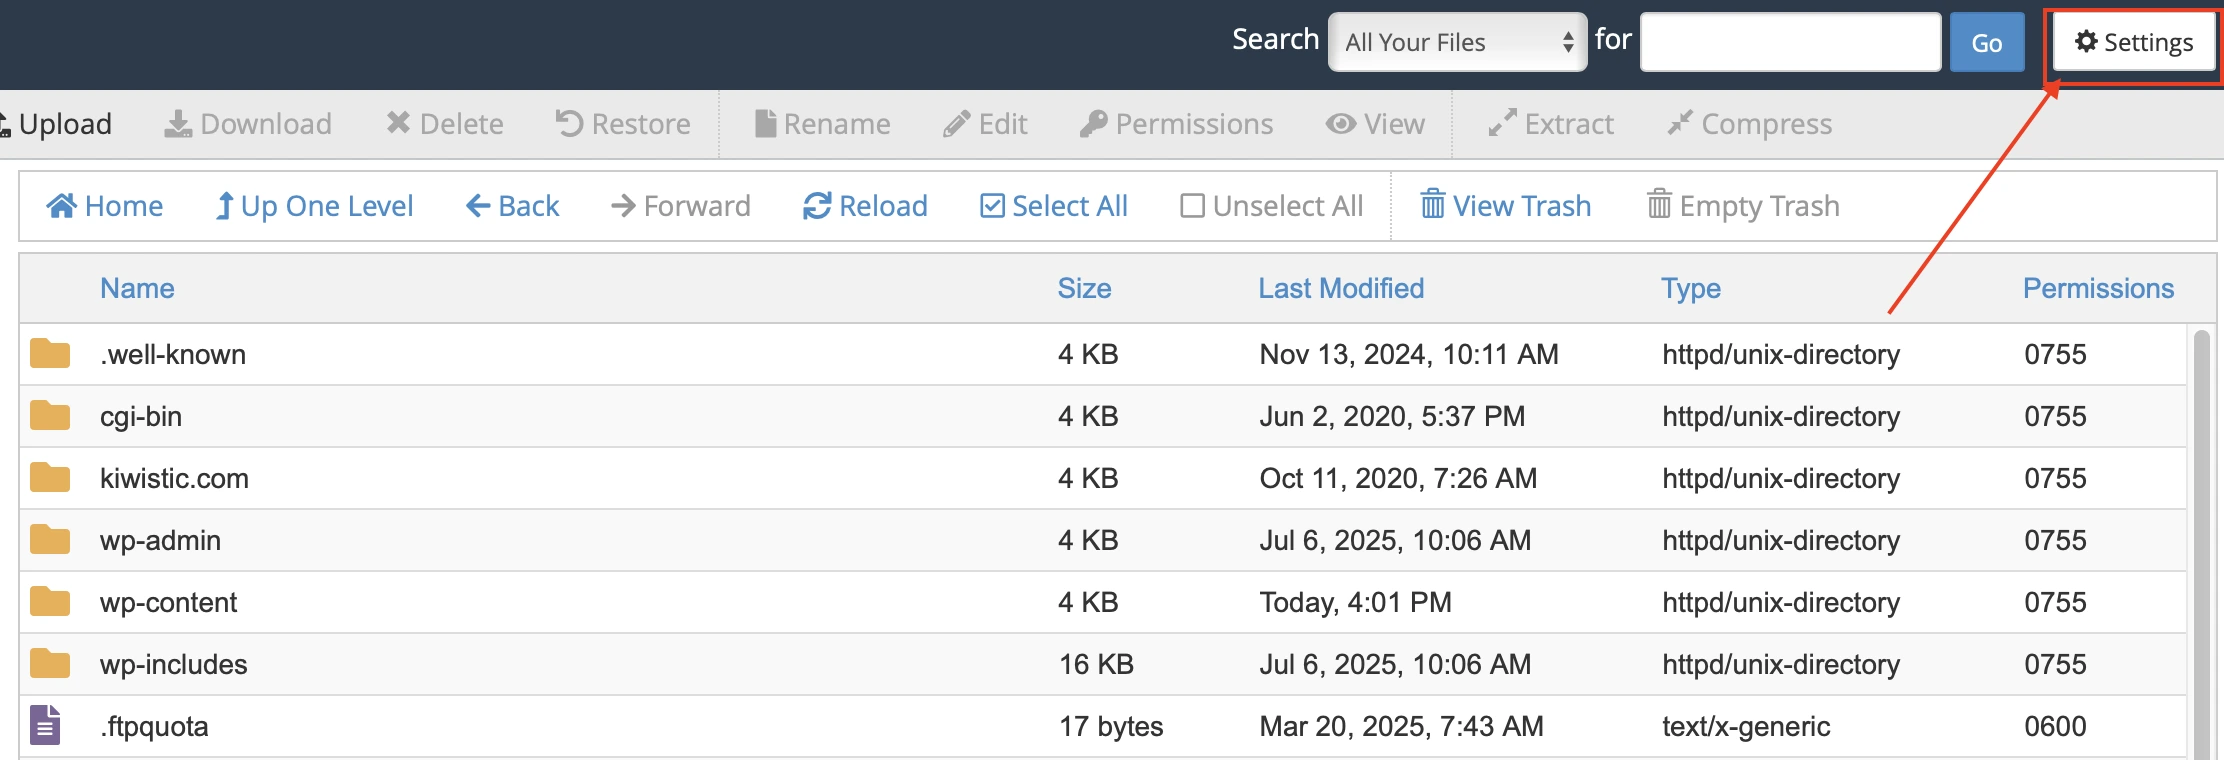
3. Enable Show Hidden Files if you cannot see .htaccess.
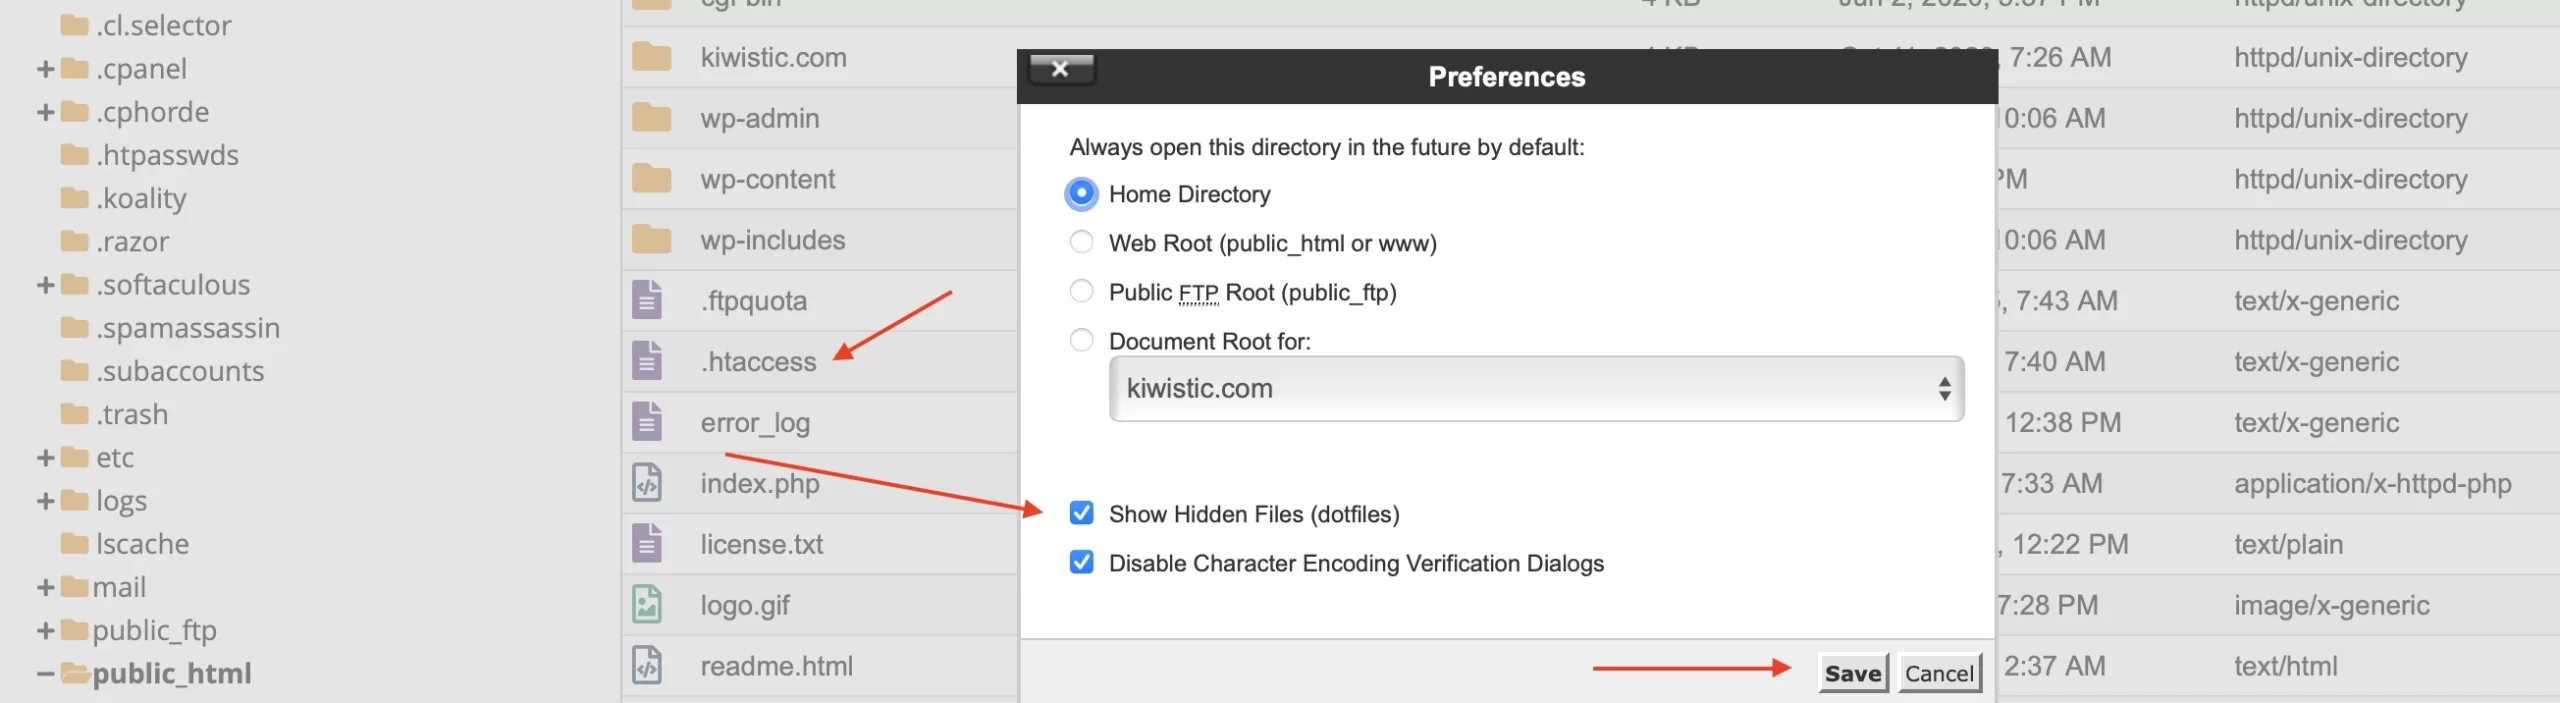
4. Download a copy of the file to your computer.
5. Check whether it contains custom redirects, security restrictions, or other rules you may need to restore later.
Step 2: Temporarily Rename the File
1. Find the .htaccess file in your WordPress installation directory.
2. Rename it to .htaccess_old.
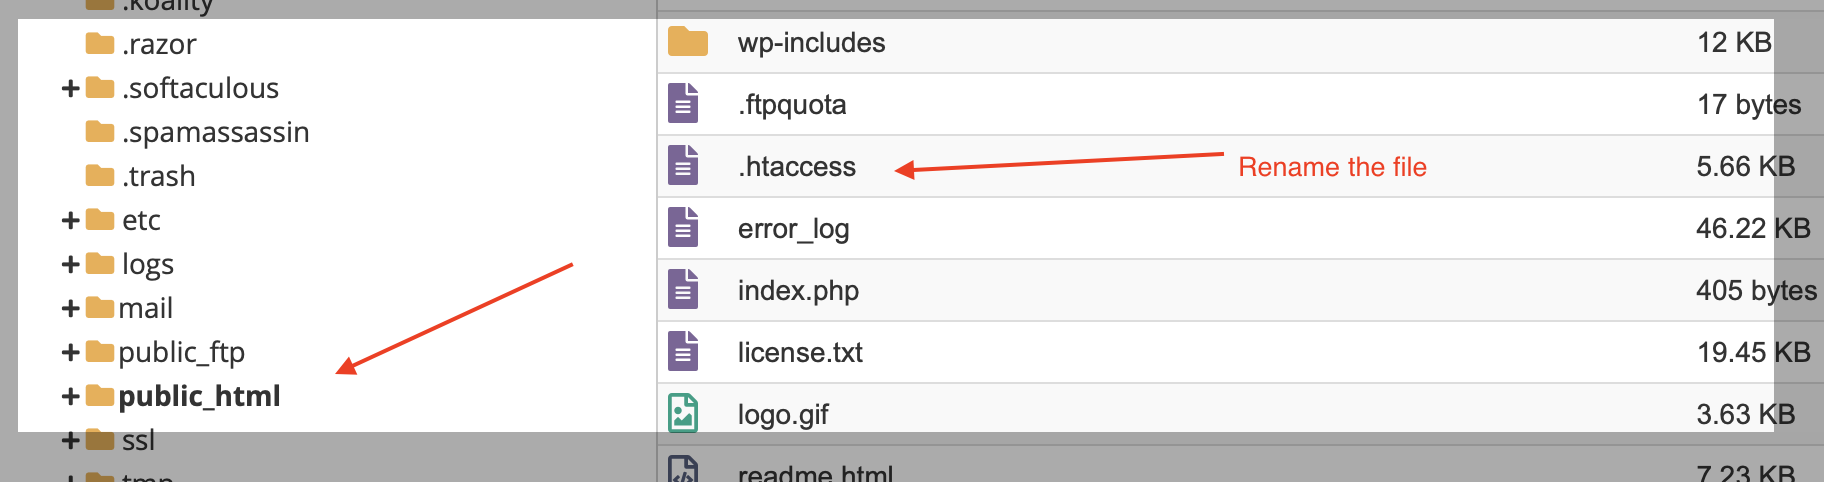
3. Open your WordPress login page again.
4. Check whether the original error still appears.
If your login works again: A rule in the original file may have caused the problem. Don’t delete the backup yet.
If the same error remains: Rename .htaccess_old back to .htaccess and continue troubleshooting. The file may not be responsible.
Step 3: Restore Your WordPress Permalink Rules
1. Sign in to your WordPress dashboard.
2. Go to Settings → Permalinks.
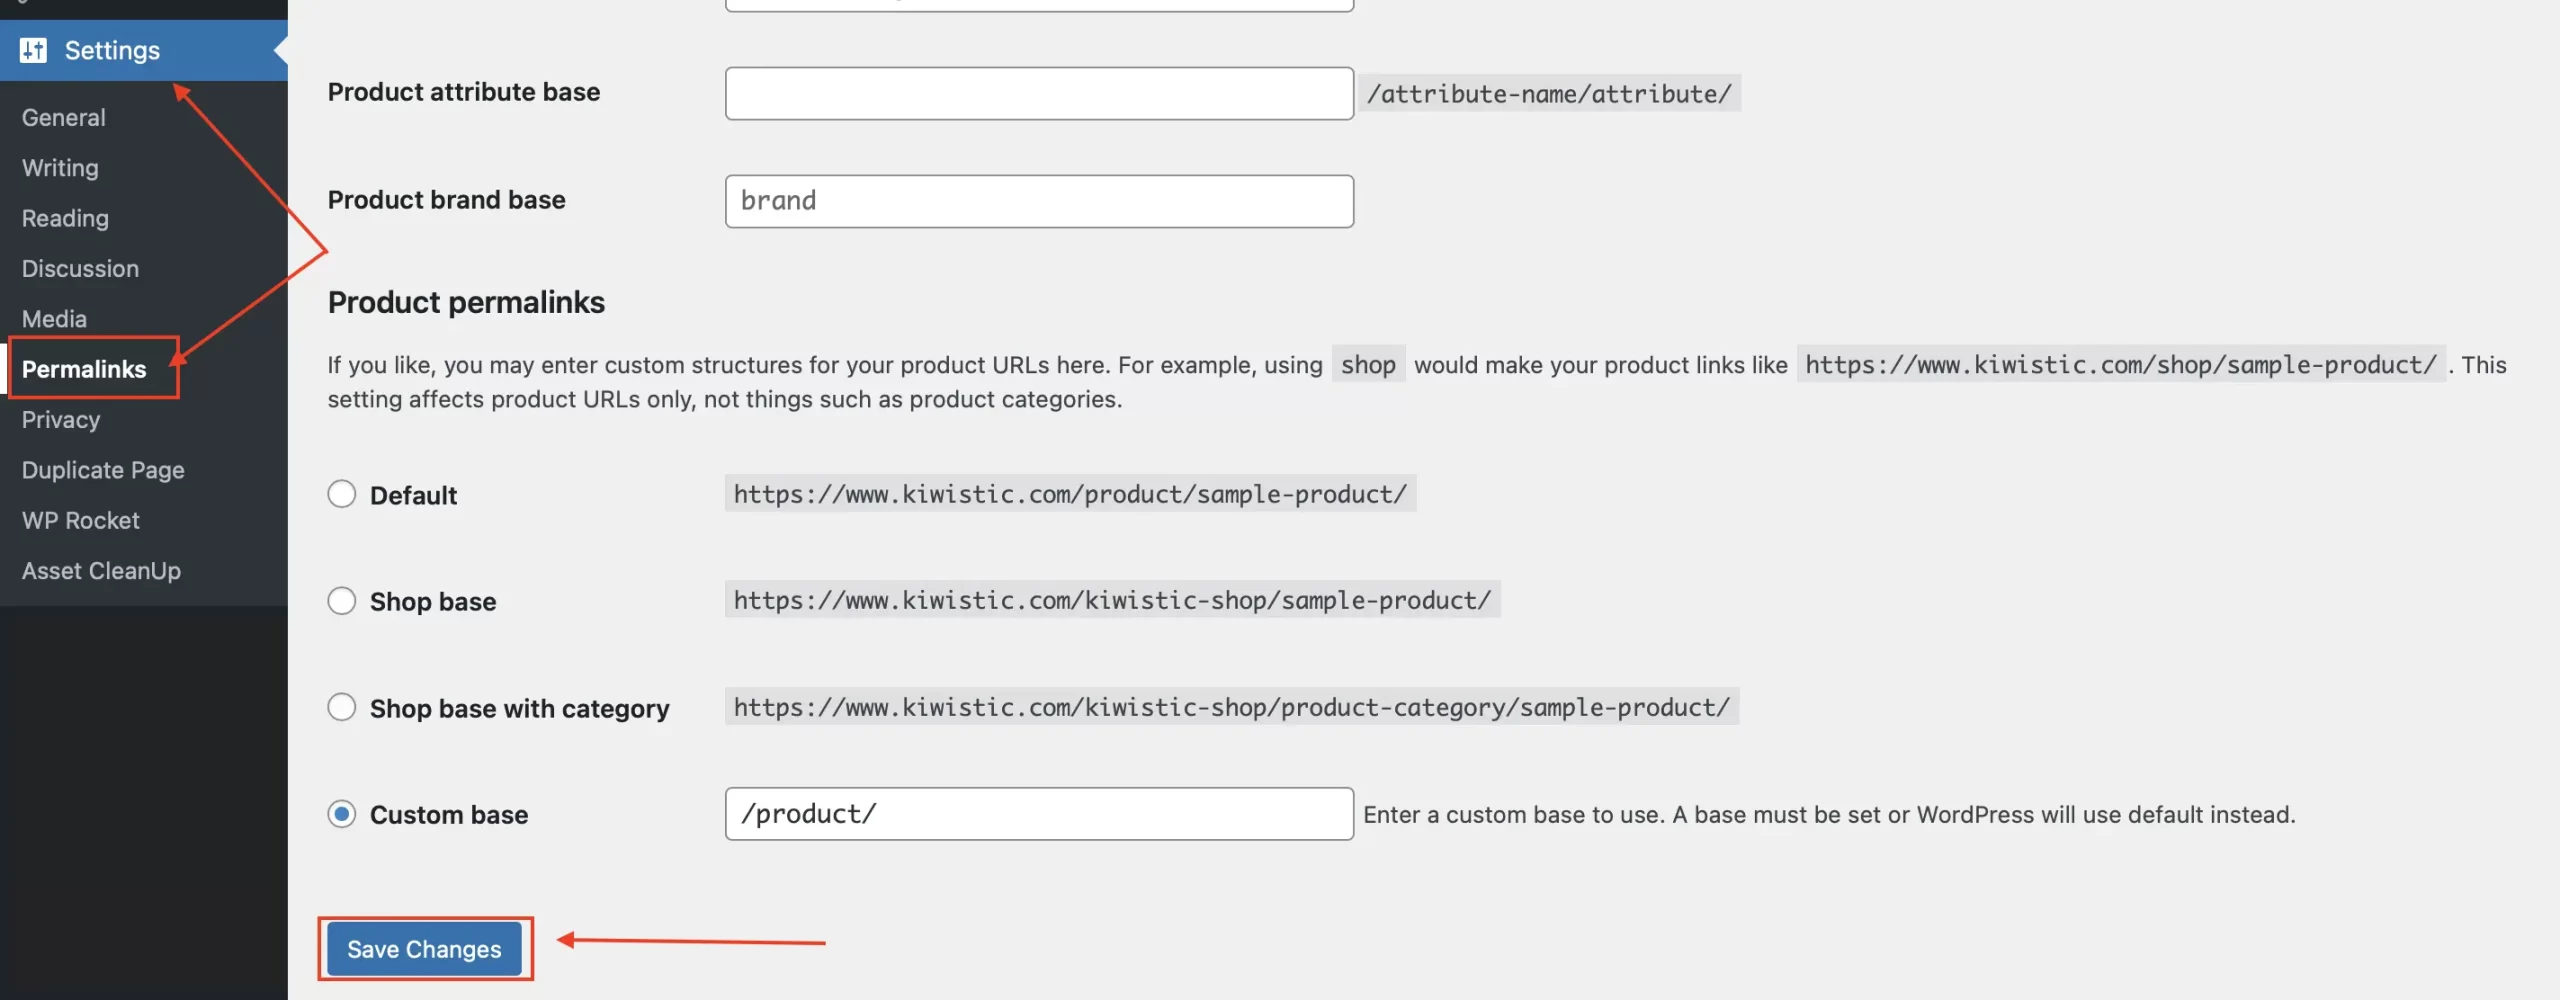
3. Keep your existing permalink structure unchanged.
4. Click Save Changes if you need WordPress to attempt to update the rewrite configuration.
4. Check whether a new .htaccess file has been created or updated.
Do not copy the entire old file back without reviewing it. That could restore the same rule that caused the error.
Step 4: Test More Than the Login Page
- Whether wp-login.php and wp-admin load correctly.
- Whether regular pages and blog posts open without 404 errors.
- Whether HTTPS and security restrictions continue to work.
- Whether contact forms and other important website features still function.
A successful login is only part of the test. A change to .htaccess can affect URLs and functionality elsewhere on the website.
What If Your Website Uses Nginx?
Still unable to log in? If the issue persists after checking the server rules, continue to Step 6: Verify Your WordPress Site URLs. Incorrect site addresses can also cause login redirects and prevent access to the dashboard.
6. Verify Your WordPress Site URLs
Check your WordPress site URLs if you keep getting redirected to the login page, see a “too many redirects” error, or lost dashboard access after moving your website or enabling HTTPS.
Step 1: Understand the Two WordPress URL Settings
- WordPress Address (URL): The location of your WordPress core files. This corresponds to WP_SITEURL.
- Site Address (URL): The public address visitors use to reach your website. This corresponds to WP_HOME.
- WP_HOME: https://example.com
- WP_SITEURL: https://example.com
- WP_HOME: https://example.com
- WP_SITEURL: https://example.com/wordpress
Step 2: Check Your wp-config.php File
1. Connect to your hosting account using SFTP or File Manager.
2. Open the folder containing your WordPress installation.
3. Locate wp-config.php.
4. Download a backup copy before making changes.
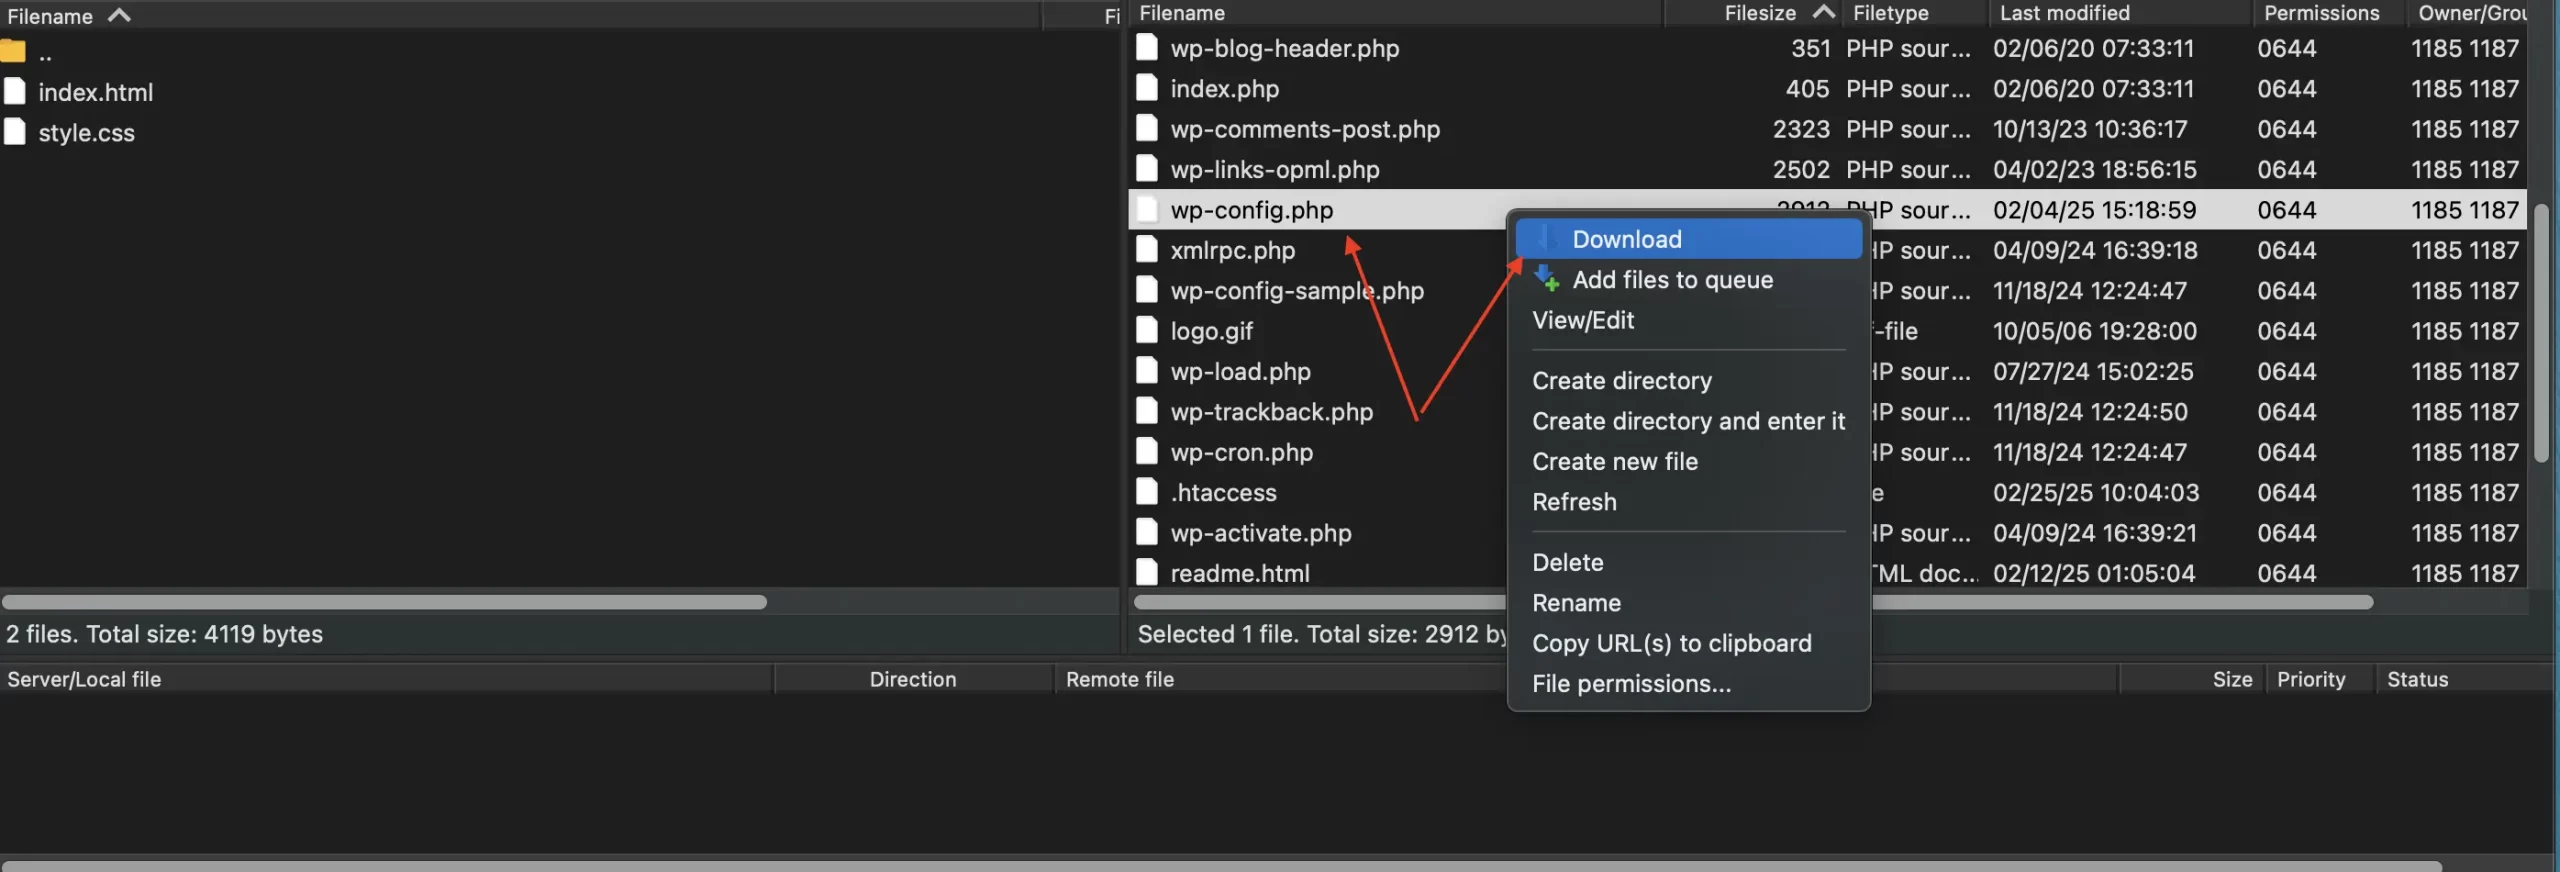
5. Open the file in a plain-text or code editor.
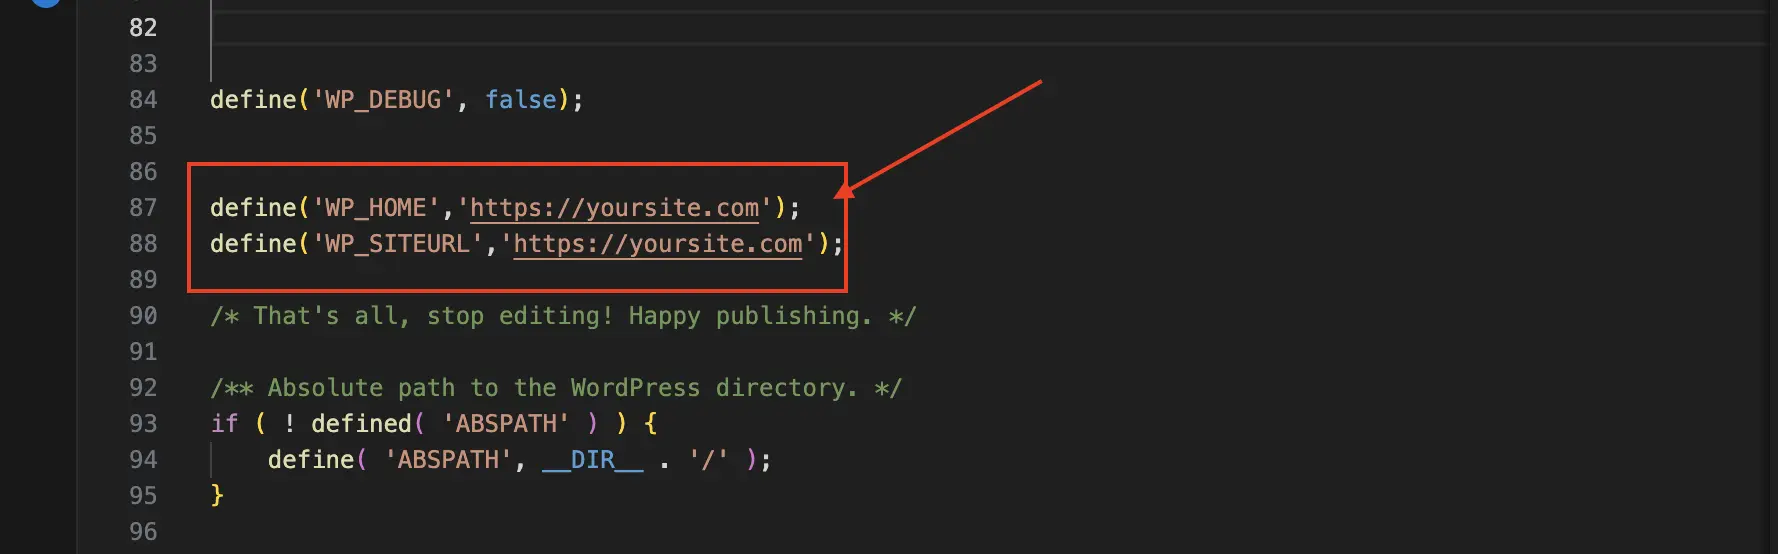
6. Search for WP_HOME and WP_SITEURL.
define( 'WP_HOME', 'https://example.com' );
define( 'WP_SITEURL', 'https://example.com' );
Step 3: Test a Temporary URL Correction
1. Keep a backup of the original configuration file.
2. Add or correct the WP_HOME and WP_SITEURL definitions using the verified addresses.
3. Place them before the line that says /* That's all, stop editing! Happy publishing. */.
4. Save the file.
4. Open your WordPress login page and try signing in again.
Important: These constants override the corresponding URL settings stored in the database. They do not update the database values themselves.
Step 4: Check the Stored URLs After Restoring Access
For a standard single-site WordPress installation, open Settings → General and look for:
- WordPress Address (URL)
- Site Address (URL)

Do not change the database URLs and configuration constants at random. Make sure you understand which values WordPress is currently using and have a reliable backup.
Step 5: Test the Login and Redirects
1. Open the website’s homepage.
2. Visit the correct wp-login.php URL for your installation.
3. Sign in and confirm that the dashboard loads.
4. Log out and repeat the login test.
5. Check that the browser stays on the intended HTTPS domain.
6. Test important internal pages and redirects.
If the login still fails: Restore your original configuration if your changes did not help, then continue to Step 7: Repair a Corrupted wp-login.php File.
7. Repair a Corrupted wp-login.php File
Consider this step if your WordPress login page displays a PHP error, fails to load, or stopped working after an interrupted WordPress update.
Step 1: Check Whether the Core File Is the Problem
- The login page produces a PHP fatal error referencing wp-login.php.
- The file is missing from your WordPress installation.
- A WordPress update or file transfer was interrupted.
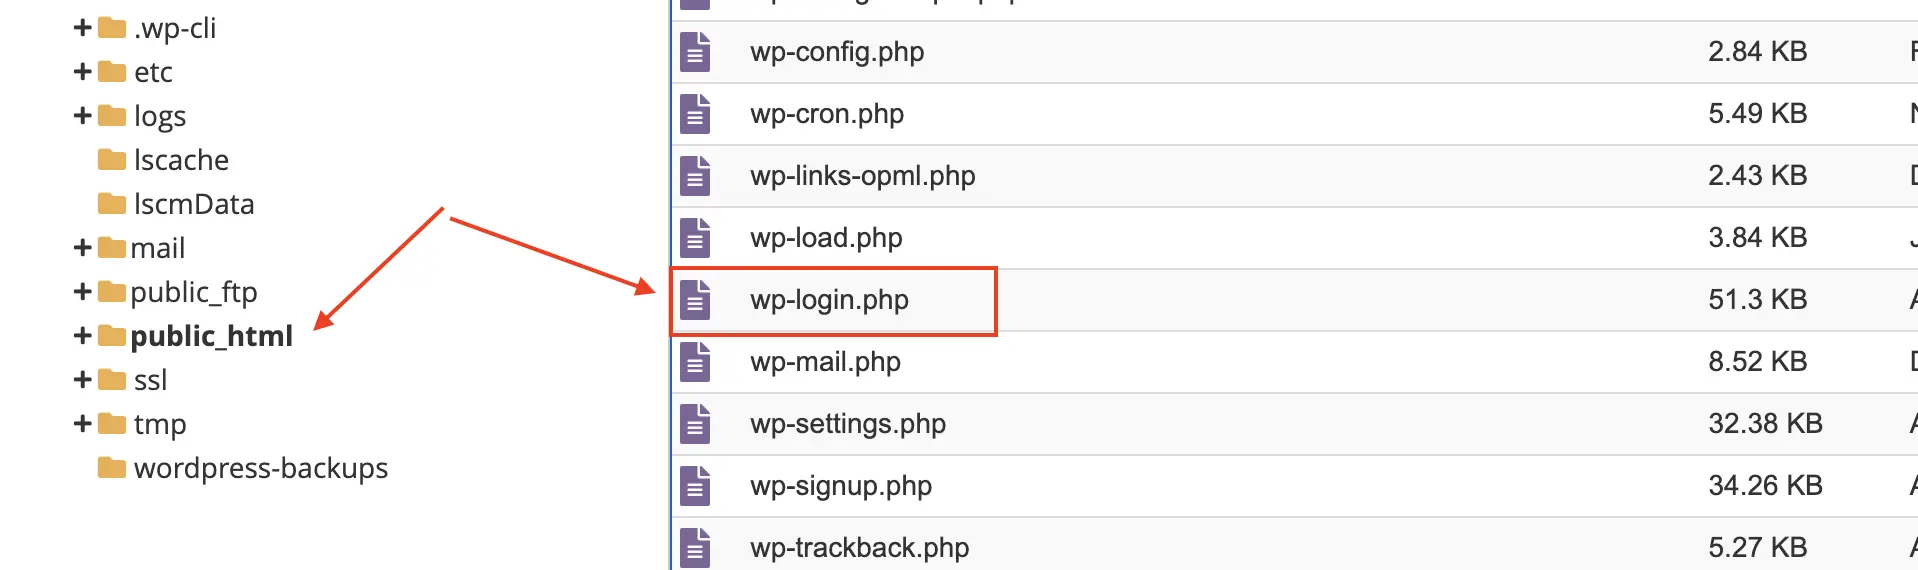
- A file integrity check reports that wp-login.php differs from the expected WordPress core file.
A changed file is not always proof of corruption. It could also indicate an unauthorized modification. If you suspect malware, investigate the wider installation instead of treating the replacement as a complete security fix.
Step 2: Back Up Your Existing WordPress Files
1. Connect to your website using SFTP or your hosting File Manager.
2. Open the directory containing your WordPress installation.
3. Locate wp-login.php, typically alongside wp-admin, wp-content, and wp-includes.
4. Download a copy of the existing wp-login.php file.
5. Confirm that you have a recent backup of your website files and database.
Step 3: Download a Clean Copy of WordPress
1. Identify the WordPress version currently installed on your website.
2. Visit the official WordPress download or release archive.
3. Download the appropriate WordPress package.
4. Extract the ZIP file on your computer.
5. Find wp-login.php inside the extracted WordPress folder.
Make sure the file comes from the correct WordPress release. Do not download an arbitrary copy from another website or assume that a file from a different WordPress version is interchangeable.
Step 4: Replace the Damaged wp-login.php File
1. Return to your website’s WordPress installation directory.
2. Rename the existing wp-login.php file to wp-login.php.bak to preserve a temporary copy.
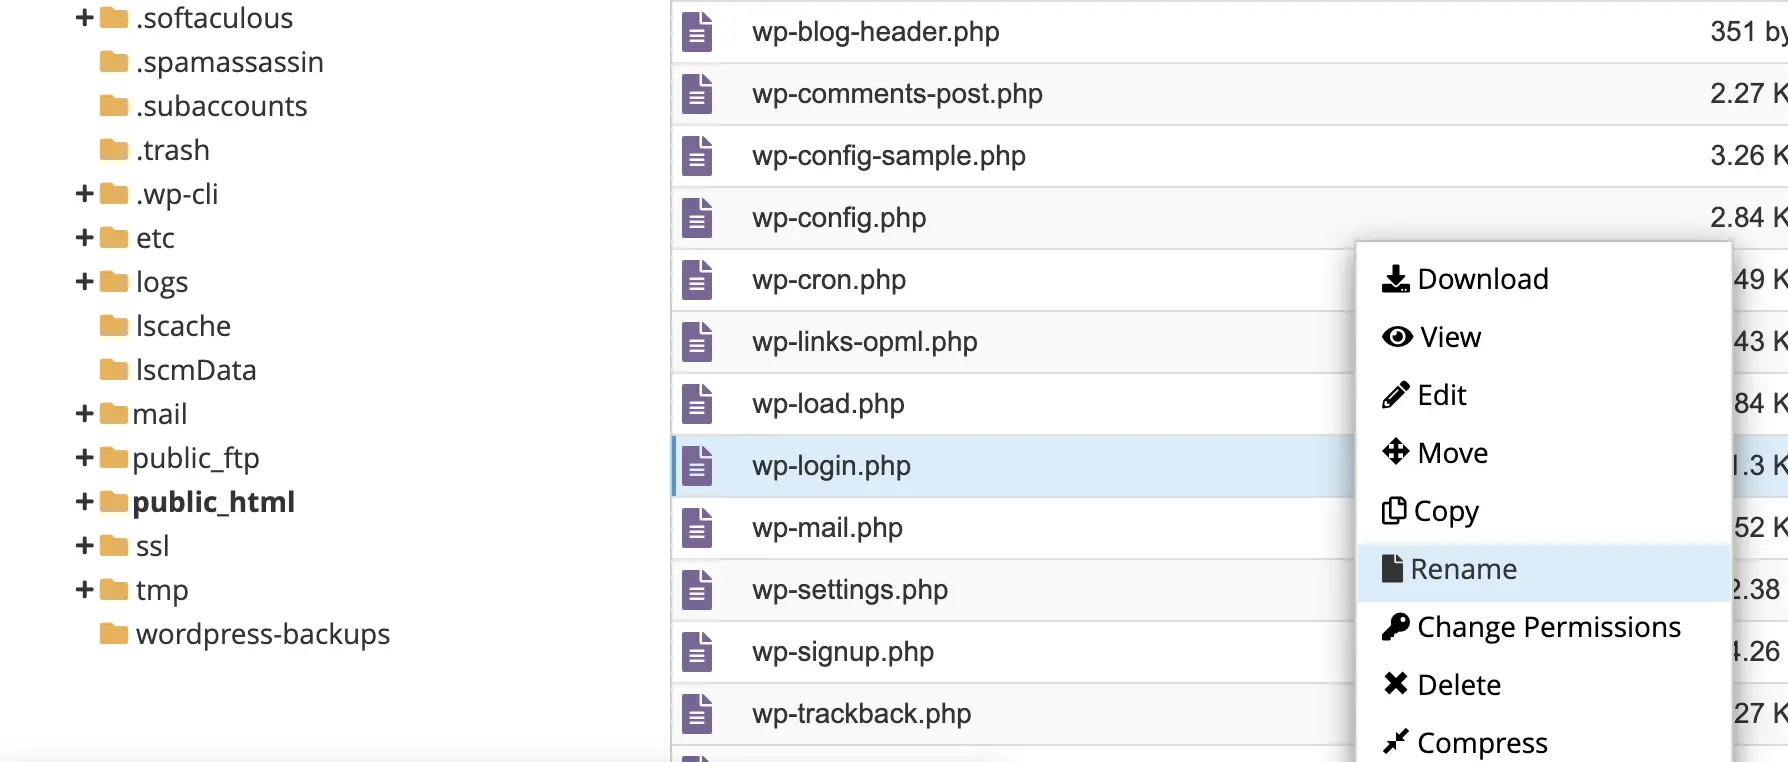
3. Upload the clean wp-login.php file from the verified WordPress package.
4. Confirm that the uploaded file has appropriate permissions for your hosting environment.
5. Open your WordPress login page and test it.
If the login page works again: The original file may have contributed to the problem.
If the error continues: Review the PHP error logs and other WordPress components rather than repeatedly replacing the same file.
Step 5: Check for Further WordPress Core Issues
1. Confirm that /wp-admin/ loads correctly.
2. Check whether WordPress reports an incomplete or pending core update.
3. Verify the integrity of the remaining WordPress core files.
4. Review PHP error logs for related problems.
5. Check for unexpected administrator accounts or suspicious file changes if you suspect unauthorized access.
Security note: If the original file contains suspicious or malicious code, do not restore it to the live website. Preserve a copy for investigation and examine the rest of the installation.
What If Replacing wp-login.php Doesn’t Fix the Login?
Continue to Step 8: Increase Your PHP Memory Limit only if you have evidence of a memory-related error. Increasing the memory limit will not resolve every WordPress login problem.
8. Increase Your PHP Memory Limit
Try this step if your WordPress login page displays an “Allowed memory size exhausted” error, or if your PHP error logs show that WordPress ran out of available memory during login.
Step 1: Confirm That PHP Memory Is the Problem
PHP Fatal error: Allowed memory size of 134217728 bytes exhausted- Your hosting control panel’s PHP error logs.
- WordPress debug logs, if logging was already enabled.
- A technical error report provided by your hosting company.
Important: A memory error tells you that PHP exhausted its available memory. It does not tell you which plugin, theme function, or process is responsible.
Step 2: Check Your Current Memory Settings
- WP_MEMORY_LIMIT: The memory limit WordPress requests for normal execution.
- WP_MAX_MEMORY_LIMIT: The higher memory limit WordPress can request for certain administrative operations.
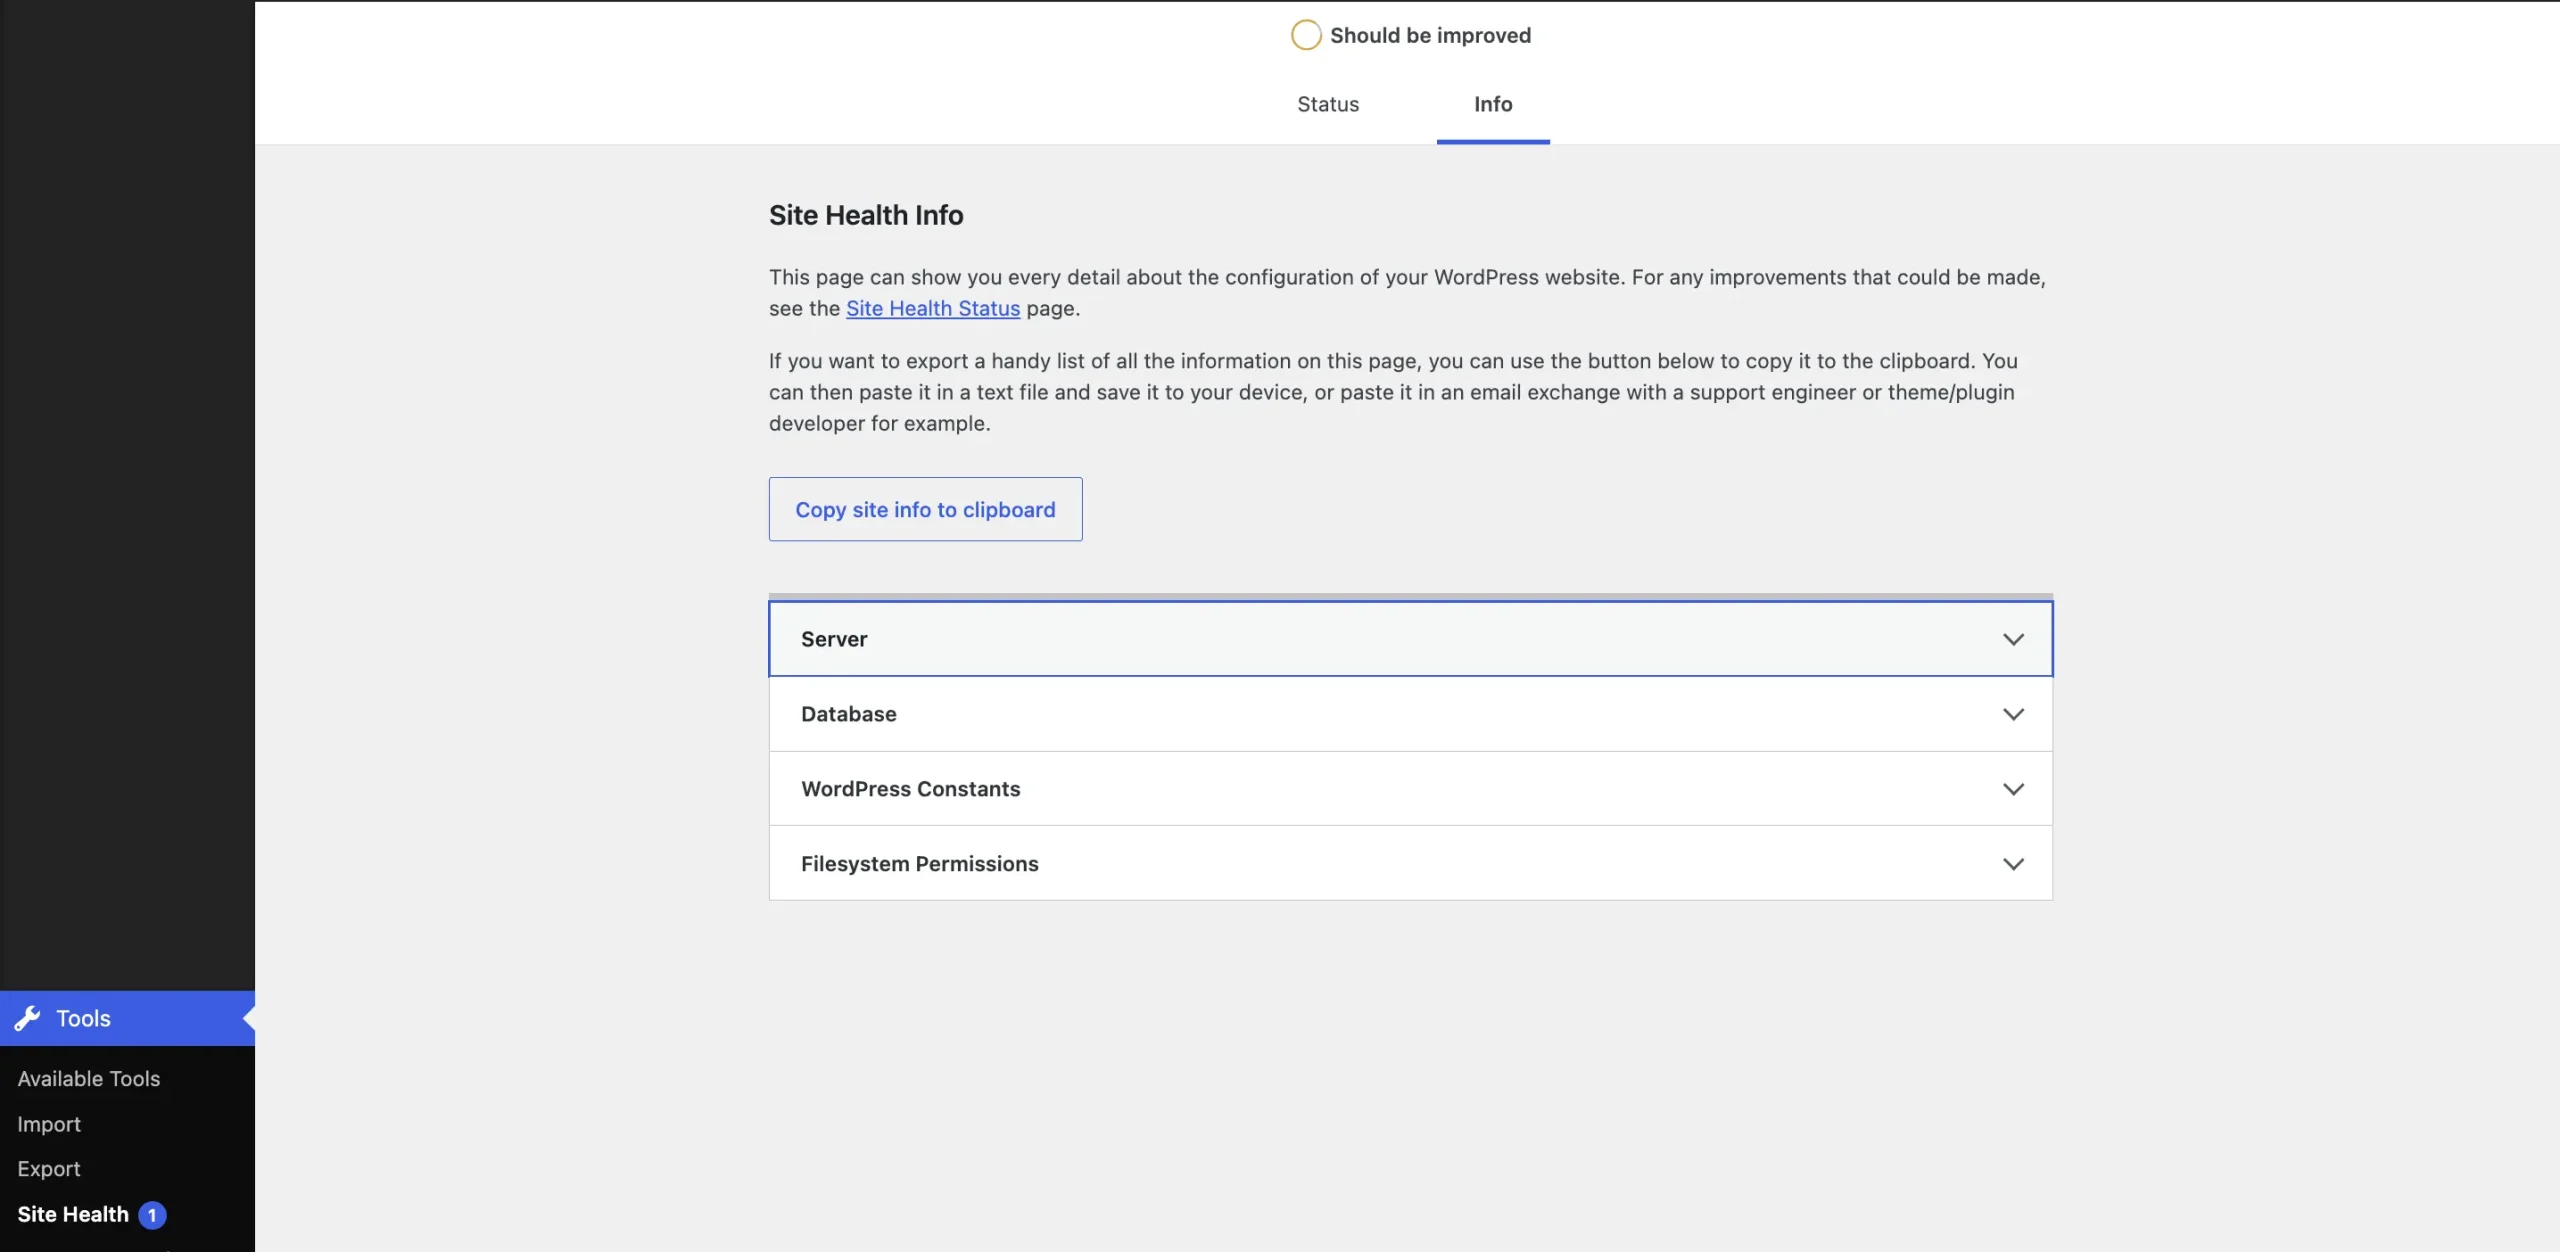
If you can access the dashboard, check Tools → Site Health → Info → Server for the PHP memory limit reported by WordPress.
Step 3: Adjust the WordPress Memory Limit
1. Connect to your website using SFTP or your hosting File Manager.
2. Locate wp-config.php in your WordPress installation.
3. Download a backup copy before editing.
4. Open the file in a code editor.
5. Search for an existing WP_MEMORY_LIMIT definition.
6. If one exists, review and update it rather than adding a duplicate.
7. Save the file and test the login again.
For example, to request a 512 MB memory limit for normal WordPress execution:
define( ‘WP_MEMORY_LIMIT’, ‘512M’ );
/* That's all, stop editing! Happy publishing. */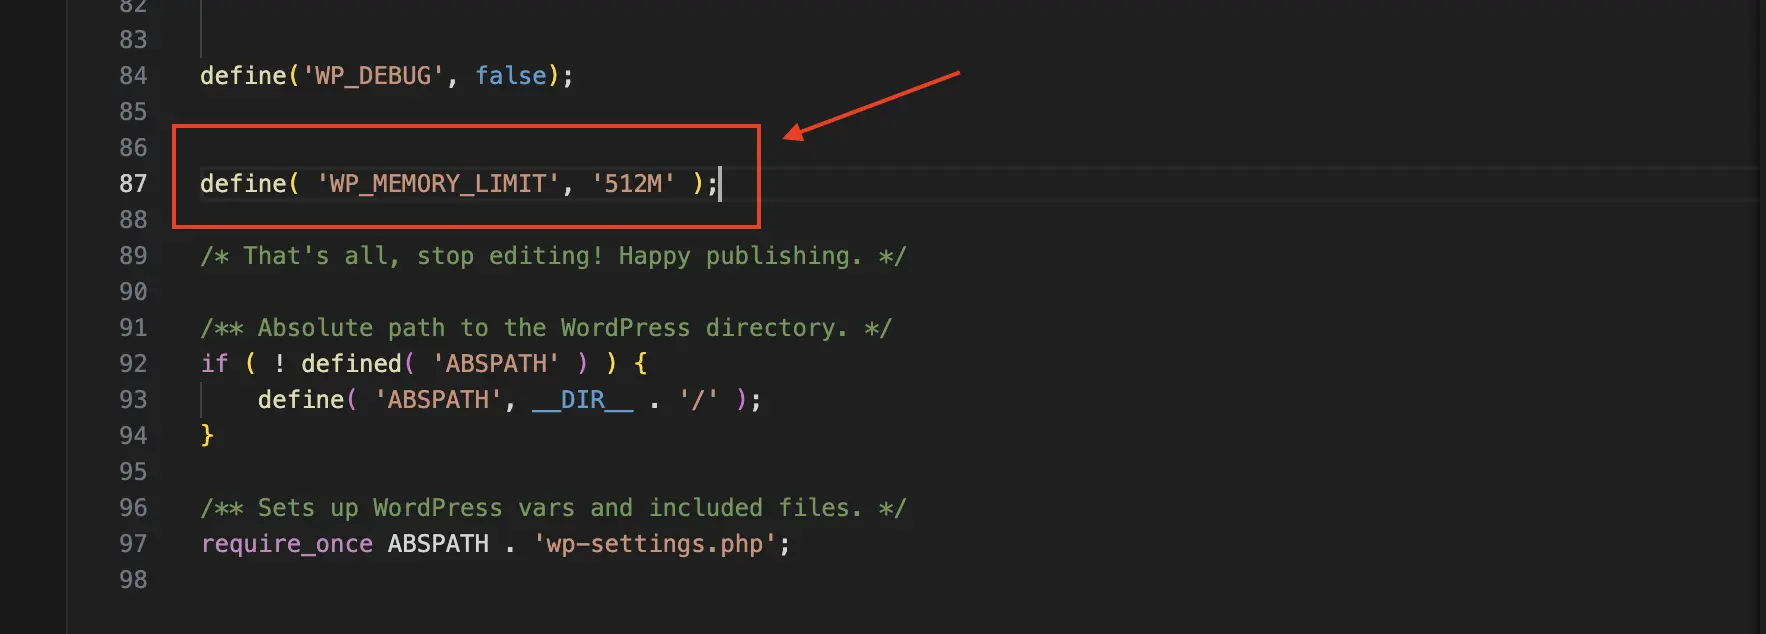
512 MB is an example, not a required setting for every website. The appropriate value depends on your actual memory usage, hosting resources, and application requirements.
Step 4: Check the WordPress Admin Memory Limit
define( ‘WP_MAX_MEMORY_LIMIT’, ‘512M’ );
Do not increase WP_MAX_MEMORY_LIMIT simply because the login form fails. First verify whether the failing process is affected by that setting.
Step 5: Check Your Hosting PHP Memory Limit
memory_limit = 256M
This is an example of a PHP configuration setting, not PHP code to paste into wp-config.php.
Step 6: Retest and Identify the Underlying Cause
1. Reload your WordPress login page.
2. Try signing in.
3. Check whether the previous memory error appears again.
4. Review the PHP logs for new errors.
5. If access is restored, inspect recently updated plugins, theme functions, and resource-intensive operations.
If increasing the limit resolves the error, don’t stop investigating automatically.
Still unable to access WordPress? Continue to Step 9: Check for a Database Connection Error, but only if the website displays a database-related error or the logs indicate a database connection failure.
9. Check for a Database Connection Error
Use this step if WordPress displays “Error establishing a database connection” when you open the website or try to access the login page.
Step 1: Check Your Database Credentials in wp-config.php
1. Connect to your hosting account using SFTP or File Manager.
2. Open your WordPress installation directory.
3. Locate wp-config.php and download a backup copy.
4. Open the file in a code editor.
5. Find the database configuration section.
define( ‘DB_NAME’, ‘example_database’ );
define( ‘DB_USER’, ‘example_user’ );
define( ‘DB_PASSWORD’, ‘your_database_password’ );
define( ‘DB_HOST’, ‘localhost’ );
- DB_NAME: The name of the database WordPress connects to.
- DB_USER: The database account used by WordPress.
- DB_PASSWORD: The password for that database account.
- DB_HOST: The address of the database server.

Don’t assume DB_HOST must be localhost. Some hosting providers use a separate hostname, IP address, port, or socket.
Step 2: Verify the Database in Your Hosting Panel
In cPanel, this information is commonly available under MySQL Databases or Manage My Databases. Other hosting panels may use different names.
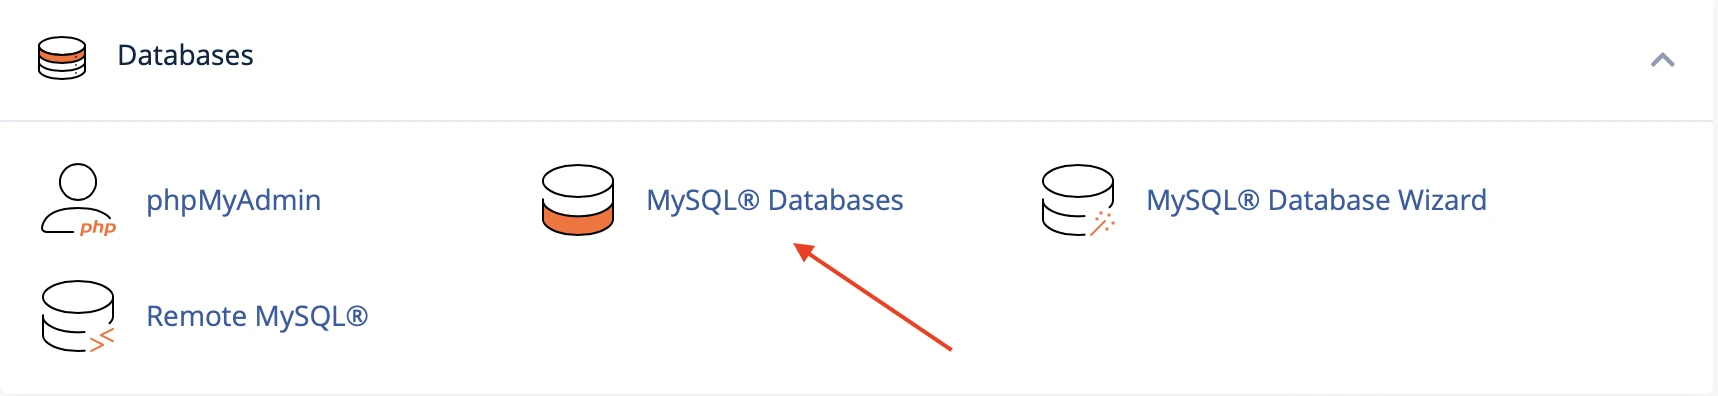
1. The database listed in your hosting panel matches DB_NAME.
2. The database user matches DB_USER.
3. The database user is assigned to the correct database.
4. The user has the permissions required by WordPress.
5. The database hostname matches the value supplied by your hosting provider.
Be careful with database passwords. Most hosting panels do not display an existing database password in plain text.
Step 3: Check Whether the Database Server Is Available
- Connection refused or connection timed out.
- Access denied for the configured database user.
- Too many database connections.
- Database server unavailable.
Step 4: Check Database Health Only After Connectivity Is Restored
wp db check
Do not run database repair, reset, or restore commands without understanding their effects and having a verified backup. In particular, a database reset is not a troubleshooting shortcut, it can remove website data.
Step 5: Confirm the Website Is Working Again
1. Reload the homepage and confirm it opens normally.
2. Visit the WordPress login page.
3. Sign in with a valid administrator account.
4. Check that the dashboard loads without database errors.
5. Test a few important pages and database-dependent features.
6. Review the logs to confirm the original connection error is no longer occurring.
If the database is working but you still cannot log in, return to the error-specific checks earlier in this guide. A successful database connection does not automatically resolve incorrect credentials, cookie problems, or authentication-related plugin conflicts.
How to Prevent Future WordPress Login Issues
1. Keep WordPress, Plugins, and Themes Updated
- Back up your website before significant changes.
- Review plugin and theme compatibility.
- Test major changes on a staging website when possible.
- Check the login page, dashboard, forms, and important website features after updating.
2. Protect Your Administrator Accounts
- Remove accounts that no longer need access.
- Give users only the permissions required for their work.
- Keep the email addresses associated with administrator accounts current.
- Secure the email accounts used for WordPress password recovery.
3. Maintain Reliable Backups and Test Restores
4. Monitor Website Errors Before They Become Bigger Problems
- Failed plugin or WordPress core updates.
- Repeated PHP fatal errors.
- Unexpected redirects.
- Unusual login activity.
- Website downtime or recurring server errors.
5. Keep an Alternative Recovery Method Available
6. Follow a Consistent Maintenance Routine
If you’d rather have these tasks handled regularly, Kiwistic’s WordPress maintenance services cover ongoing updates, backups, monitoring, and technical support.
Conclusion
If you’ve restored access, check that your dashboard, website pages, and essential features work correctly before considering the issue resolved. Keep a reliable backup, document any changes you made, and investigate recurring errors rather than applying the same temporary fix again.
FAQ
Why does my WordPress login page keep refreshing or redirecting?
A login page that refreshes or redirects without signing you in can indicate a problem with authentication cookies, WordPress URL settings, plugins, or server redirects.
Start by testing the login in a private browser window. If the problem also occurs in another browser, investigate the site’s URL configuration and authentication-related plugins. Avoid changing .htaccess rules unless the symptoms or server logs give you a reason to suspect them.
How can I find my WordPress username if I've forgotten it?
The WordPress password-reset form accepts either a username or the email address associated with your account.
If you don’t remember either, an authorized administrator with database access can inspect the WordPress users table through phpMyAdmin. The table is commonly named wp_users, but its prefix may be different. Look for your account in the user_login and user_email columns.
Don’t create another administrator account until you’ve confirmed whether your original account still exists.
What does a blank white screen on my WordPress login page mean?
A blank white screen can be caused by a PHP fatal error, but the screen alone doesn’t identify the cause.
Check the PHP error logs for the time of the failed request. Common areas to investigate include recently updated plugins, theme code, incompatible PHP changes, and memory exhaustion.
Use the error details to choose the next step instead of immediately increasing the PHP memory limit or replacing WordPress core files.
What if I lose access to my WordPress two-factor authentication (2FA) app?
If another authorized administrator can access WordPress, they may be able to help reset your 2FA setup.
If neither option is available, the recovery process depends on how 2FA was configured. Some plugins provide administrator or command-line recovery methods, while other authentication systems may be managed outside WordPress.
Avoid disabling your site’s security protections without verifying the appropriate recovery procedure. Once access is restored, configure 2FA again and securely store new recovery codes.
Why can I log in to WordPress but not access wp-admin?
A redirect back to the login screen may point to an authentication cookie or URL configuration problem. A 403 error may indicate a server security rule or access restriction. A message saying you don’t have permission to access a page may involve your WordPress user role or capabilities.
If you see a critical error instead, check the PHP logs and recent plugin or theme changes.
The correct fix depends on the error. Don’t reset your password repeatedly if WordPress is already accepting your credentials.