TL;DR
To manually update a WordPress plugin, go to Plugins → Installed Plugins and click Update Now next to the plugin. Back up your website first and test important features after the update. If the dashboard update fails or isn’t available, you can replace the plugin files through SFTP or your hosting File Manager using a verified plugin package. Always keep a recovery option in case the update causes problems.
Why Regular WordPress Plugin Updates Matter
1. Security fixes. Some updates address vulnerabilities that could otherwise be exploited. Check the plugin’s changelog or security notices to understand whether an update contains an important security fix.
2. Bug fixes and compatibility. Developers release updates to resolve errors and support newer WordPress or PHP versions. However, a new release can also introduce conflicts, particularly when your website relies on several interconnected plugins.
3. Performance and functionality. Updates may improve how a plugin runs or introduce useful features. These benefits depend on the specific release, so don’t assume every newer version will make your website faster.
Manual updates give you control over when changes happen. Automatic updates reduce the need for routine intervention. Neither approach eliminates the possibility of errors, so the right choice depends on the importance of each plugin and how your website is maintained.
Plugins you no longer use need attention too. Learn about the risks of inactive WordPress plugins before deciding which ones to keep installed.
Before You Update WordPress Plugins
1. Review the update details. Go to Plugins → Installed Plugins and check the available version, changelog, and compatibility information. Pay particular attention to major releases or plugins that haven’t been updated in a long time.
2. Back up your website. Create a current backup of your database and website files. If the plugin stores orders, form submissions, or other important data, make sure your recovery plan accounts for changes made after the backup. Verify that the backup is accessible and can be restored.
3. Test important updates on staging. If a plugin controls checkout, payments, bookings, forms, or other business-critical features, test the update on a staging website when possible. Check the affected functionality before updating the live site.
4. Know what to check afterward. Identify the features that depend on the plugin. For example, after updating a contact form plugin, submit a test form and confirm the message is received. After updating a WooCommerce extension, test the relevant store functionality.
Don’t update several critical plugins at once unless you’ve already tested them together. Updating them individually makes it easier to identify which change caused a problem.
How to Manually Update WordPress Plugins from the Dashboard
Method 1: Update a Single WordPress Plugin
1. Open your WordPress dashboard. Go to Plugins → Installed Plugins.
2. Find the available update. Look for a notification beneath the plugin showing that a newer version is available.
3. Review the release details. Click the version details link, if available, and check the changelog and compatibility information.
4. Click Update Now. WordPress will download and install the update.

5. Wait for confirmation. Don’t navigate away while the update is running.
6. Test the plugin. Open the website feature that depends on the plugin and confirm that it still works.
If you don’t see an update notification: The plugin may already be current, or its developer may distribute updates outside the WordPress plugin directory. Premium plugins may require an active license or their own update mechanism.
Method 2: Update Multiple Plugins Using Bulk Actions
1. Go to Plugins → Installed Plugins.
2. Select Update Available to view plugins with pending updates, if that filter is displayed.
3. Check the boxes next to the plugins you want to update.
4. From the Bulk Actions dropdown, select Update.
5. Click Apply.

6. Wait for the updates to complete and review any error messages.
For business-critical plugins, update and test them individually when practical. This is especially important for checkout, payment gateways, booking systems, and other features that directly affect customers.
Check Your Website After Updating
- Open the homepage and important pages.
- Check contact forms and other interactive elements.
- Test WooCommerce checkout-related functionality if an updated plugin affects your store.
- Review the WordPress dashboard for update errors or new warnings.
If an update fails or WordPress becomes inaccessible, you’ll need to investigate the error before proceeding. The next method explains how to replace plugin files using SFTP or your hosting File Manager when a dashboard update isn’t suitable.
How to Manually Update a WordPress Plugin via SFTP
Use SFTP when a plugin update fails through the WordPress dashboard, the automatic updater is unavailable, or you need to replace plugin files manually.
Step 1: Download the Correct Plugin Version
1. Find the plugin in the official WordPress Plugin Directory or on its developer’s website.
2. Confirm that you’re downloading the correct plugin and intended version.
3. Review its WordPress and PHP compatibility requirements.
4. Download the installation ZIP file.
5. Extract the ZIP file on your computer.
Don’t download plugin files from unverified third-party websites. Modified packages can contain malicious code or outdated dependencies.
Step 2: Connect to Your Website Using SFTP
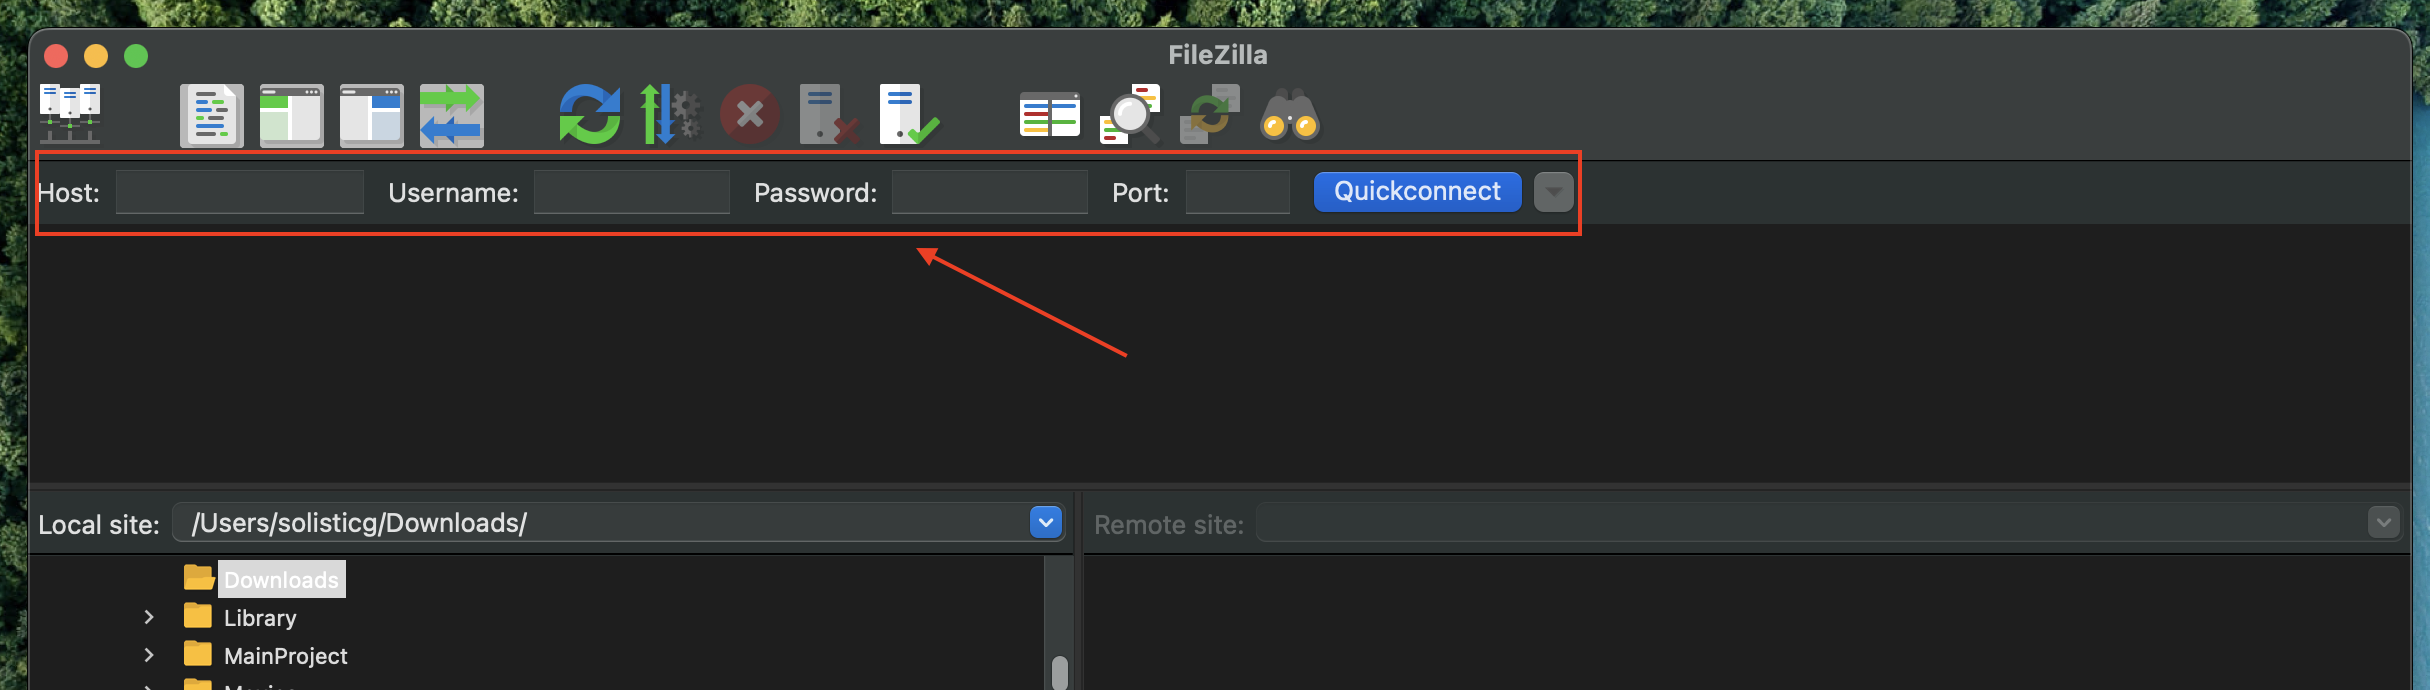
- SFTP hostname.
- Username.
- Authentication password or SSH key.
- Port number.
wp-admin/, wp-content/, and wp-includes/.wp-content/plugins/
Before proceeding, confirm that you’re working on the correct website. Hosting accounts may contain several domains, staging installations, or development environments.
Step 3: Identify and Preserve the Existing Plugin
wp-content/plugins/example-plugin/1. Confirm that you’ve identified the correct plugin directory.
2. Record the currently installed version, if available.
3. Download a copy of the existing plugin folder.
4. Keep that copy outside the live website’s public directory.
5. Confirm that your website backup includes both files and database data.
Don’t delete the original plugin folder before you have a usable recovery copy.
Step 4: Upload the New Plugin Files
1. On your computer, locate the extracted folder containing the updated plugin files.
2. In wp-content/plugins/, upload that folder using a temporary name, such as example-plugin-new.
3. Wait until all files have finished transferring.
4. Check that the transfer completed without failed files or interrupted uploads.
5. Prepare to make the final folder-name changes.
1. Rename the original example-plugin folder to example-plugin-backup.
2. Rename example-plugin-new to example-plugin.
3. Confirm that the new plugin files are now in the original directory.
wp-content/plugins/example-plugin/Important: This is a controlled file-replacement technique, not an atomic update. There may still be a brief period when the original plugin directory is unavailable, and some plugins may be deactivated or fail to load during the change.
Step 5: Verify the Plugin Updates
1. Open your WordPress dashboard, if accessible.
2. Go to Plugins → Installed Plugins.
3. Confirm that WordPress recognizes the updated plugin and its expected version.
4. Check whether the plugin is still active. Reactivate it if necessary and safe.
5. Test the website feature that depends on the plugin.
6. Review PHP error logs if the website shows unexpected errors.
Don’t change file or folder permissions automatically. Only adjust permissions if you’ve confirmed that they are incorrect for your hosting environment.
What If the Plugin Stops Working?
- Record the error message and when it appeared.
- Check the PHP logs for the affected plugin.
- Avoid updating additional plugins while investigating.
- Use your existing backup and recovery plan if restoring the previous version is necessary.
Should You Enable Automatic WordPress Plugin Updates?
Automatic plugin updates can help keep your WordPress website current without requiring you to install every new release manually. However, not every plugin needs the same update strategy.
When Automatic Updates Make Sense
Automatic updates can be useful for plugins with a reliable maintenance history, straightforward functionality, and limited impact on critical website operations.
- Reliable backups and a tested recovery process.
- A way to monitor website errors or downtime.
- Someone responsible for reviewing failed updates and compatibility issues.
When Manual Updates Are a Better Choice
Important: If a release fixes a serious security vulnerability, delaying the update indefinitely can create a greater risk than applying it. Evaluate the urgency of the security fix alongside the compatibility risk.
How to Enable or Disable Automatic Updates
1. Go to Plugins → Installed Plugins.
2. Find the plugin you want to configure.
3. Locate the Automatic Updates column.
4. Click Enable auto-updates or Disable auto-updates, depending on your preference.

5. Review the setting periodically, especially after adding new plugins or changing critical website functionality.
If you’d prefer ongoing monitoring, tested updates, and technical support, Kiwistic’s WordPress maintenance services can help you manage those responsibilities.
Troubleshooting Failed WordPress Plugin Updates
A failed plugin update doesn’t always mean the plugin itself is broken. The problem may come from file permissions, an interrupted download, a compatibility issue, or a server error.
Start with the exact error message and the time the update failed. Don’t repeatedly attempt the same update or change unrelated settings without identifying what went wrong.
1. WordPress Is Stuck in Maintenance Mode
“Briefly unavailable for scheduled maintenance. Check back in a minute.”
1. Confirm that no update is still running.
2. Connect using SFTP or your hosting File Manager.
3. Open the WordPress installation directory containing wp-admin.
4. Enable hidden files if .maintenance isn’t visible.
5. If the update has definitely stopped, remove the leftover .maintenance file.
6. Reload the website and check the plugin’s version and status.
Removing this file only exits maintenance mode. It doesn’t complete an interrupted update or repair damaged plugin files. Verify the installation before trying again.
2. The Update Fails With a File Permission Error
Messages such as “Could not create directory” or “Could not copy file” can indicate a filesystem access problem.
1. Check the exact directory or file named in the error.
2. Confirm that your hosting account has sufficient disk space and hasn’t reached its storage quota.
3. Check file ownership and write access using your hosting panel or ask your hosting provider.
4. Review whether WordPress requires filesystem credentials to perform updates.
Don’t apply 777 permissions or change every directory to 755 and every file to 644 blindly. Correct permissions and ownership depend on the server configuration.
3. A Plugin Update Causes a Critical Error
If your site displays “There has been a critical error on this website” after updating a plugin, first identify which component is failing.
1. Check the administrator email for a WordPress Recovery Mode link.
2. Review PHP error logs for messages recorded immediately after the update.
3. Check whether the error references the updated plugin.
4. Verify the plugin’s PHP, WordPress, and dependency requirements.
5. If the updated plugin is responsible, disable it or restore a compatible version using your recovery plan.
Be careful: disabling payment, security, membership, or other business-critical plugins can interrupt essential functionality.
A fatal error appearing after an update is a useful clue, not proof that the updated plugin alone is responsible. The failure may involve an interaction with another plugin, the active theme, or the PHP environment.
4. The Update Completes, but a Website Feature Stops Working
1. Reproduce the problem and record the affected page or feature.
2. Check the plugin’s changelog for changed settings, requirements, or deprecated functionality.
3. Review relevant PHP logs and browser console errors.
4. Compare the behavior with a staging environment or the previous working version, if available.
5. Check the plugin developer’s documentation for known compatibility issues.
If the issue cannot be resolved through configuration or a compatible update, restoring the previous plugin version may be appropriate.
How to Roll Back a WordPress Plugin Update
Steps to Restore a Previous Plugin Version
1. Identify the problematic update. Check the plugin version, error logs, and when the issue started.
2. Find a trusted previous version. Use your existing backup or an older release from the official plugin developer. Confirm its compatibility before proceeding.
3. Restore the plugin files. Replace the affected plugin using your backup or the SFTP procedure explained earlier.
4. Check for database changes. Some updates modify stored data or database structures. Restoring old files alone may not reverse these changes.
5. Test the website. Verify that the plugin and its dependent features work correctly.
Important: Older plugin versions may contain known security vulnerabilities. If the update included a security fix, investigate a compatible solution promptly rather than leaving the website on an outdated release.